For the past three Halloweens my oldest son, Benjamin, has wanted to and tried very hard to scare Trick-or-Treaters on Halloween night. I didn’t want to start producing a full-on Halloween Haunted House, but I wanted a way for him to have his wish. In searching online about how to make a maze I found instructions on how to build modular maze panels. Paul Nelson is a composer and has information on his website about his music, however, he also has complete instructions on how to build a large modular maze with detailed instructions on how to put it together. My purpose in providing the information below is not to copy Paul’s instructions, but to show how I used his plans to make our own smaller maze that fit our yard and needs, and to also preserve the plans in case he stops hosting the plans in the future. For full instructions please visit Paul’s Modular Maze Panels website (Update November 2023: It looks like Paul’s website is no longer active).
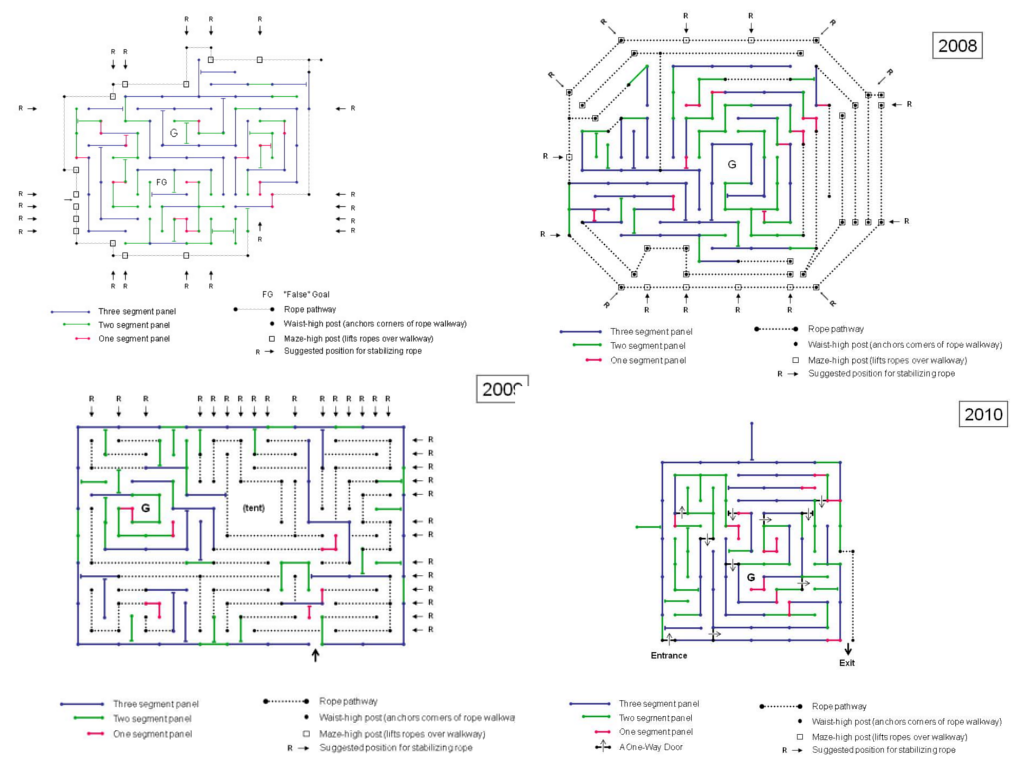
Paul’s full-size maze is 32.75 feet squared (14 panel segments by 14 panel segments), or larger. The area of my front yard where we planned to set our maze up was not that large, plus the cost of building the full maze would be over $1,500. My budget was $400, so I needed to come up with a design that would fit my budget and my yard. I settled on an 8 panel segment by 8 panel segment maze. That would be 18.75 feet squared and would fit in my yard nicely. Paul’s maze designs require 43 3-segment panels, 38 2-segment panels, and 14 1-segment panels. That’s 95 panels with 219 total segments. My smaller design required me to make 10 3-segment panels, 17 2-segment panels, and 13 1-segment panels. That’s 40 panels with 77 total segments.
What is a Segment?
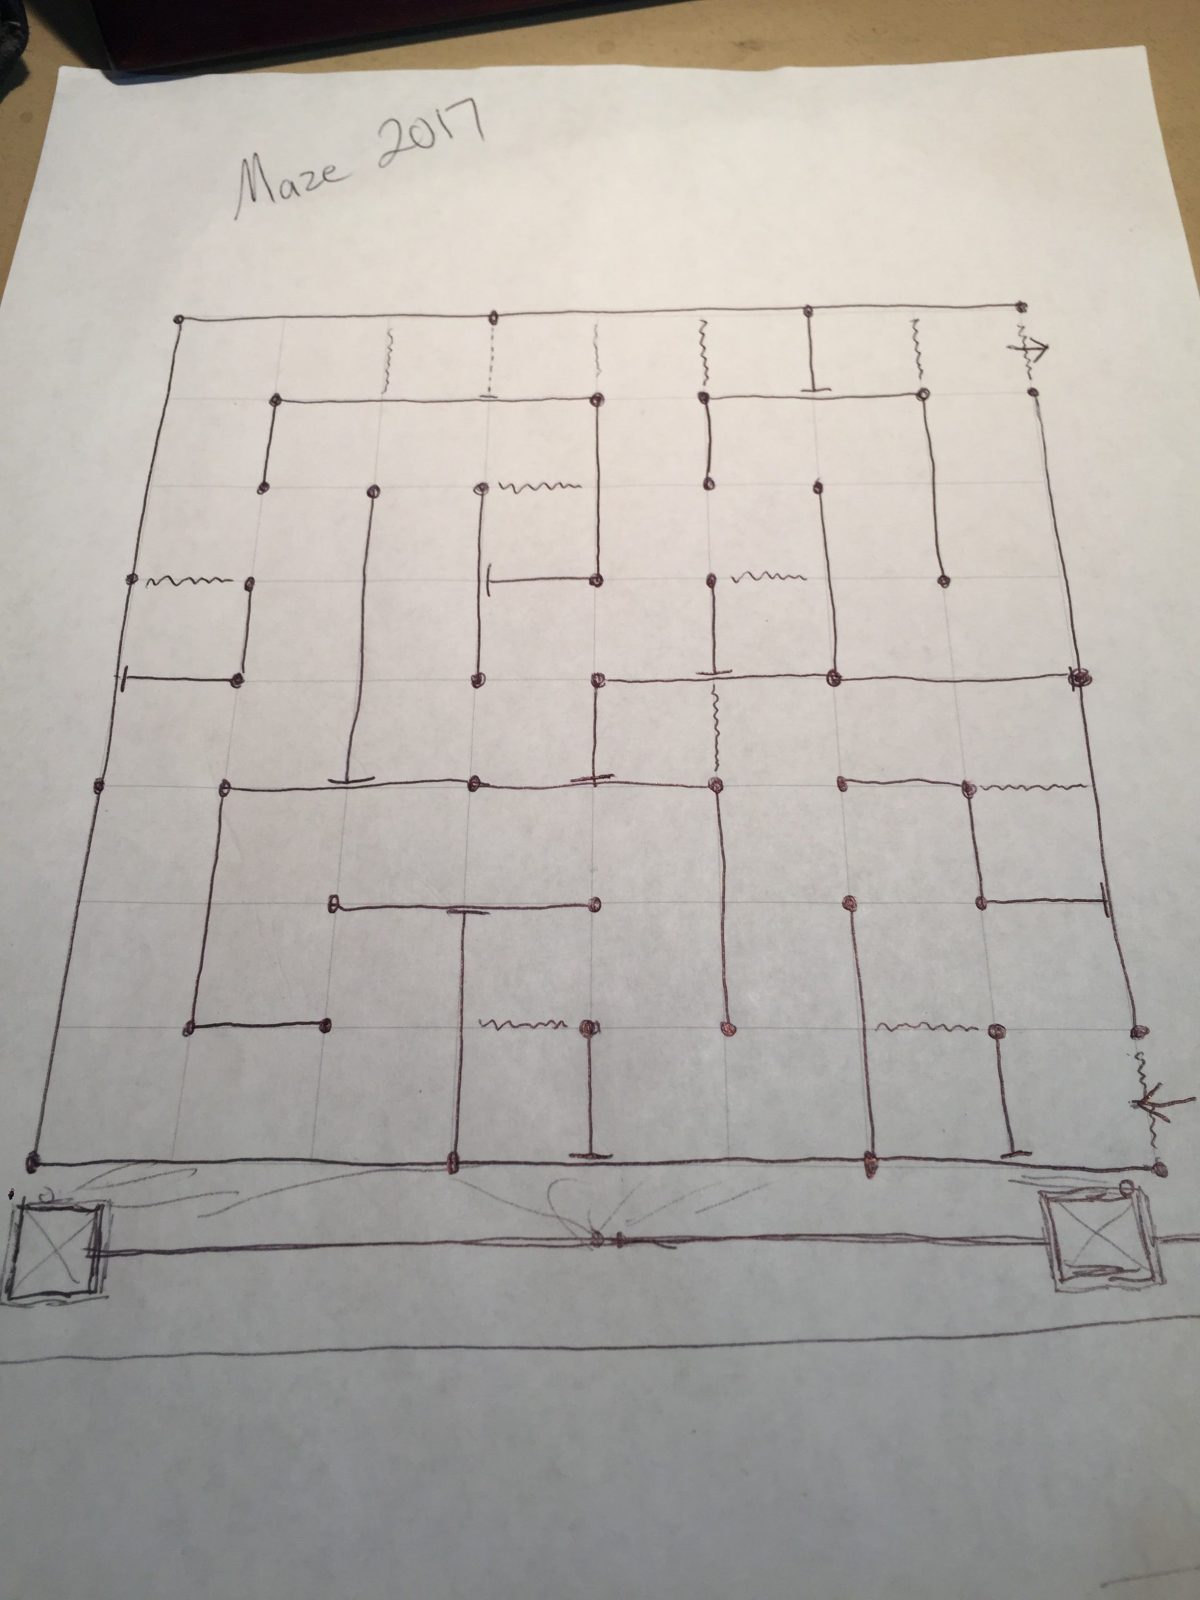
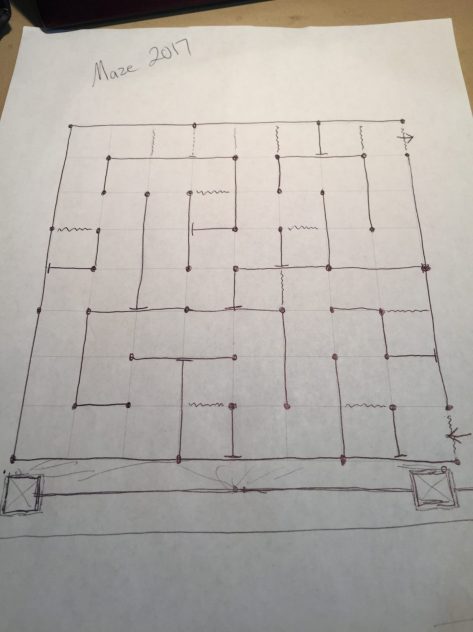
If you look at your maze from above it is made up of many squares. Each side of the square where a wall or panel is in place is a segment. As you can see below, this is my concept design for the final design that we used. In this picture you can see how I divided the maze into 3-panel, 2-panel, and 1-panel segments. Although the final maze has some differences from this drawing, this is what we based our panel building off of.

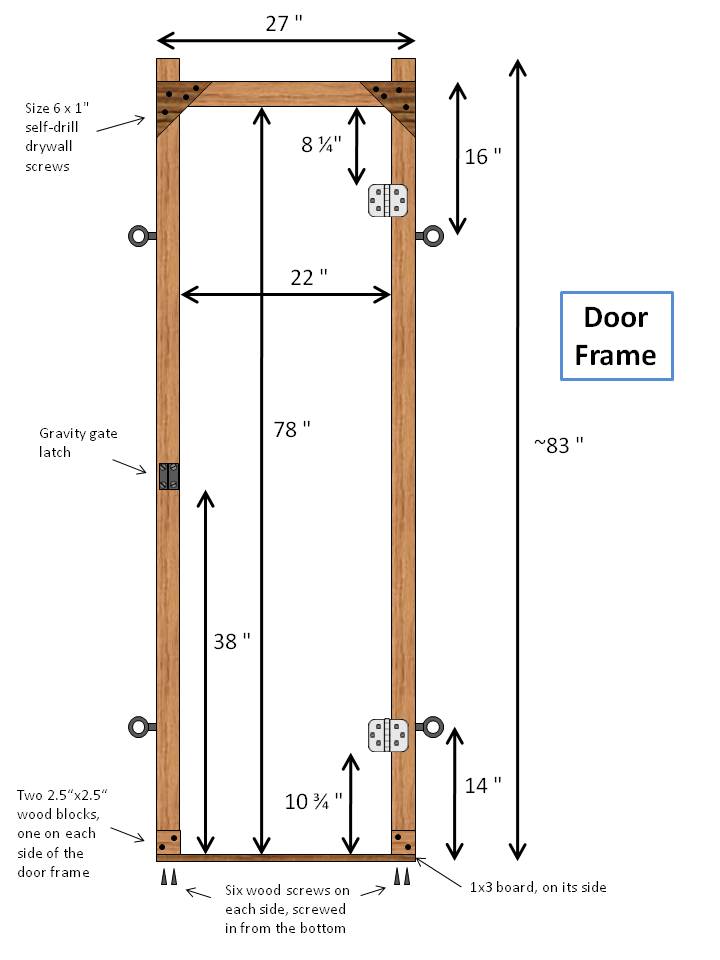
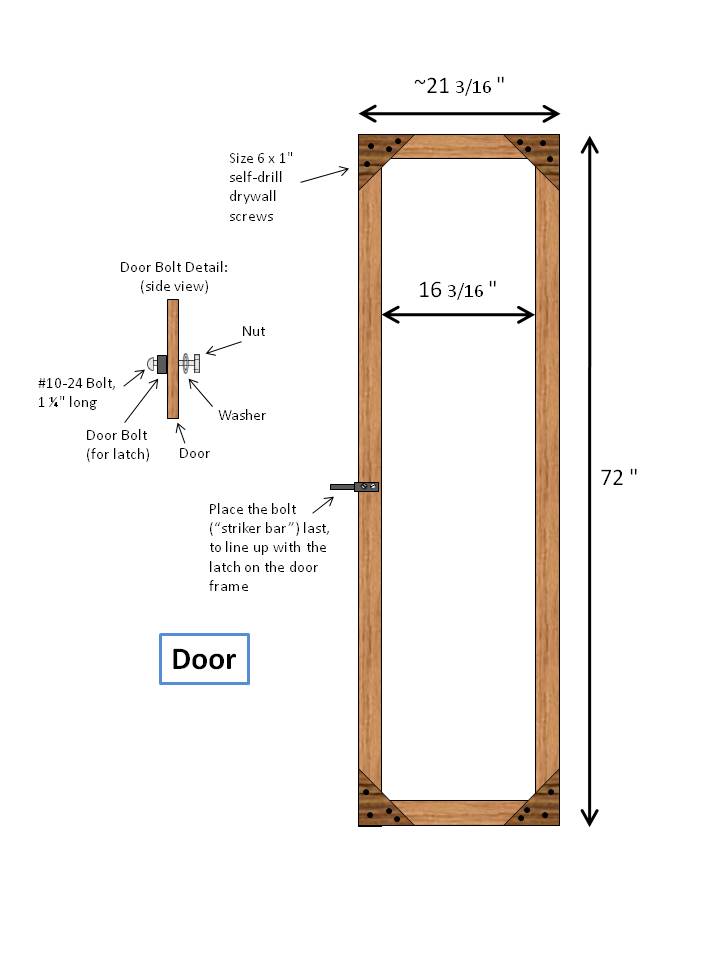
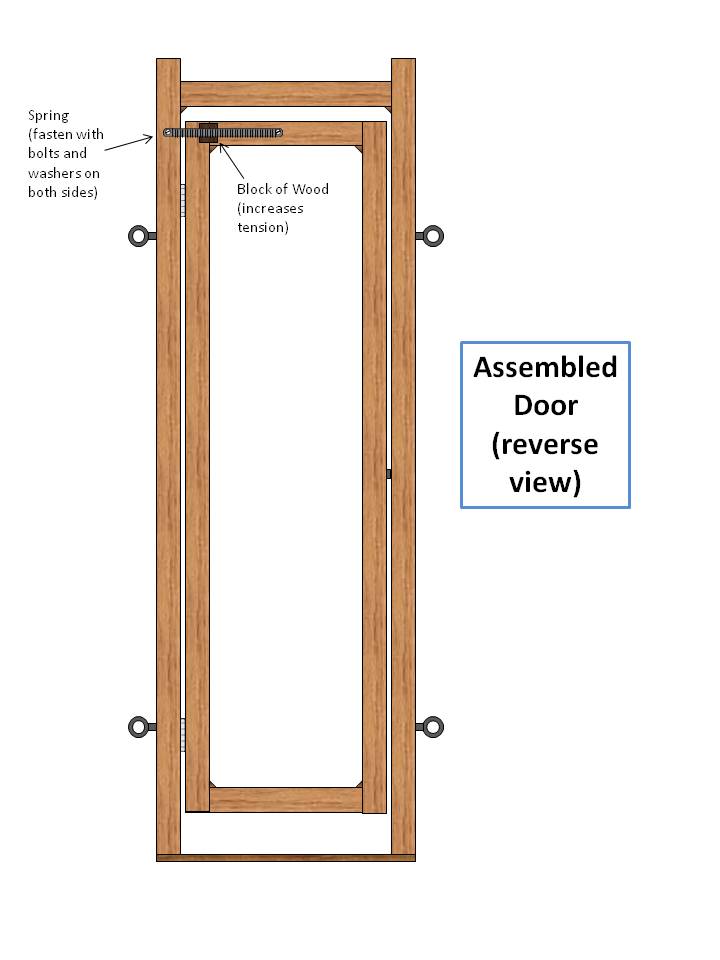
Paul’s instructions include the dimensions for these segmented panels.
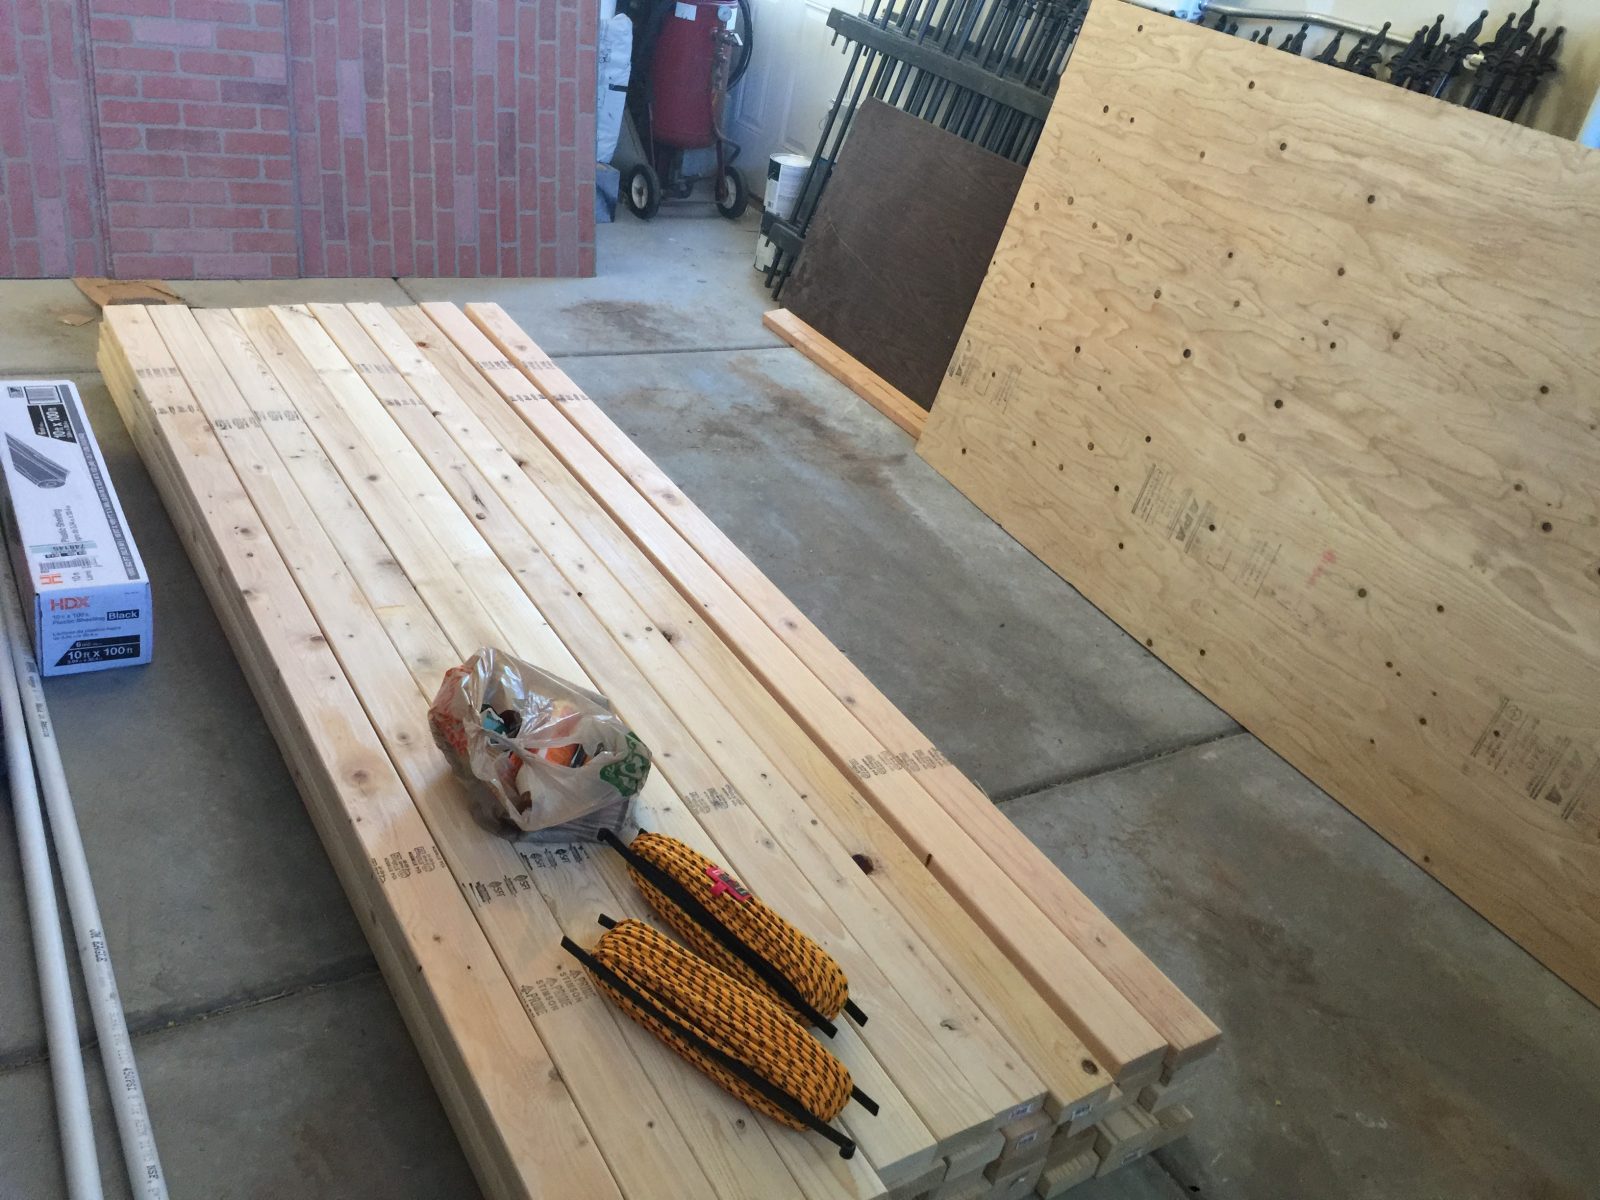
I started by calculating how much I needed of the following materials: 2x4s, 3/8″ plywood sheets, 6-mil black plastic rolls, screws, eye screws, wood glue, staple gun staples, rope, and tent stakes. For my maze I needed at least 47x 104.625x2x4s, 1 sheet of 3/8″ plywood, 3x 10’x100′ rools of 6-mil black plastic, 3 lbs of drywall screws, 250x #8 eye screws, 1x 18oz Gorilla Wood Glue, at least 4,500 staple gun staples, at least 150′ clothesline or rope, 10 to 20 tent stakes. I spent about $500 for all of the supplies. Paul has an itemized list of the supplies to build his full-size mazes on his website.
The first step in starting to build your modular maze panels is to rip the 2x4s lengthwise into four equal strips using a sharp blade on a table saw. Paul says to cut them to 0.875″. That is about 25/32″ on a tape measurer or on your table saw. It took my wife and I about 5 hours to rip all 50 of the 2x4s that we had. Our table saw kept tripping our breaker, so we had to keep resetting it. I also had bought a brand new 60-tooth blade, which I think it would have cut faster with a 40-tooth blade. When we were done we had about 200 struts.
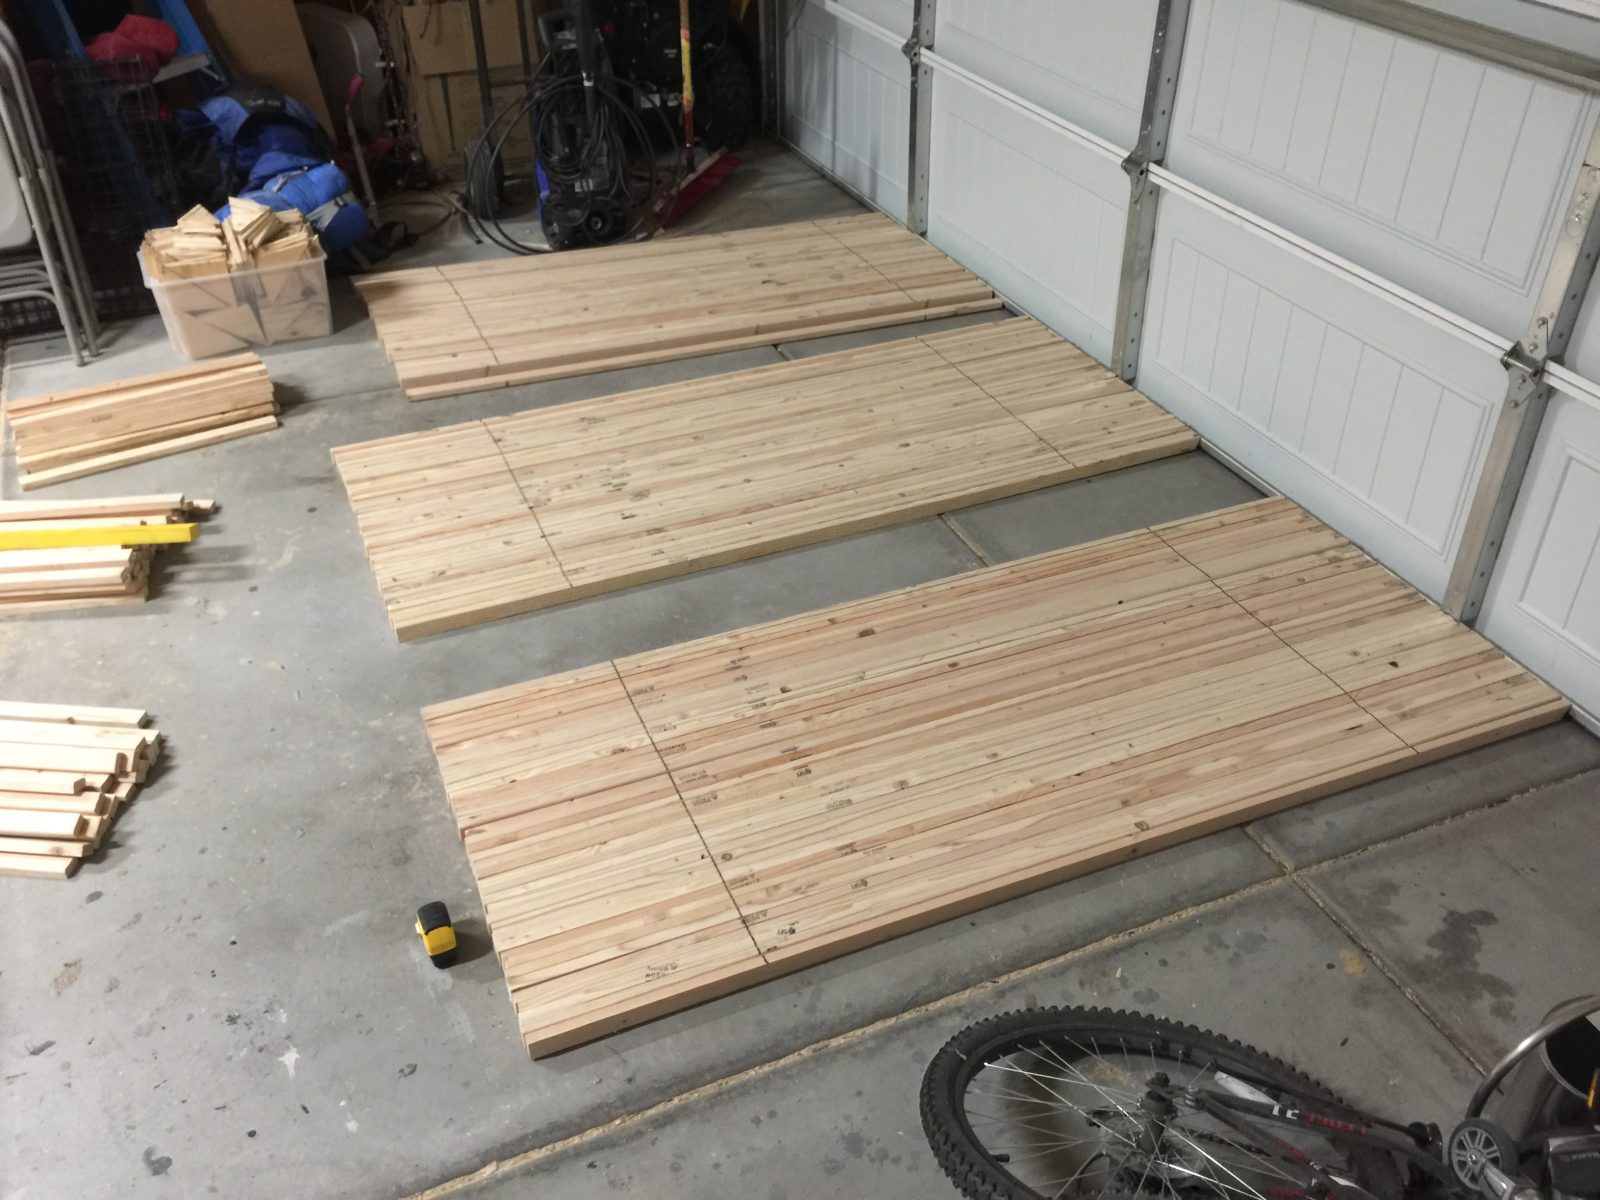
Next, we cut these wood struts into the correct dimensions for the different parts of the panels. We needed 80 cut to 81″ with a 15 degree angle on the bottom for the feet to “grip” the ground/grass. For the horizontal struts we needed 26 pieces cut to 24″ long for the single segment panels, 34 pieces cut to 52″ long for the two segment panels, and 20 pieces cut to 80″ long for the three segment panels. The inside vertical pieces are all 72″ long and we needed 37 of them cut. We also cut the 3/8″ plywood into over 234 5.5″x5.5″ triangle gussets. Again, Paul has instructions for the full-size modular maze panels on his website.
The next step is to measure and mark lines where the eye screws will be inserted. On the outer 81″ long struts measure and mark at 15″ and 66″ from the bottom and mark a perpendicular line across all of the struts. I used my garage door as a stop at the end to keep all of the pieces of wood together and straight. I used a 4 foot level to draw the lines. My two boys helped me A LOT to get these measured and marked. The vertical center pieces for the 2-segment and 3-segment panels need to be marked at 10.5″ from each end. Make sure that on the 81″ struts that you mark the outside (long end) of the wood, not the shorter angled side.

Next I drilled pilot holes for the eye screws. I moved pretty quickly through the struts trying my best to hit the center of the strut. They weren’t perfect, but they all worked just fine. I enlisted the help of my two youngest kids to help me screw the eye screws into the wood.
Next place the outer struts (81″ long ones) on their faces with the angled feet facing inward two at a time. You will want the angled end facing inward, so place a bunch of them together and mark at 3″ and 78″ to mark where the horizontal struts will attach. I used my garage door as the stop at the end. Mark a line on the wide face across all of the pairs of struts.
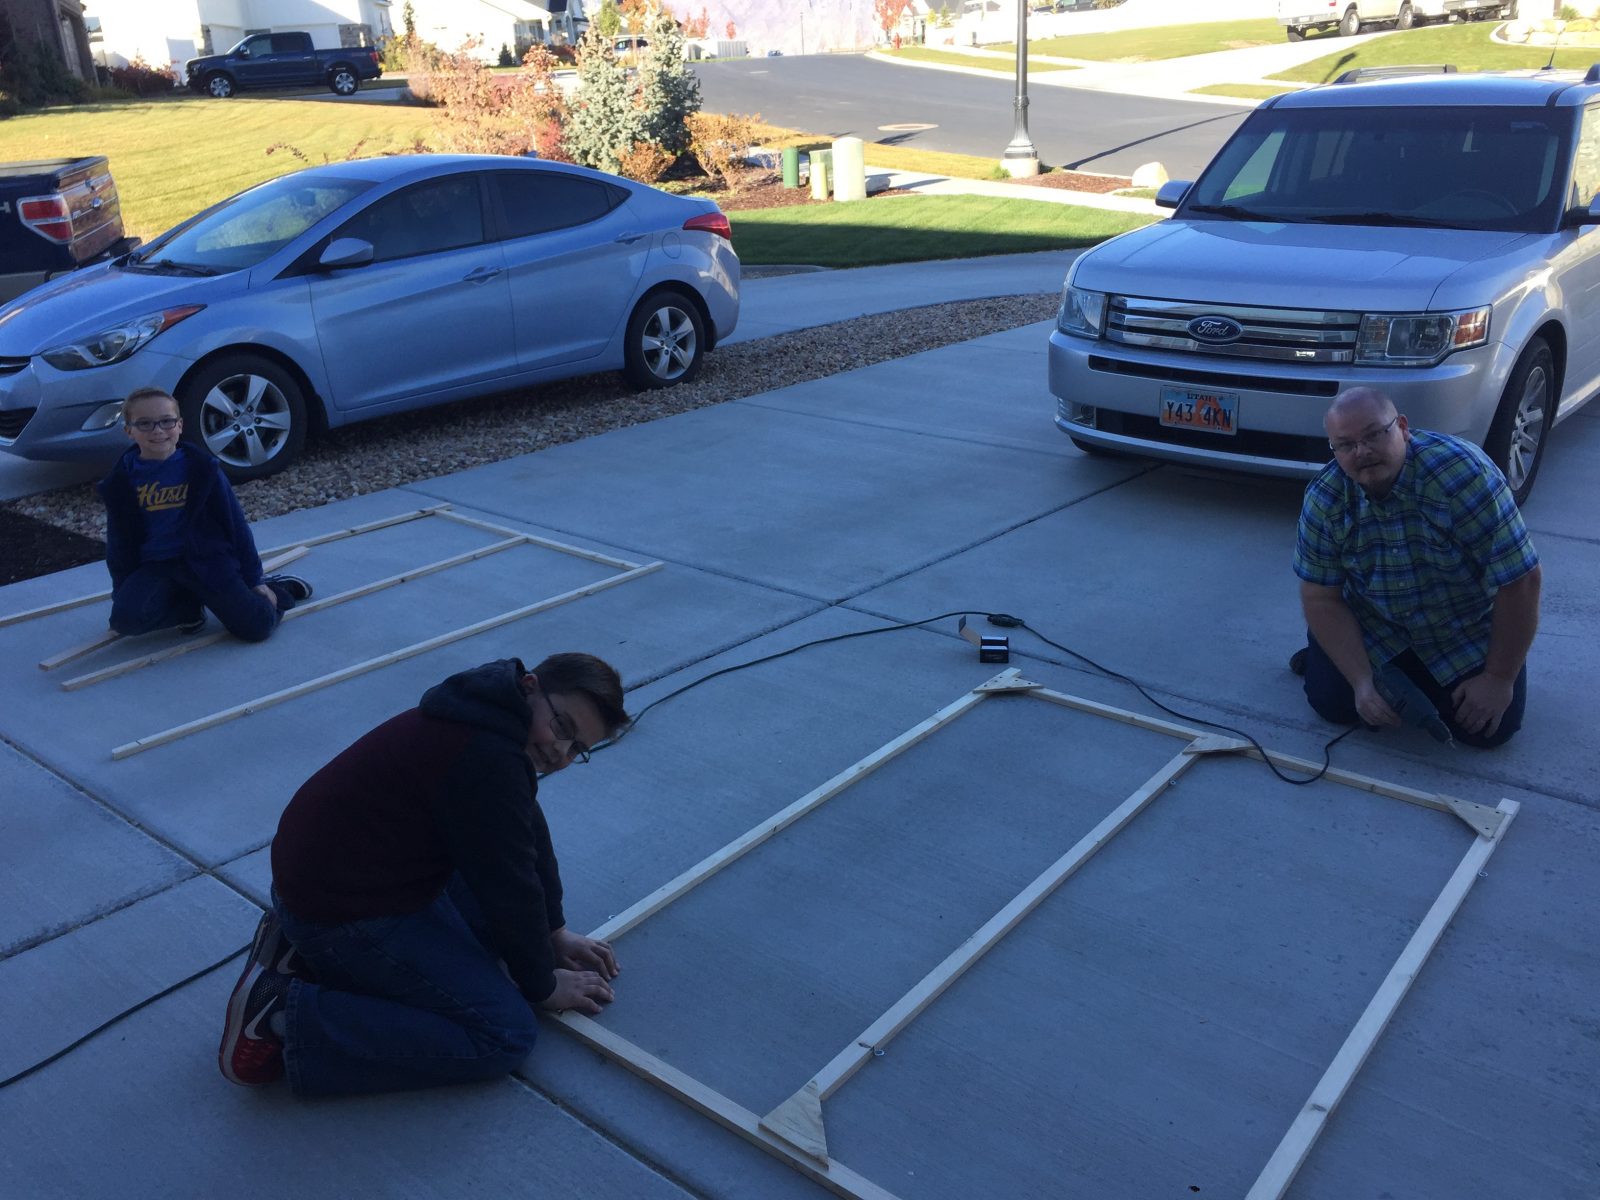
Now you are ready to assemble your panels. I laid out one of each size panel to get an idea of the sizes and what was needed. It also gave my kids a visual look at what the panels would look like when assembled.
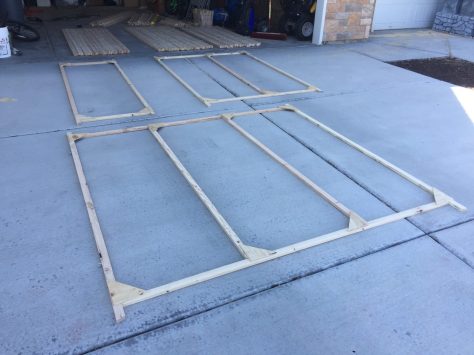
We worked as a team to assemble the panels. We first did all of the single segment panels, then the two segment panels, then the three segment panels. My younger son arranged the wood struts, my daughter applied glue to the triangle gussets, and my oldest son placed the gussets on the joints, while I followed with a t-square to make sure the joints were square and then put the drywall screws in.
It took about 5 hours to assemble all of the panels.
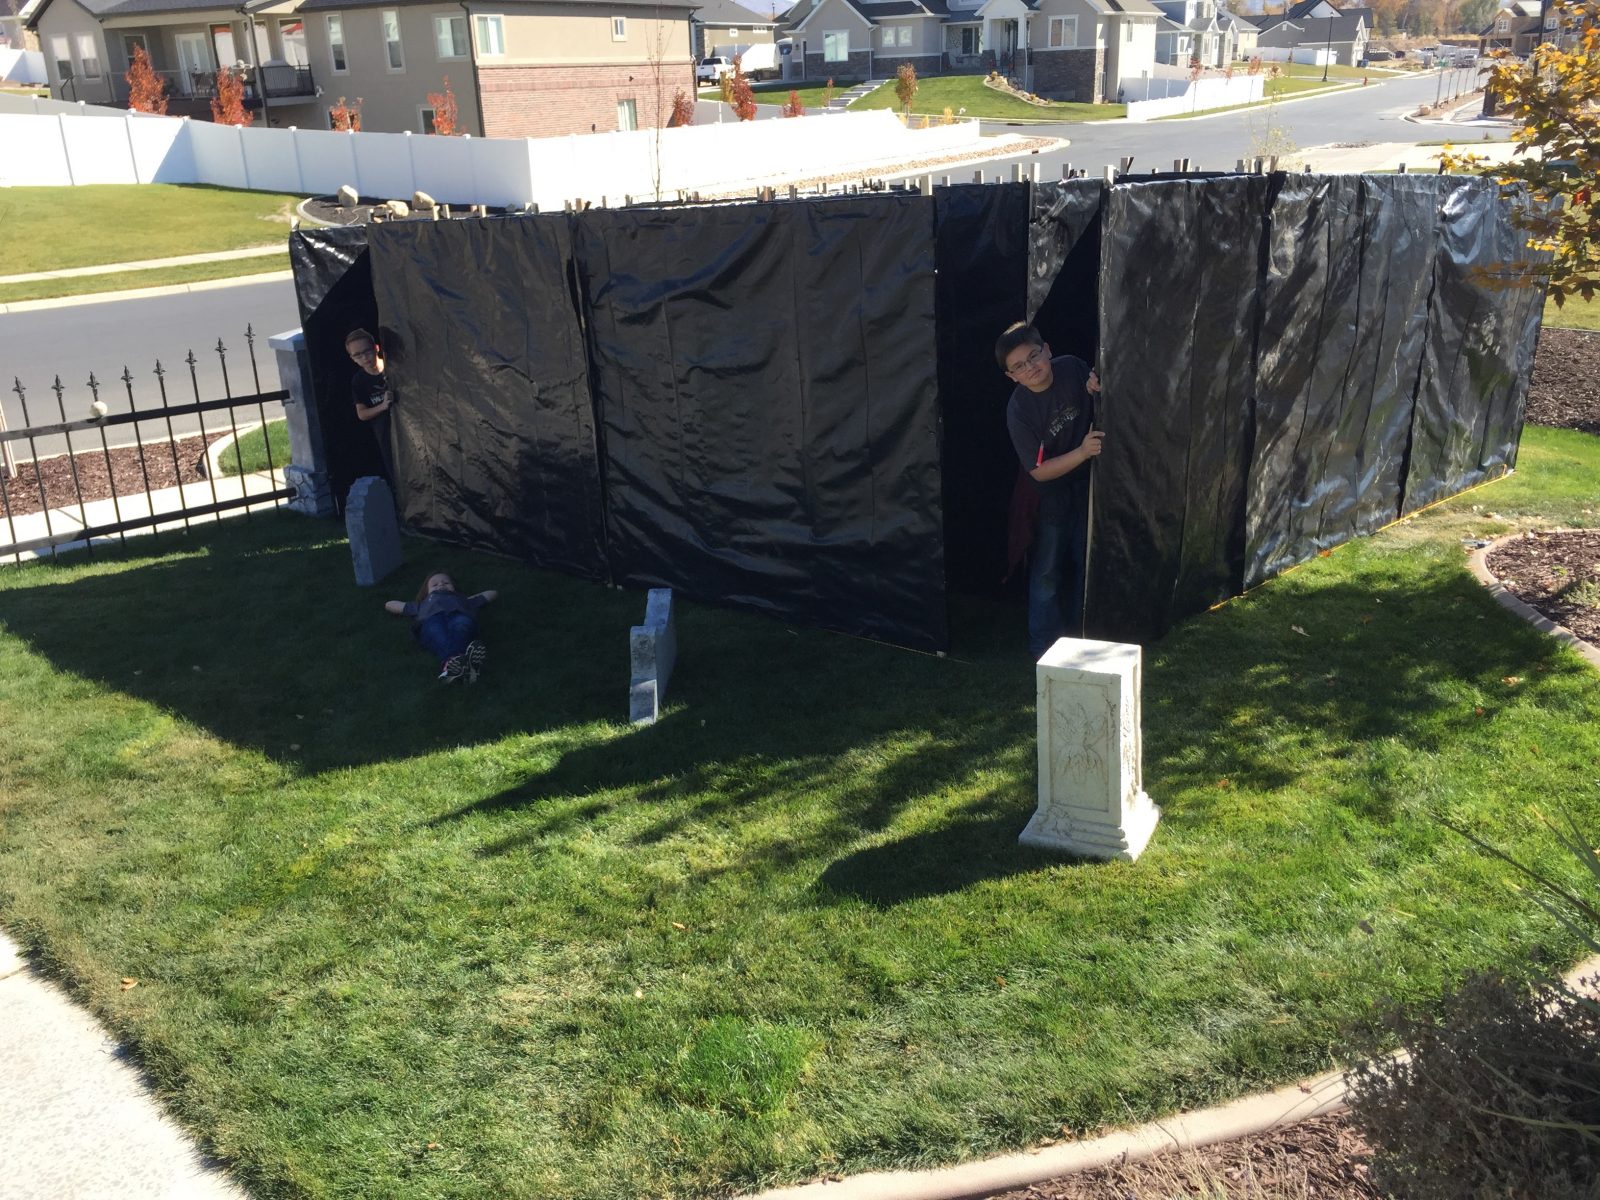
The last step in building your modular maze panels is to wrap the frames that you made with some kind of a covering. You can use plastic, burlap, fabric, canvas, wood, etc. Paul recommended 6-mil black plastic and I can understand why. I priced out using burlap and it was still way more expensive than using the plastic. Be sure to use 6-mil plastic or thicker or you may have lots of wear, even from your first use with visitors going through your maze. Paul says to buy the 20 foot wide by 100 foot long rolls of the plastic. I opted to spend a little bit more and use the 10 foot wide by 100 feet long rolls. The reason was that it was easier for me and my kids to manage the 10 foot roll.
Unroll about 160 inches at a time and cut with a straight edge at about 152.5 inches. You will end up with about 8 sections of plastic from each roll. Unwrap the sections of plastic to make it be 10 feet by 152.5″. We started with the 3-segment panels. Line up eye screws at the end of the straight side of 152.5″ side of the plastic with the bottom of your panel sticking out about 10 inches. Fold the long end over the top and align the plastic with the bottom rail of your frame. Staple along that edge of the side so that the plastic overlaps the eye screws slightly. This will hide the eye screws when the maze is assembled. We stapled about every 6 inches using the staple gun itself as our measurement. After stapling that first side, staple the bottom rail of the frame making sure to pull it tight and keeping it straight. Then pull the top tight and staple across the top, then the other side of the frame. Cut some slits in the top of the plastic and lift the panel and fold the plastic down on the other side. Staple the straight side, then the bottom, then the top, then the remaining side. Cut the excess plastic off with sharp scissors making sure to leave a small amount of plastic overlapping the eye screws. The remaining plastic is enough to do a single segment panel. There will only be 6-7 inches of wasted plastic per section of plastic that you cut.
With the two segment panels we laid two panels on the plastic and did both at the same time, cutting the plastic down the middle once we had three sides of the frame stapled on both of the panels. Then finished them separately. It took us about 10 hours to staple the plastic to all of the frames.
In all it took us about 20 hours to build our modular maze panels.
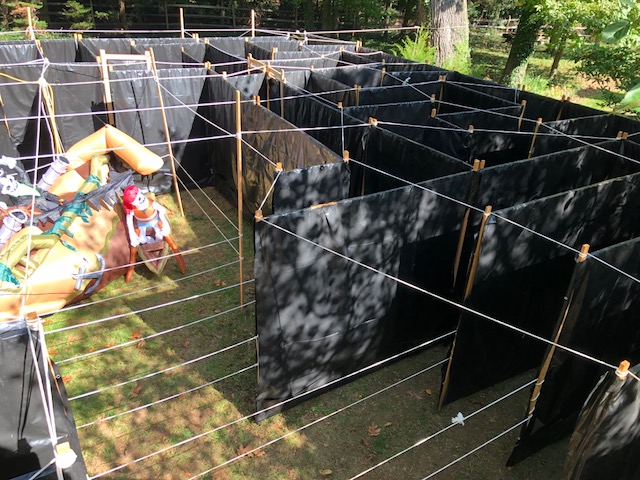
It took us about 3 hours to set our maze up for the first time. It was just me with my three kids, so with more adults your first time could be faster. The Maze was a huge success on both our Open House Party and on Halloween Night. We had so many Trick-or-Treaters come and were so busy that I didn’t take any pictures or video the entire night. Good luck with building your Modular Maze.
Paul’s Maze Plans in PDF format:
Plans | Construction | Assembly | One-way Doors
Paul’s 2017 Design: