


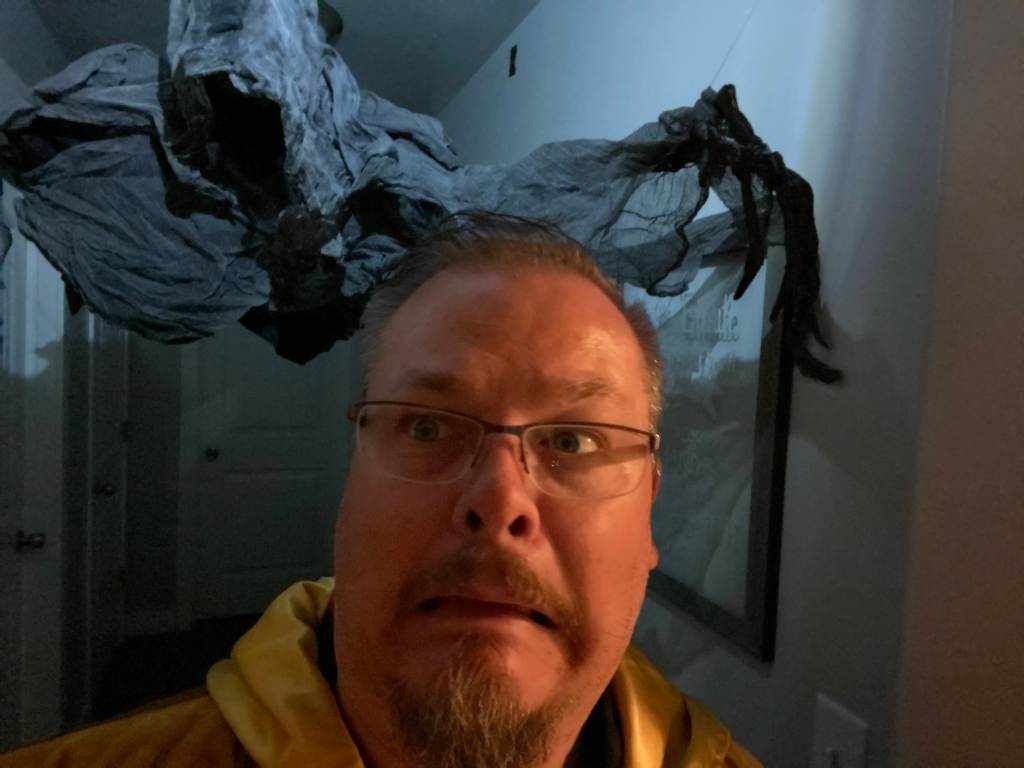


Halloween 2019 marked the end of the tradition of my kids scaring trick-or-treaters and hosting the haunted maze. My kids are all teenagers now and they just wanted to have their friends over for a Halloween party. So, I sold the maze, the graveyard fence, and all of our largest animatronic and static props. Anything that wouldn’t fit through the attic storage access door had to go. There was a lot that I did not complete this year that would have made this Halloween “epic.”
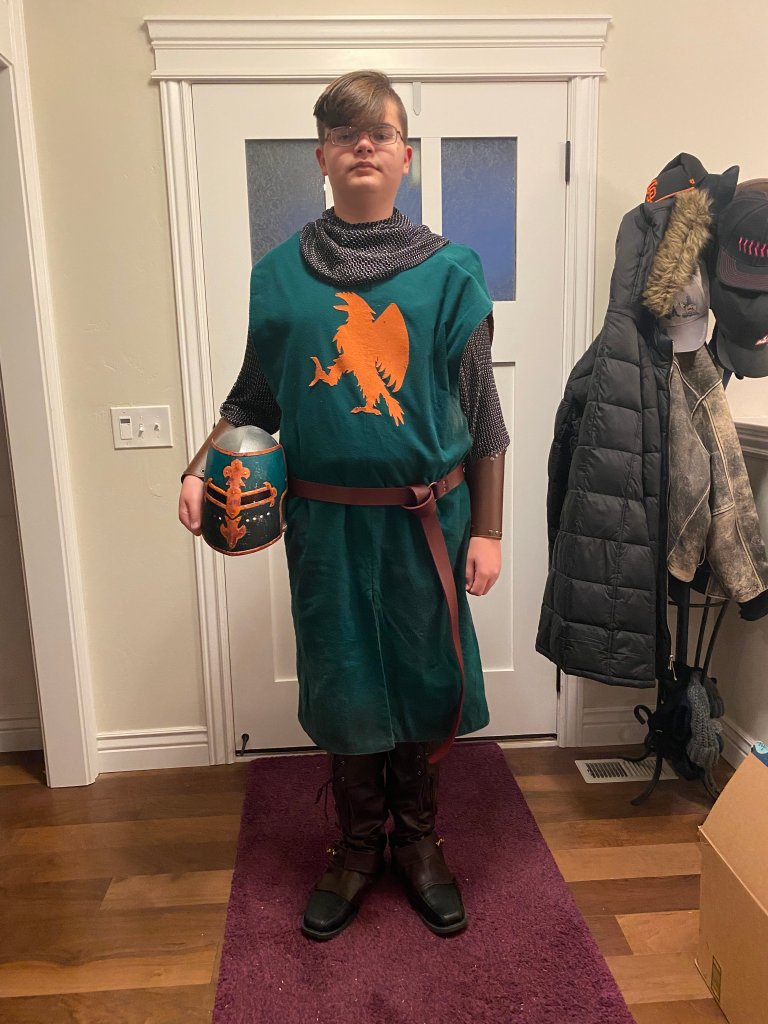
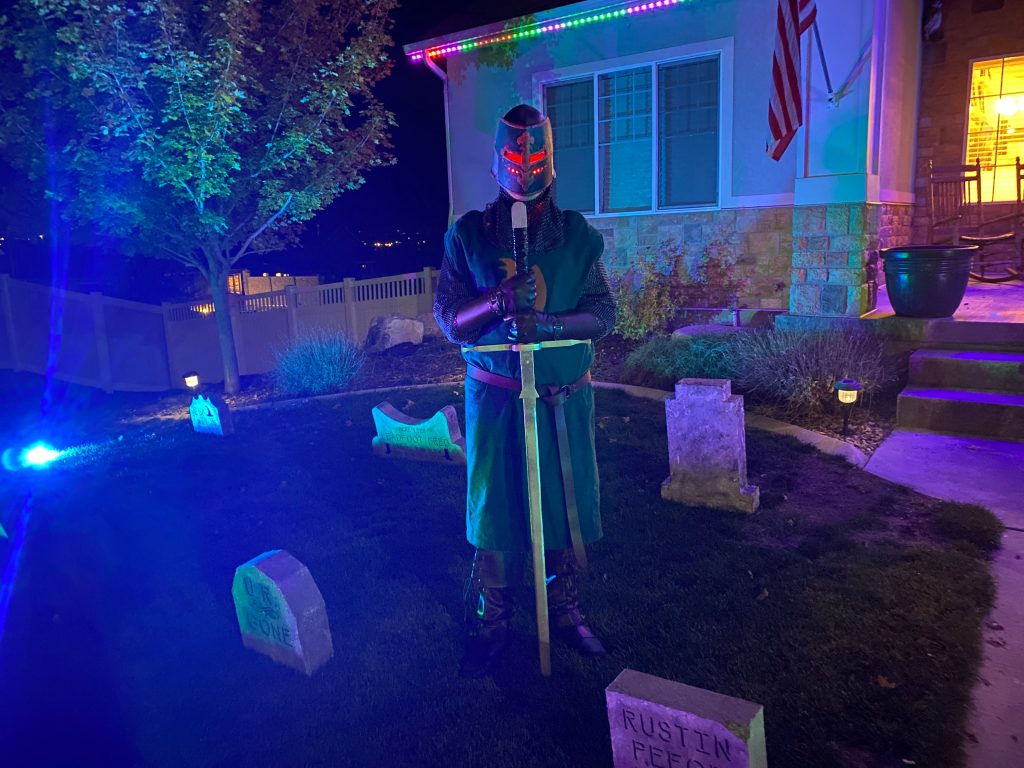
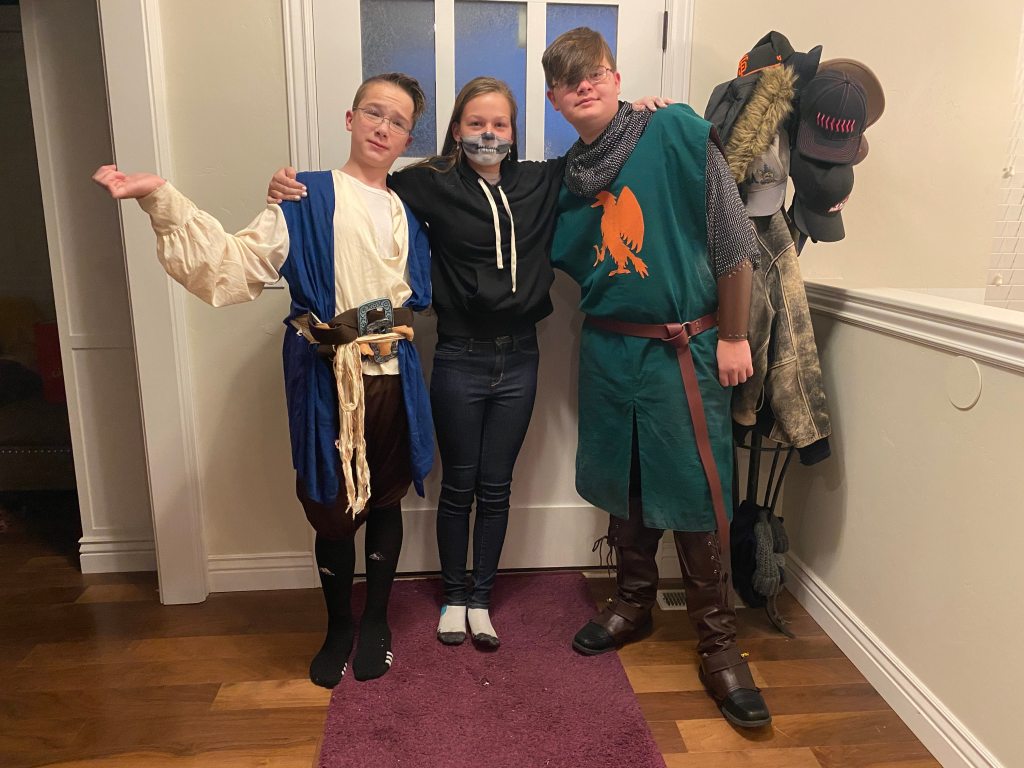
Not everything was incomplete this year. Benjamin spent a lot of time, with some help from mom and dad, making his own costume this year. He wanted a 13th century inspired wraith-knight costume. I found a knight helmet in the classified ads that worked out well as a base for him to work with. Ben and I added red, pulsating LEDs inside and he painted it and really did an amazing job on it. Heidi helped him by sewing the tabard and putting the crest that he created on it. I helped him make the tabard look worn by sanding away layers of fabric and using spray paint to make it look dirty, sweaty, and worn. He made his own long sword out of wood and it turned out amazing as well.


Annie did her own face paint this year for school and for Halloween night and she did an excellent job. Tyler dressed up in the pirate costume that I wore when he was 1 year old. They’re all growing up so fast. Heidi dressed up as a Beanie Baby with the other 3rd grade teachers at her school. She was a giraffe, but I won’t share a picture here to embarrass her.


The kids had their friends over for a Halloween party. They had Beetlejuice playing in the theater room, they played Jackbox Games Party Pack 8, and pigged out on pizza, soda, candy, and other junk food.


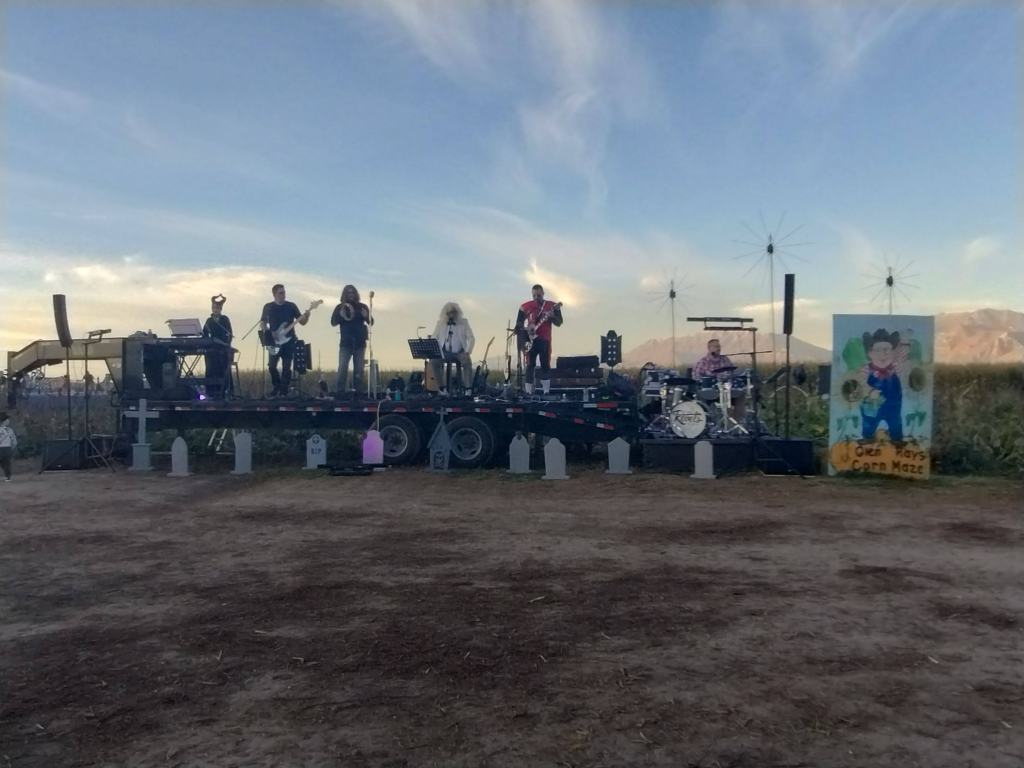
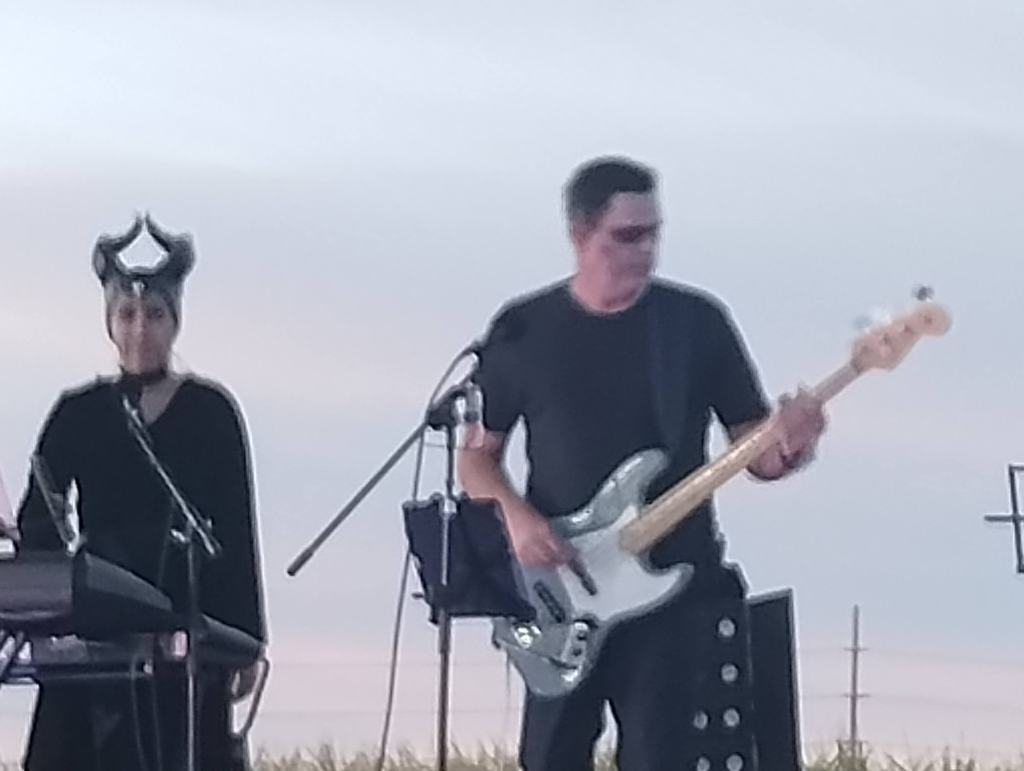
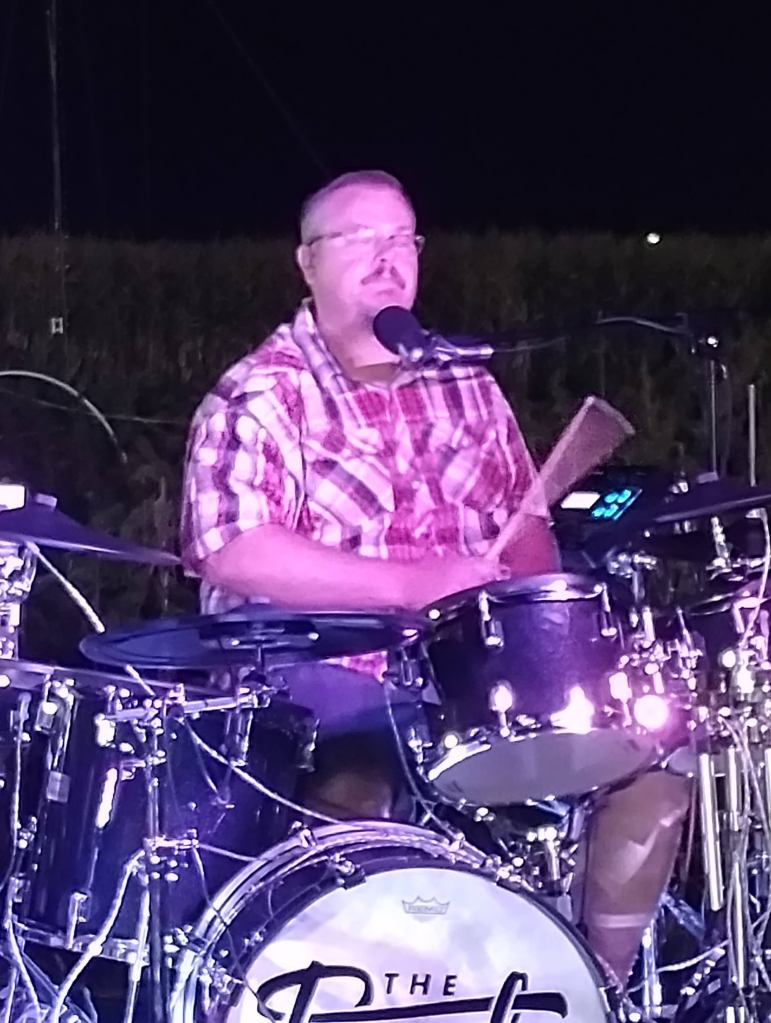
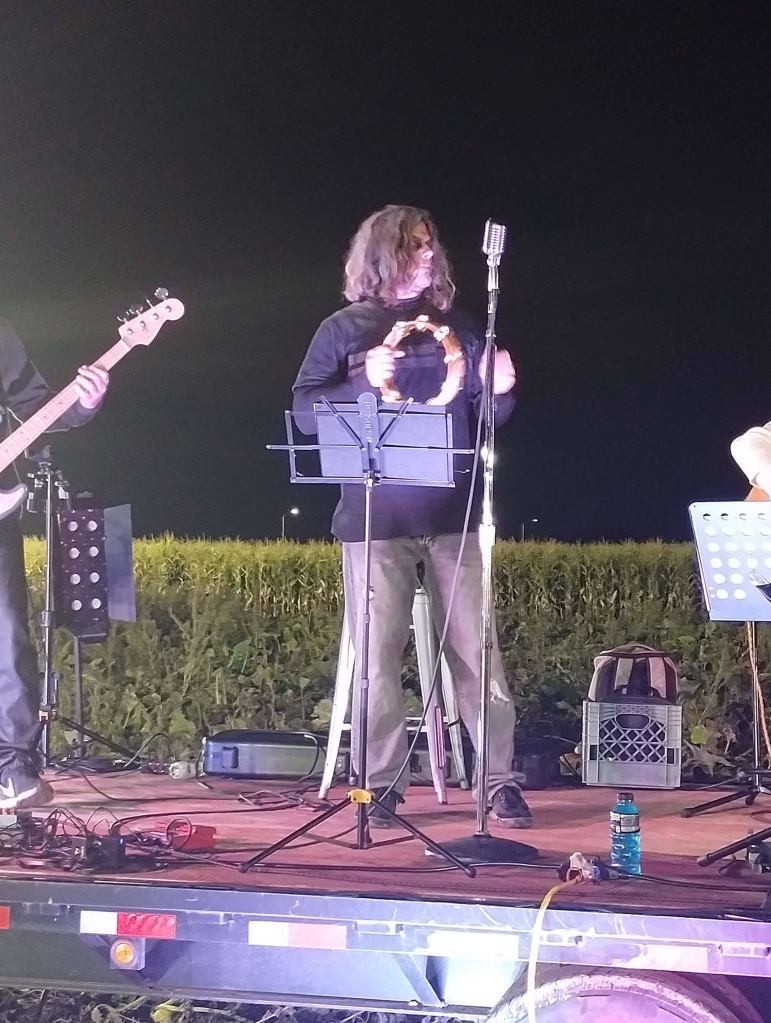
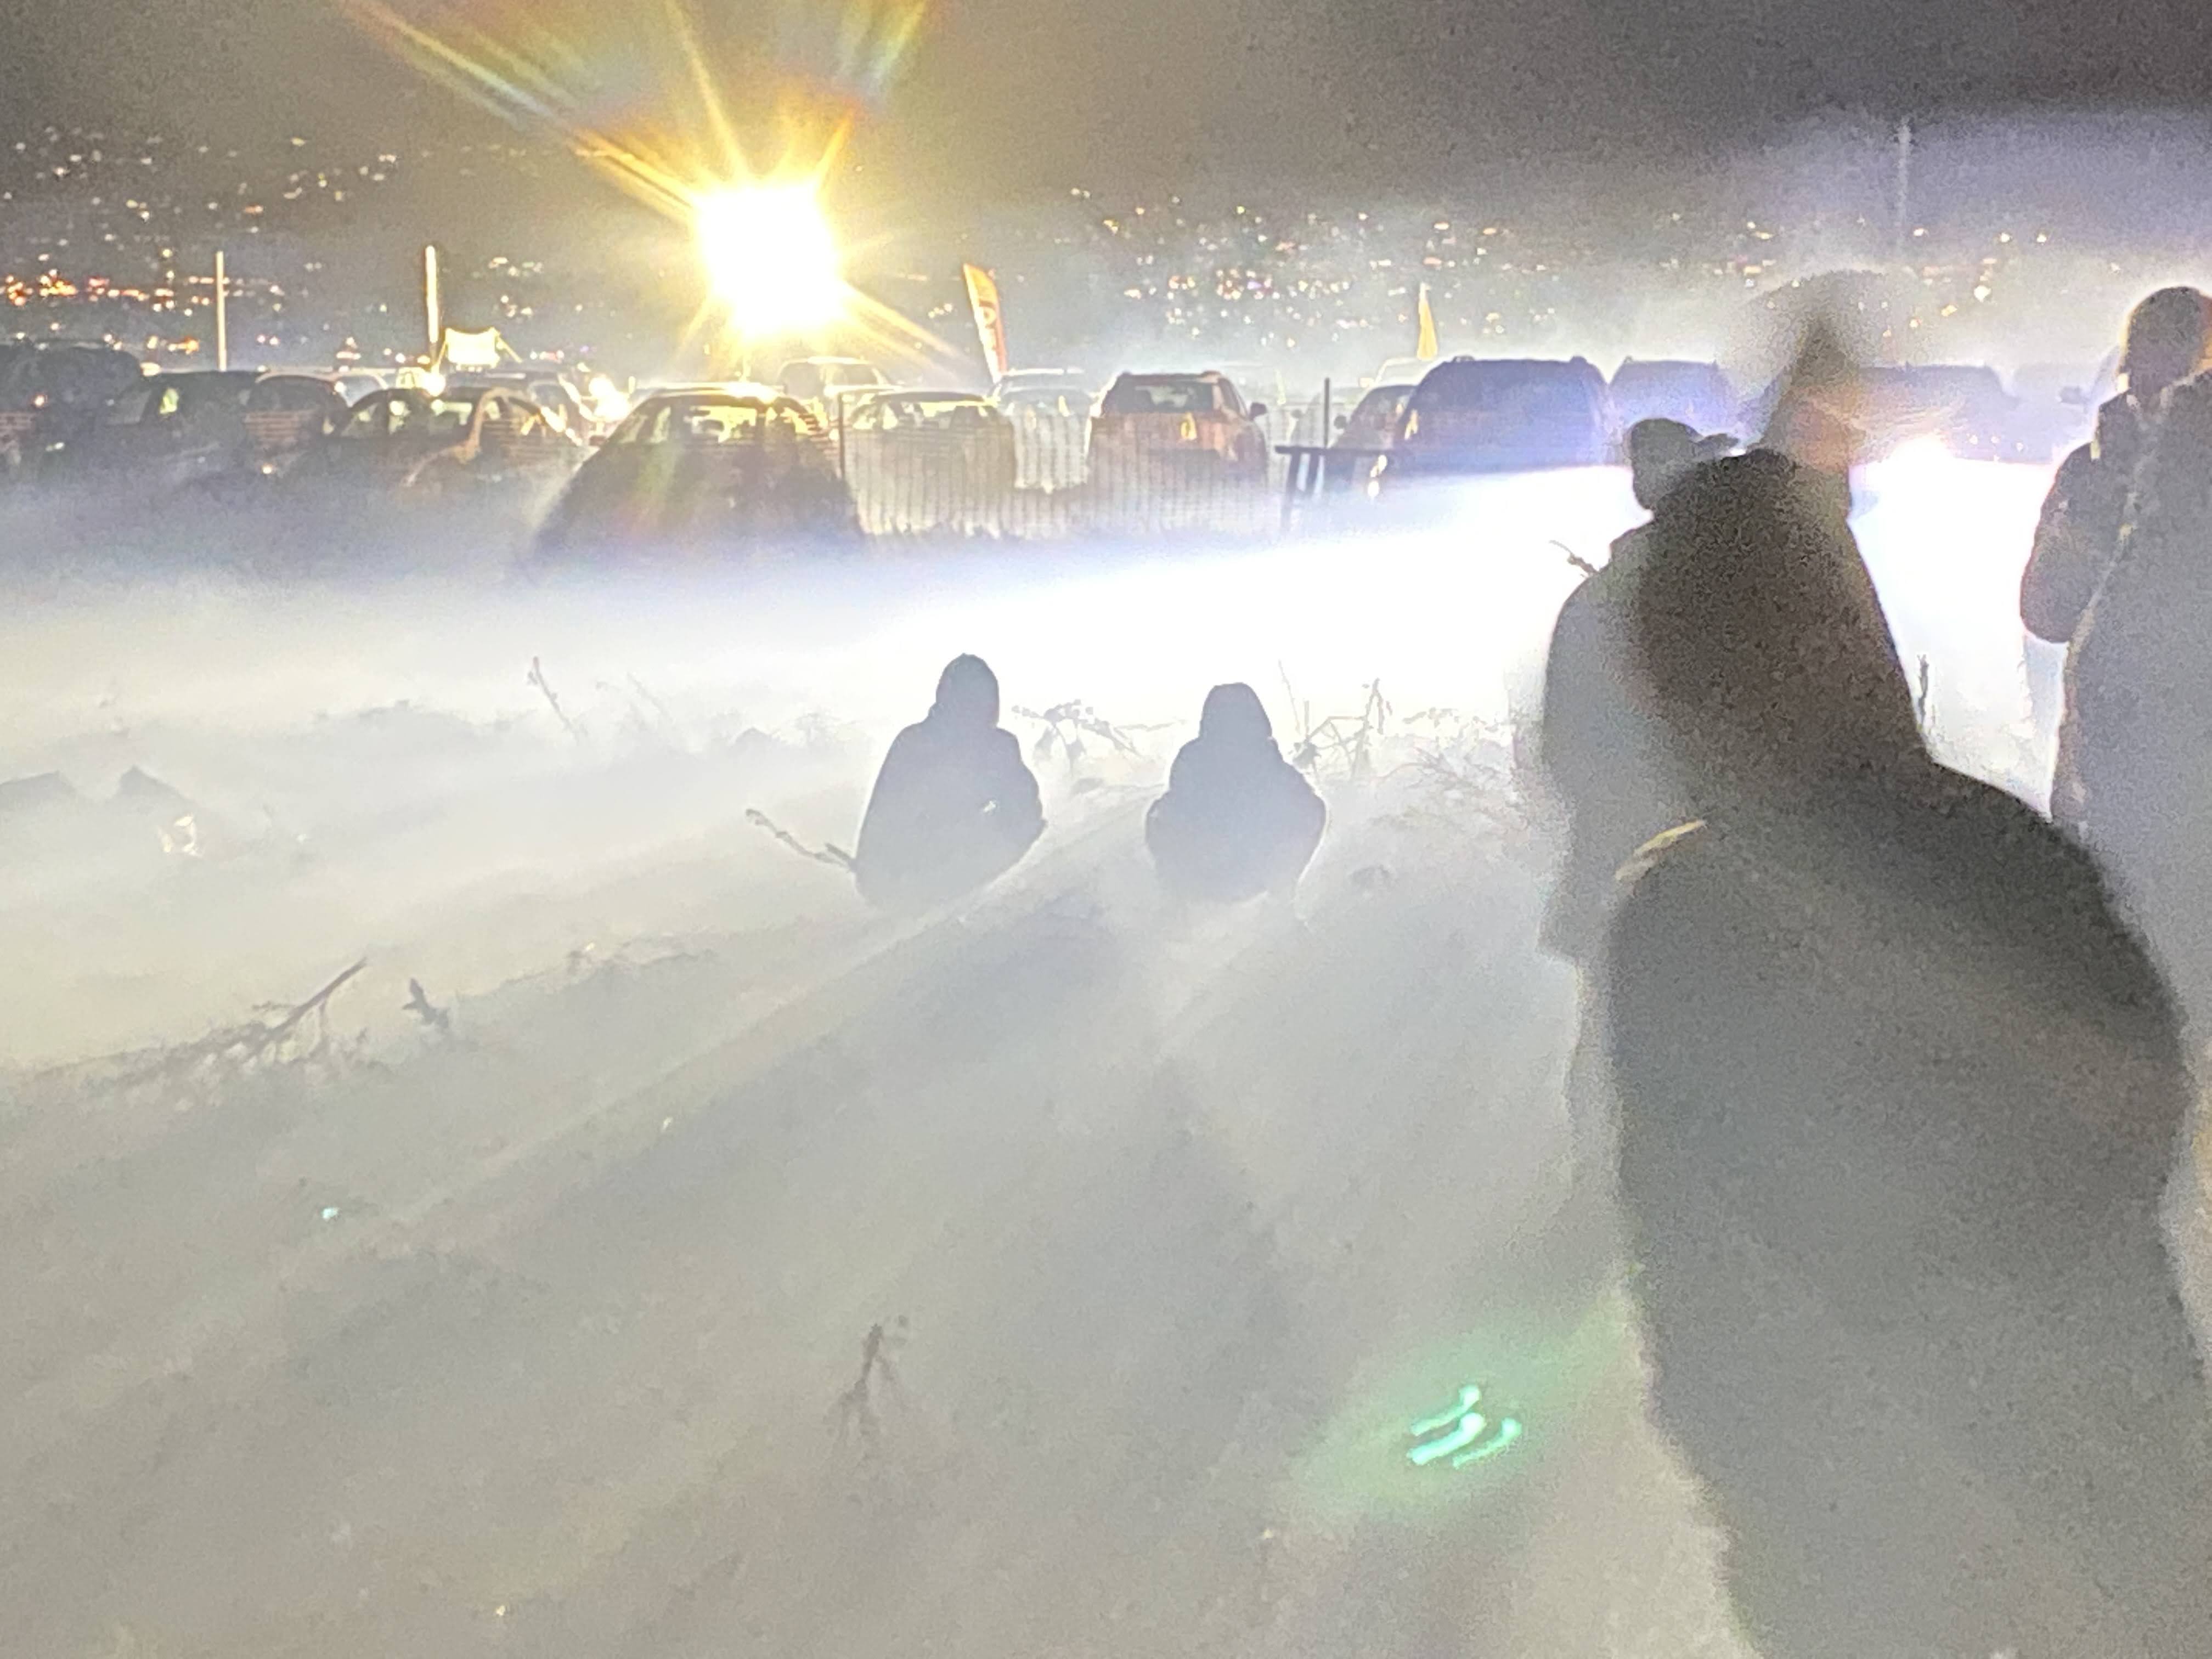
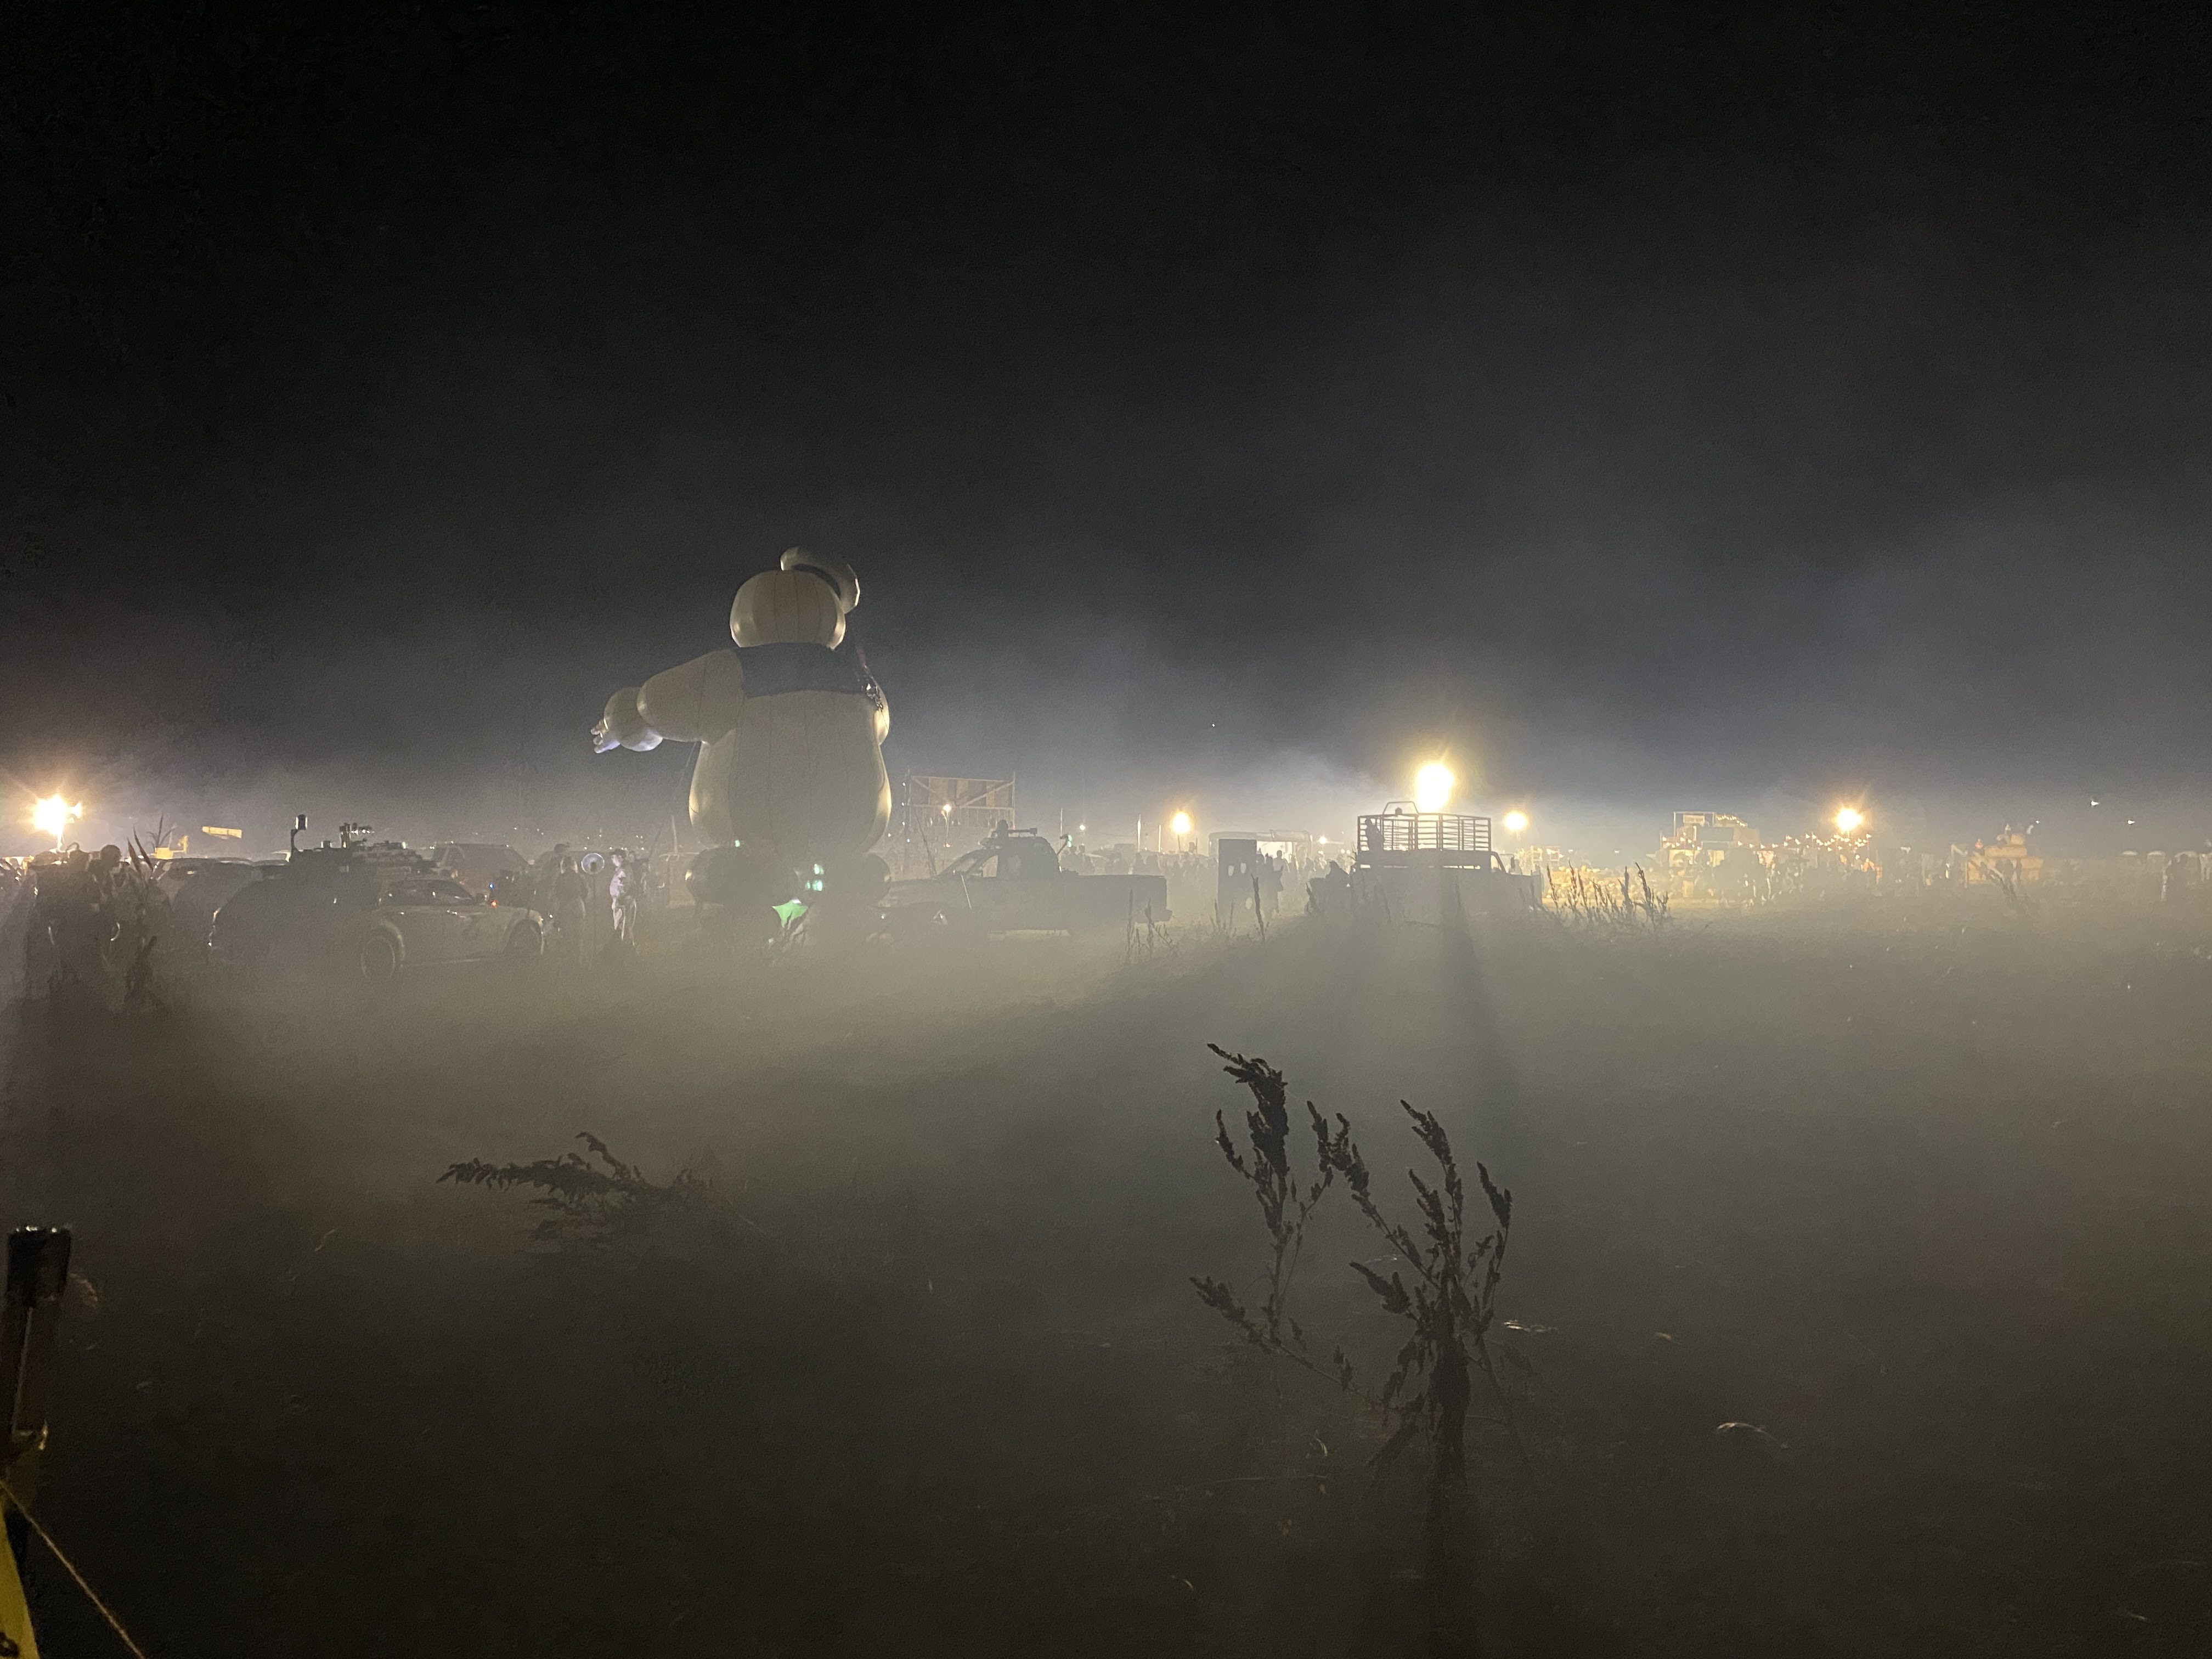
Ben, Tyler, and I went to Glen Ray’s Corn Maze’s Field of Fright haunted maze on October 22nd to see my friend, Jared, and the rest of The Ghostbusters of SLC. This was the first year that I did not help the owner’s of the corn maze plan and set up their haunted maze. There was a 10-15 minute period while we were waiting in line where there was a natural fog effect as the temperature dropped and the moisture and heat in the soil caused a really cool atmosphere. Tyler was acting scared at first as we entered the maze and was clinging to me, but he started making it a game to give a funny name to all of the haunters that were trying to scare him and he ended up having fun.


Annie, Tyler, and Ben all went with our local church youth group to the maze on October 27th as well.


I have been researching, budgeting for, and building out a holiday light show for several years now. I want our Christmas display to be as cool as, or better than, our Halloween display. I installed permanent holiday lights/pixels on my home last year between Halloween and Christmas. Maybe I’ll do a separate post about how I accomplished that once I have my light show complete.
The idea is that I can still “haunt” the neighborhood and dazzle the trick-or-treaters and parents, but without me and my kids having to haunt the graveyard or maze and keep unruly ToTs in line.
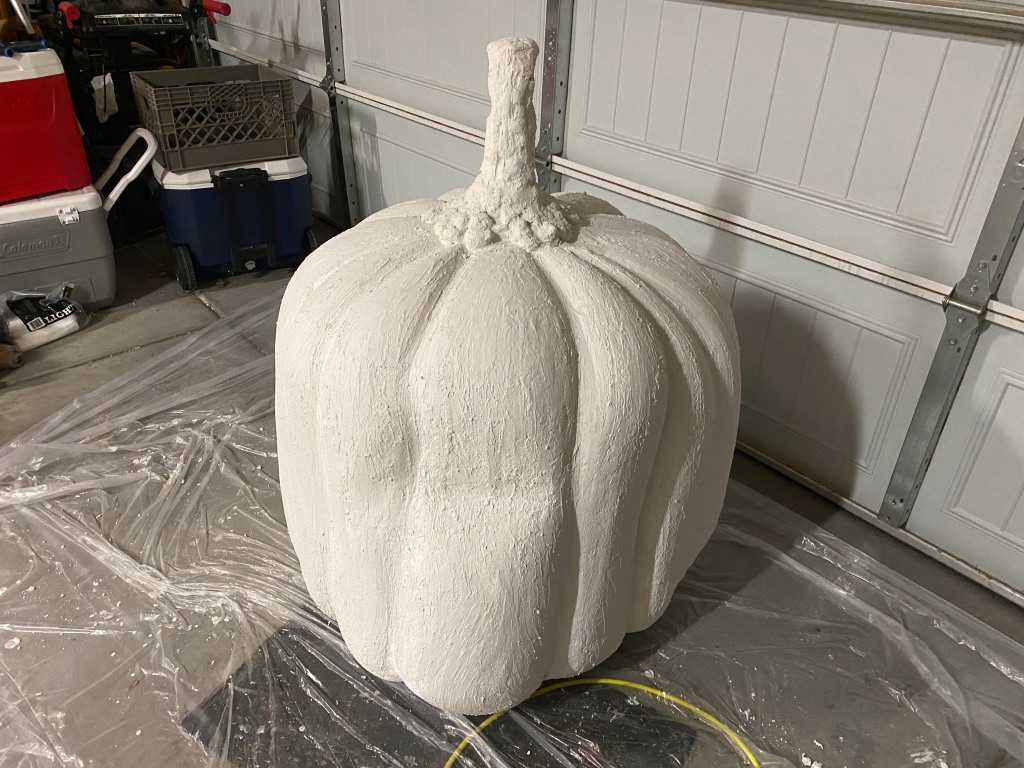
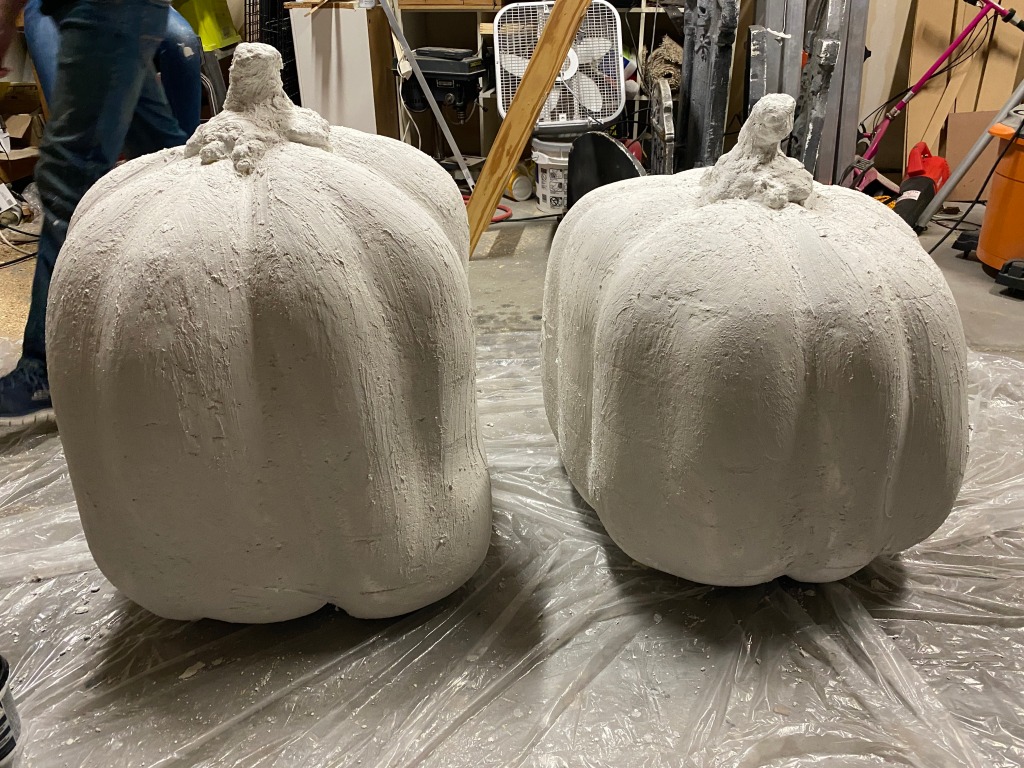
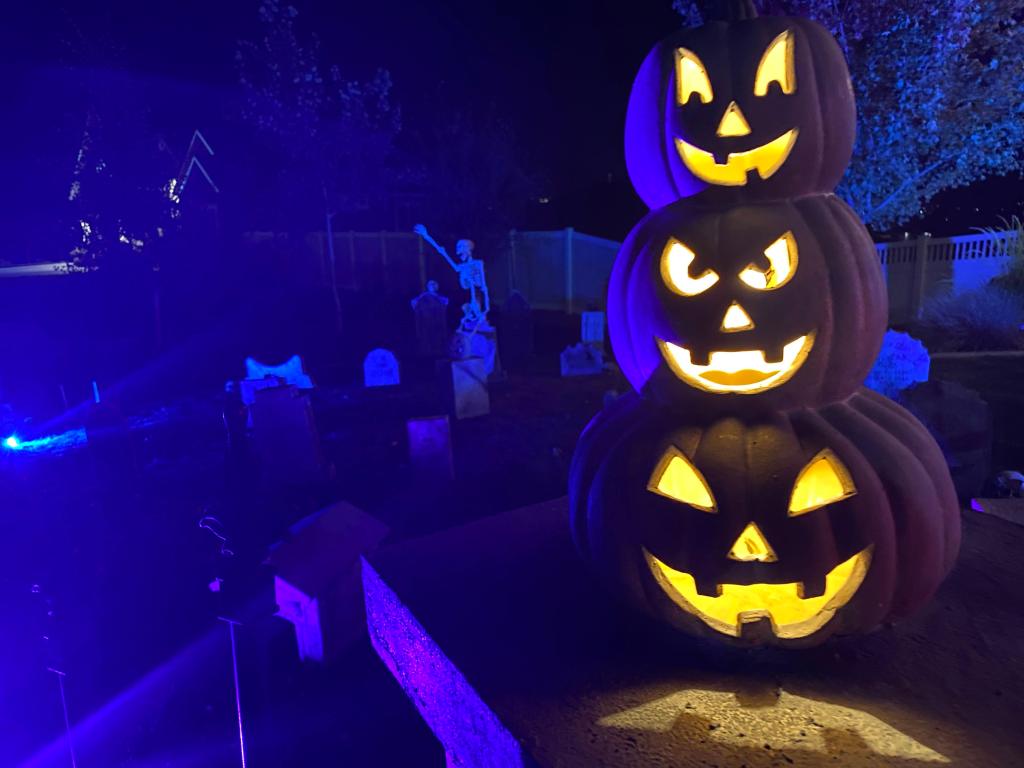
So, I wanted to do a light show using my singing pumpkins video projections as the stars and have the lights on the house and RGB flood lights on the tombstones synchronized to the songs. But I was thinking the singing pumpkins needed to be BIG. Like GIANT.
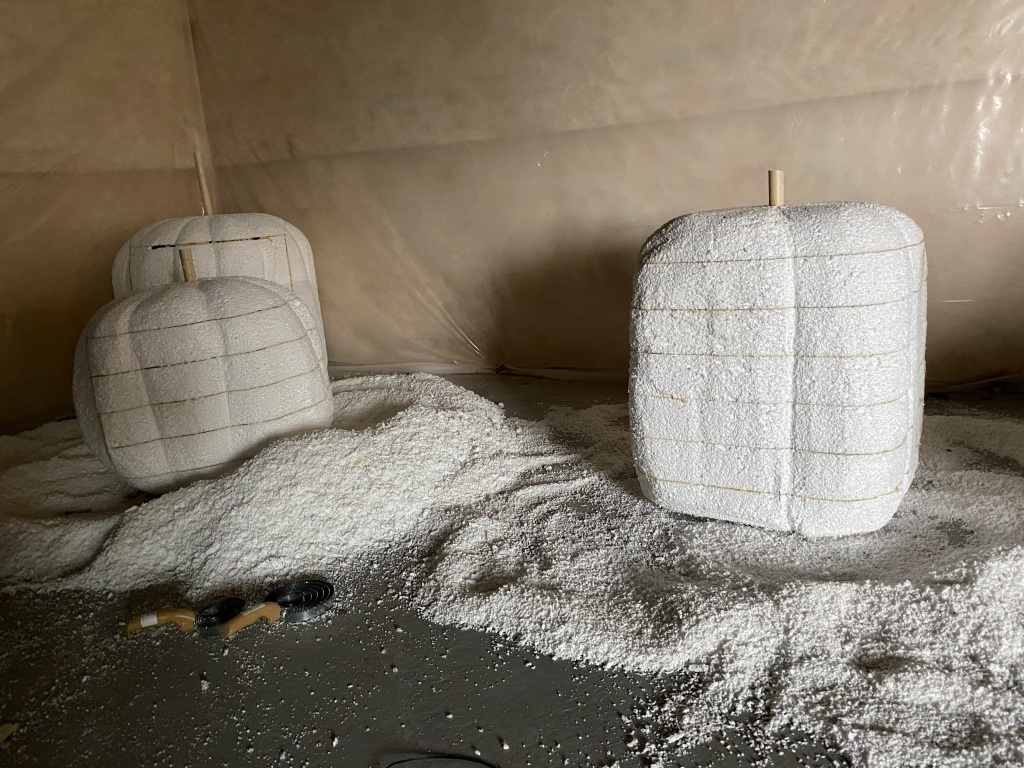
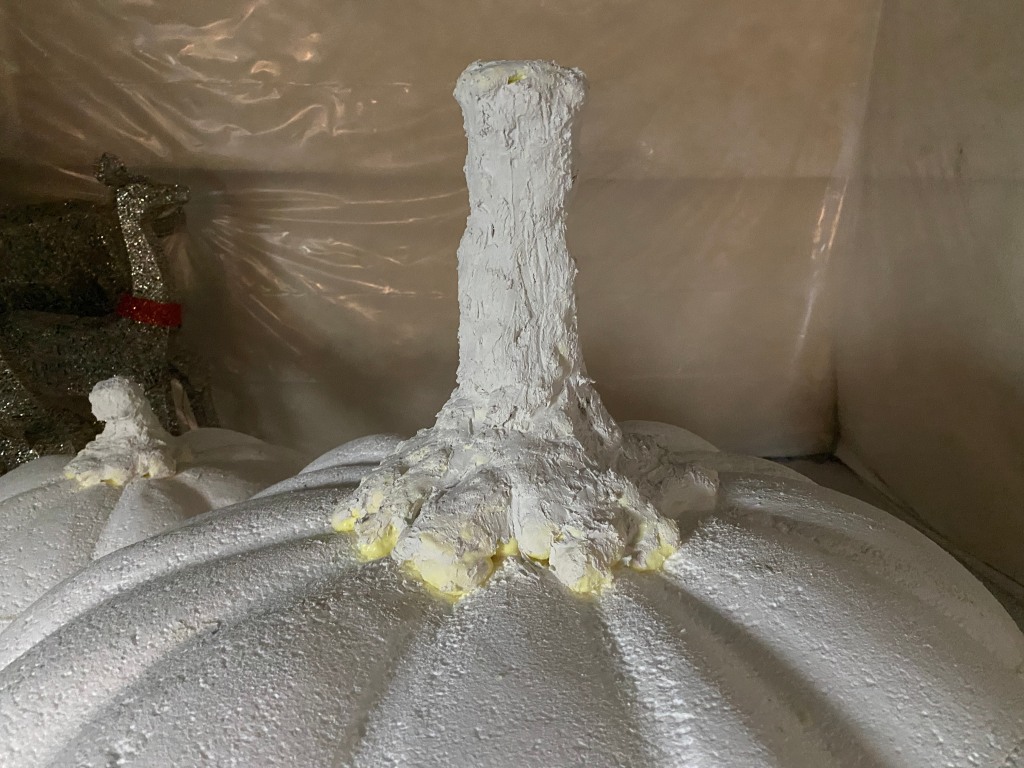
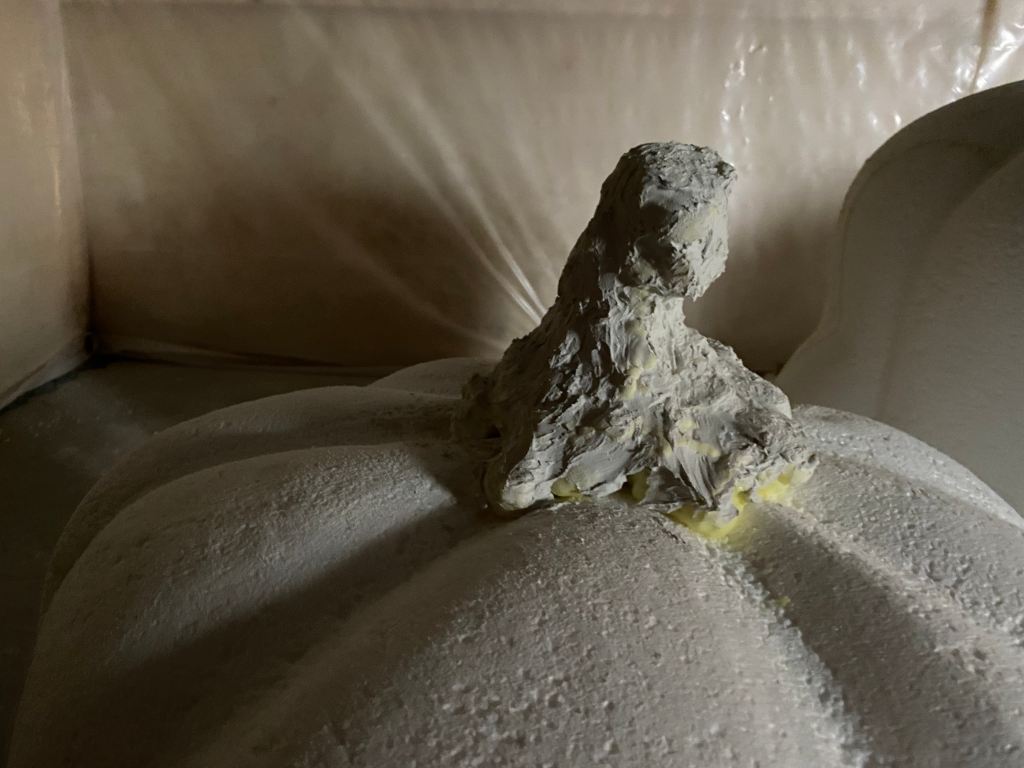
Last year we got some large pieces of styrofoam from one of the other Rocky Mountain Haunters. We glued the foam pieces together using Great Stuff expanding foam and started the process of shaping them into giant pumpkins. Despite starting this project in September 2020 I ran out of time and motivation to complete them. One of my childhood best friends passed away unexpectedly and I was asked to deliver the eulogy at his funeral. That was a real blow to my motivation. We also traveled out-of-state for our niece’s wedding. I also wasn’t sure what I was going to carve them with, or hard coat them with, so they were put into storage in the basement.


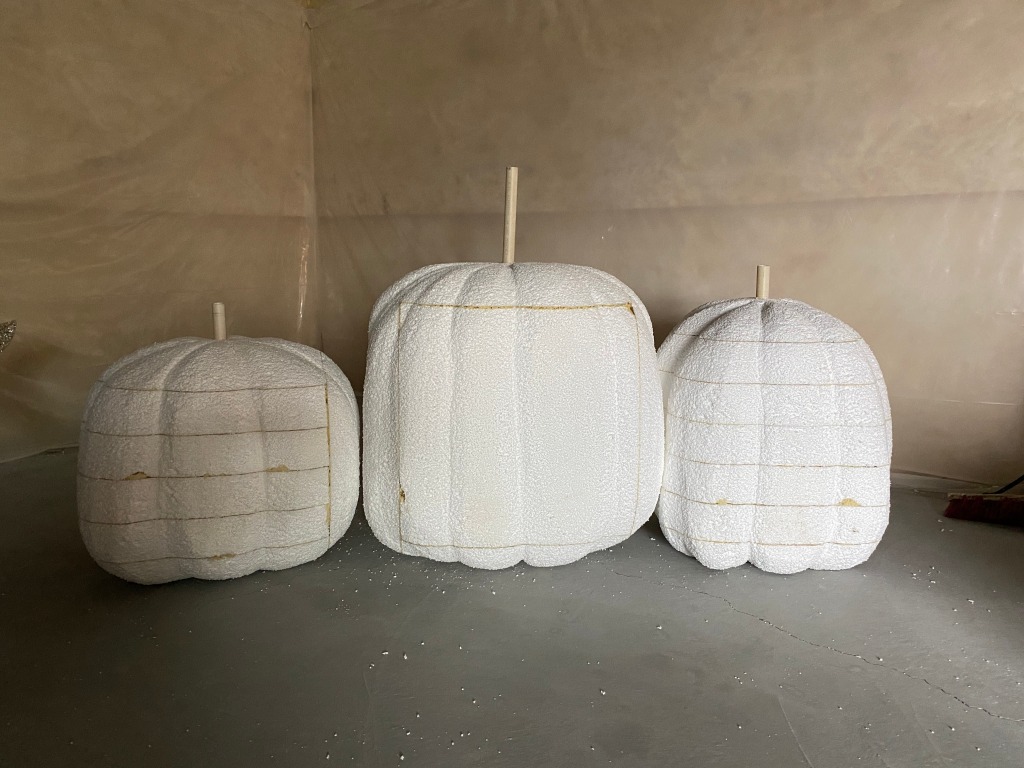
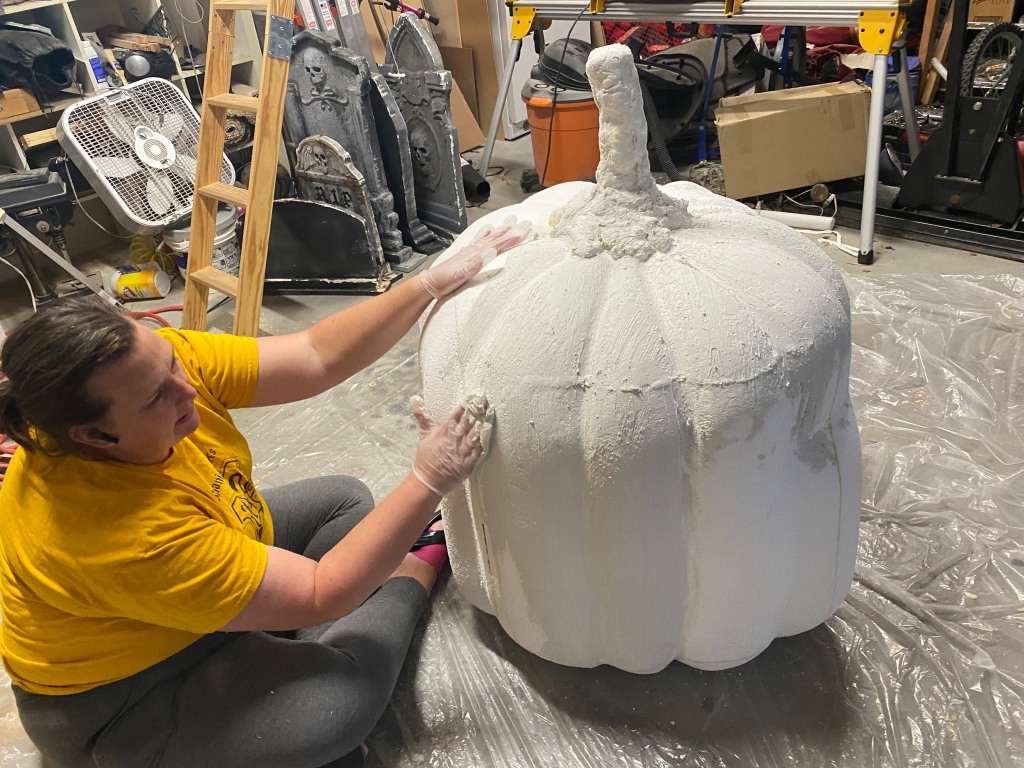
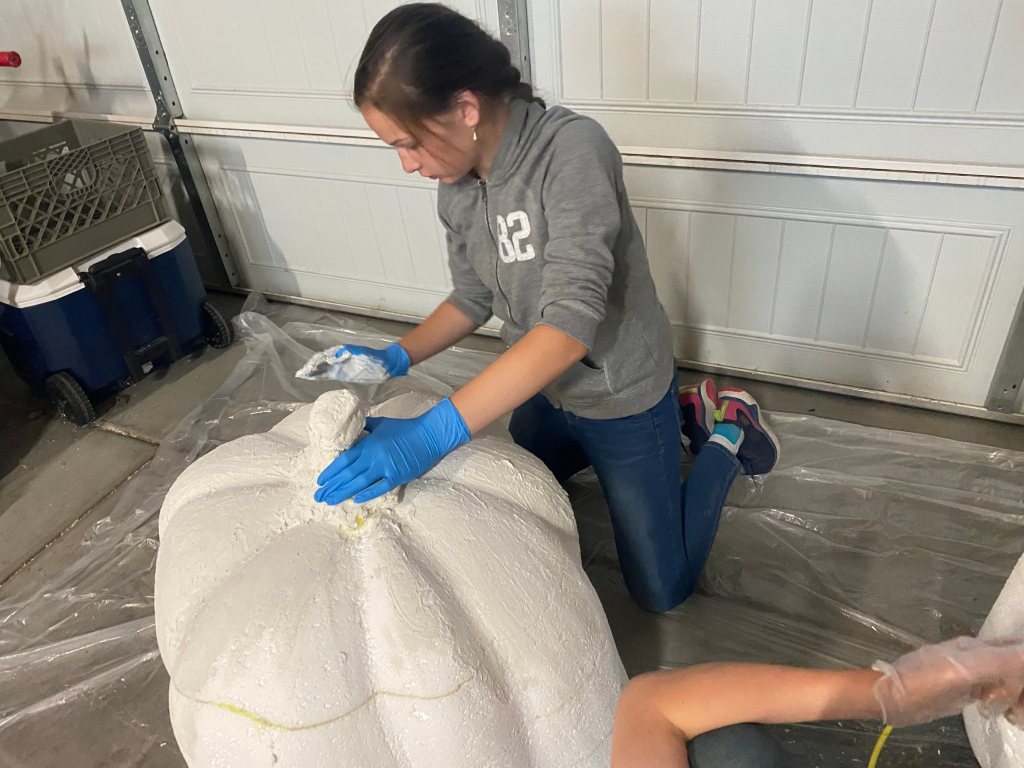
Fast-forward to this year and we continued carving and shaping the pumpkins until I was satisfied with the results. We used metal curry combs made for brushing horses and some rough 60-80 grit sand paper for the rough carving. Then I used a 120 grit sand paper to smooth out the surface. Hollywood Haunter on and Kara Walker Designs on YouTube had some tutorials that helped me figure out what to use to carve them.
We had three very cool looking giant pumpkins, but how was I going to hard-coat them for durability? From years past you may know that we have used DAP Stucco Patch to coat all of our tombstones and the fence columns with great success. The “problem” with the stucco patch product is that it has sand in it and makes a rough, stone-like texture. That’s perfect for tombstones, but I wanted the pumpkins to be smooth.


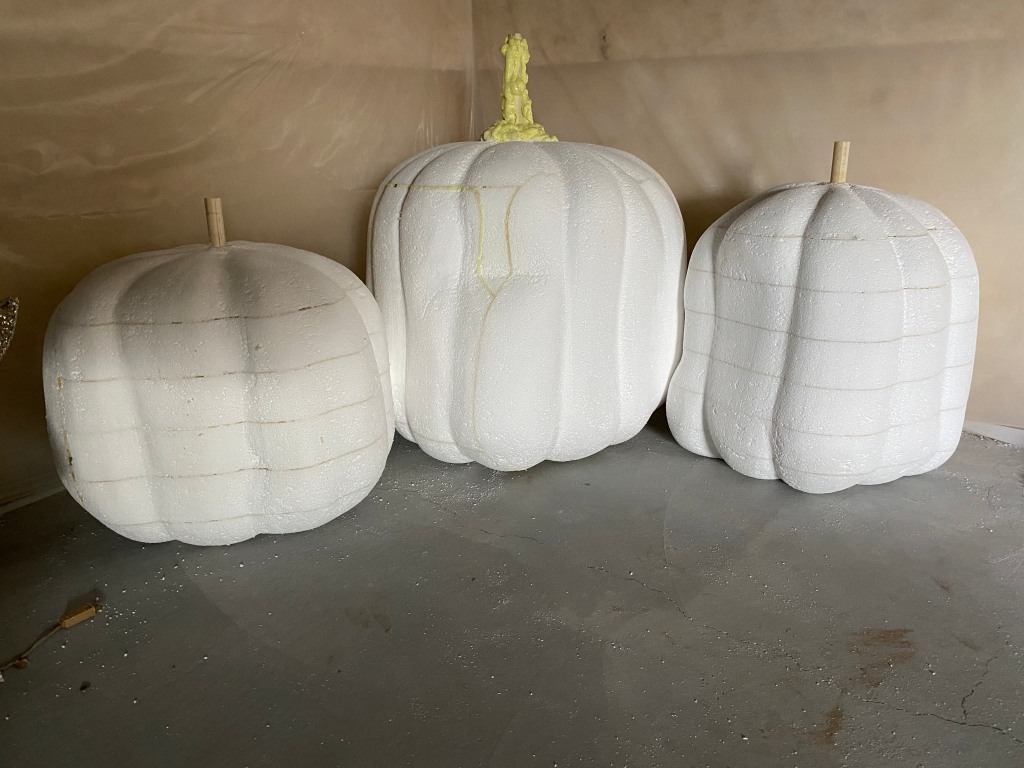

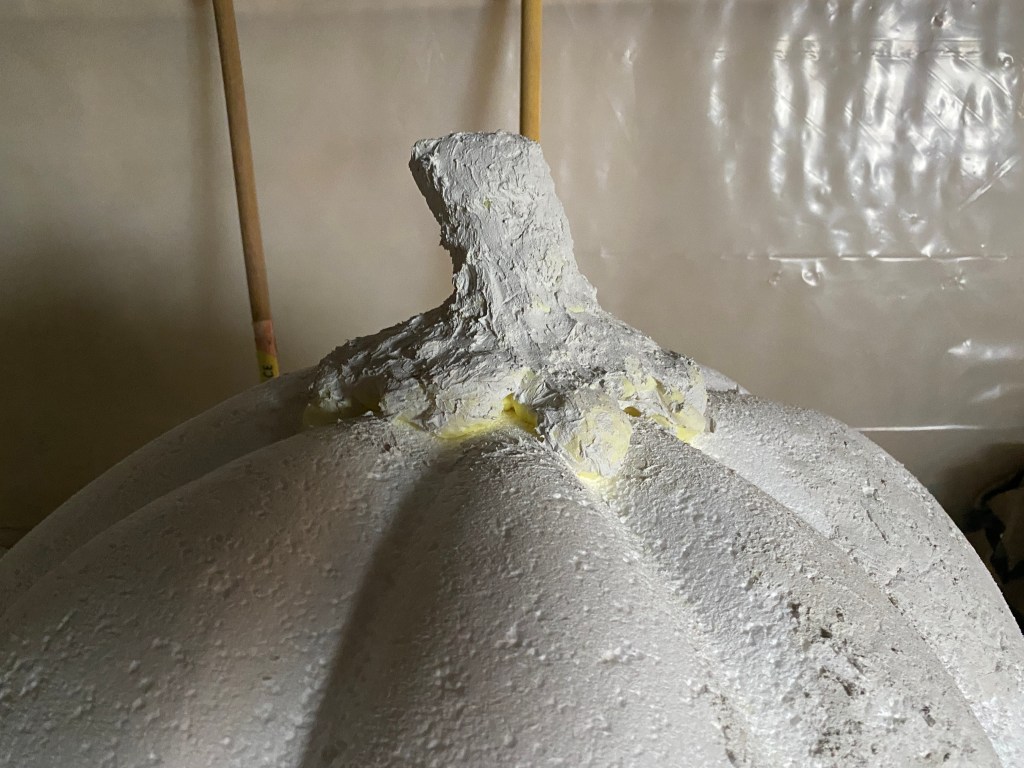
So, I experimented with another DAP product called Platinum Patch. The ingredients suggested it was made from the same materials as the stucco patch, but did not have the sand in it. The online reviews and description said it dries “rock hard.” I thought it would be perfect. So, we covered the pumpkins in a thick layer of DAP Platinum Patch and waited for them to dry completely. We waited and waited and waited. It took several days until I felt comfortable with sanding them smooth. After sanding them smooth I noticed that the platinum patch product doesn’t dry as hard as the stucco patch product. There was way too much flexibility and give for me to feel like the pumpkins would be durable enough to withstand being moved around year to year.
So, I got enough stucco patch that fit within the rest of my Halloween budget and we started coating the pumpkins with it. We did not have enough to finish the pumpkins, and there was so much time wasted waiting in between layers of the different patches we used, so they are now sitting in storage, half covered in stucco patch, incomplete, waiting for next year.


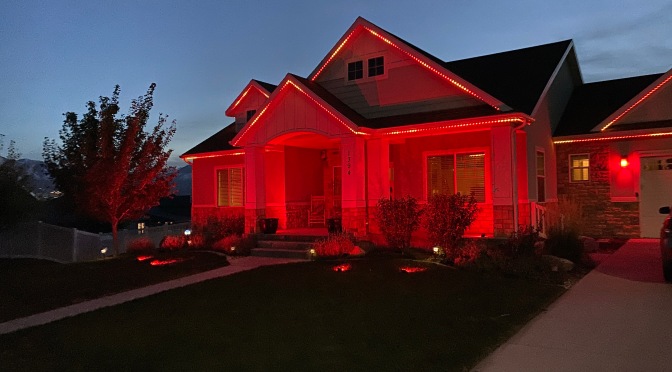
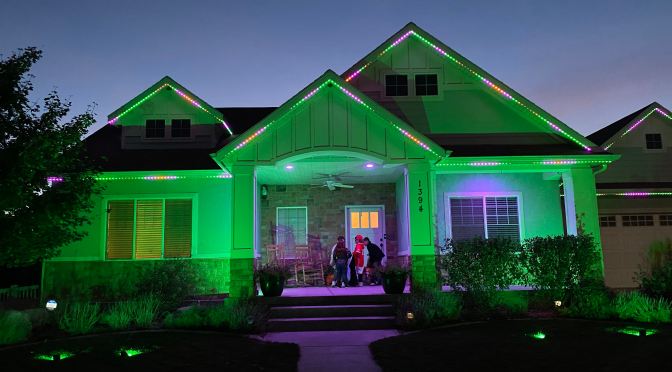
In addition to the giant pumpkins being incomplete, I didn’t end up doing a light show for Halloween this year. I could have. In fact, I had a few sequences created in xLights and I stayed up until 2am on Friday, October 29th, running in and out of my house looking at the sequences on my house lights. But I ended up deciding to table the Halloween light show for this year. I’m still learning xLights and wasn’t sure how to set up the sequences to loop automatically the whole night. So, we had a simple display this year with gravestones with static lighting and a “plasma” lighting effect of green, orange, and purple on the roof pixels. Below is a sample video of one of the xLights sequences that I had ready.
This year we decided to not set up our Maze due to COVID-19. We didn’t want to become a scapegoat for any sicknesses being passed around the neighborhood. Despite not doing the Maze we had a wonderful Halloween. I wish that Halloween was on Saturday every year. It was so nice to add the finishing touches and lighting throughout the day with my kids.
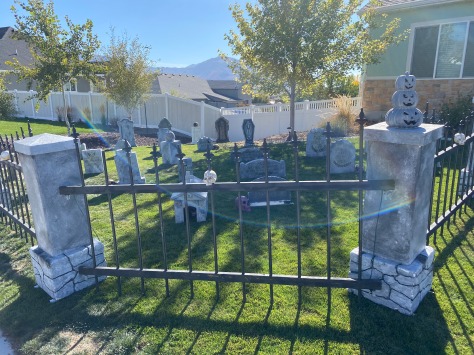
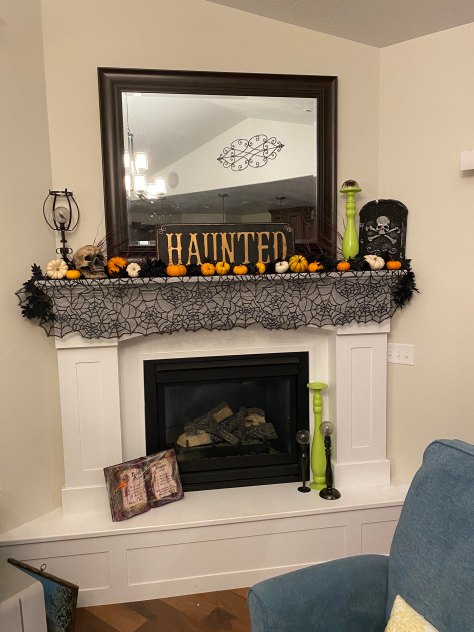
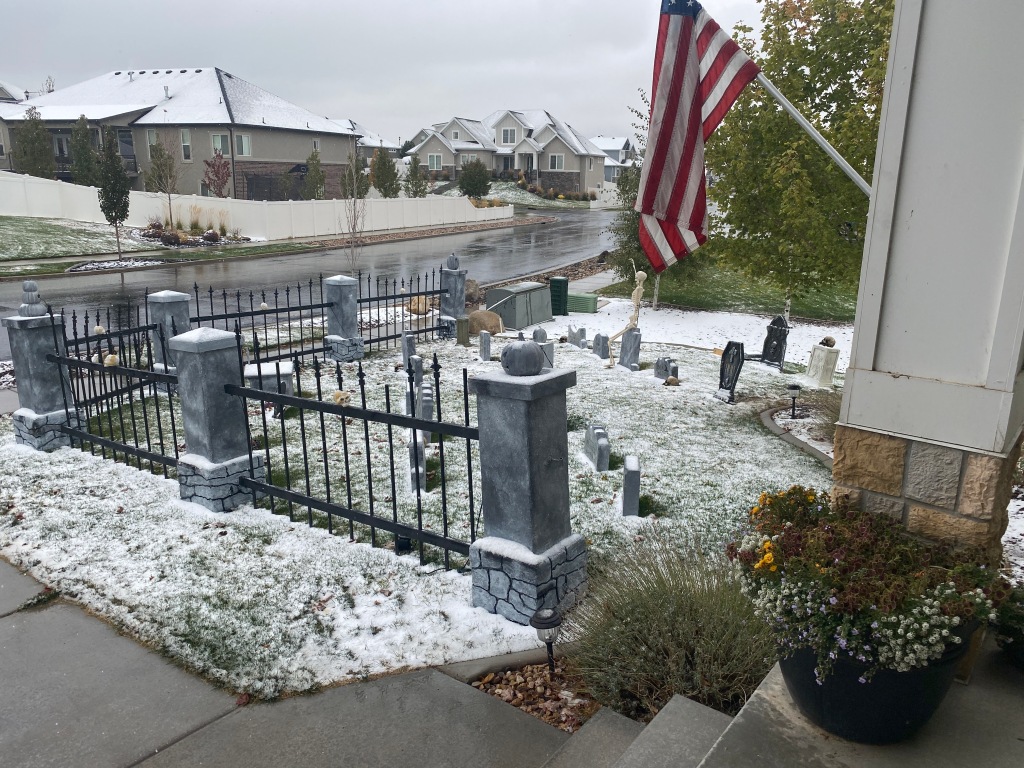
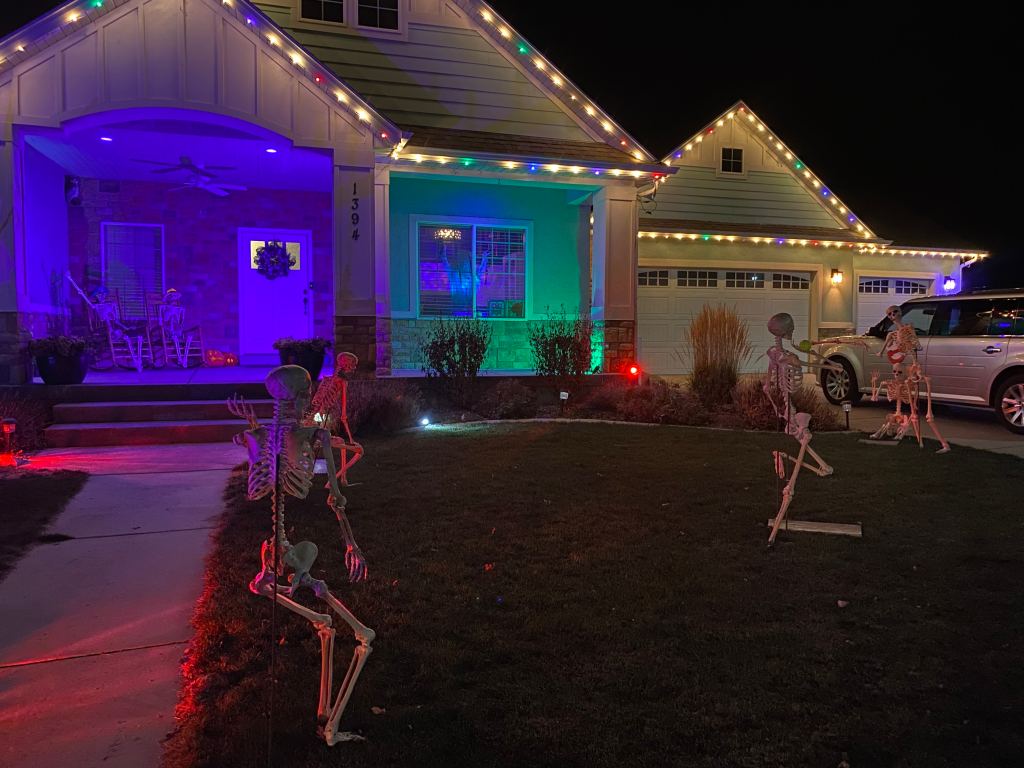
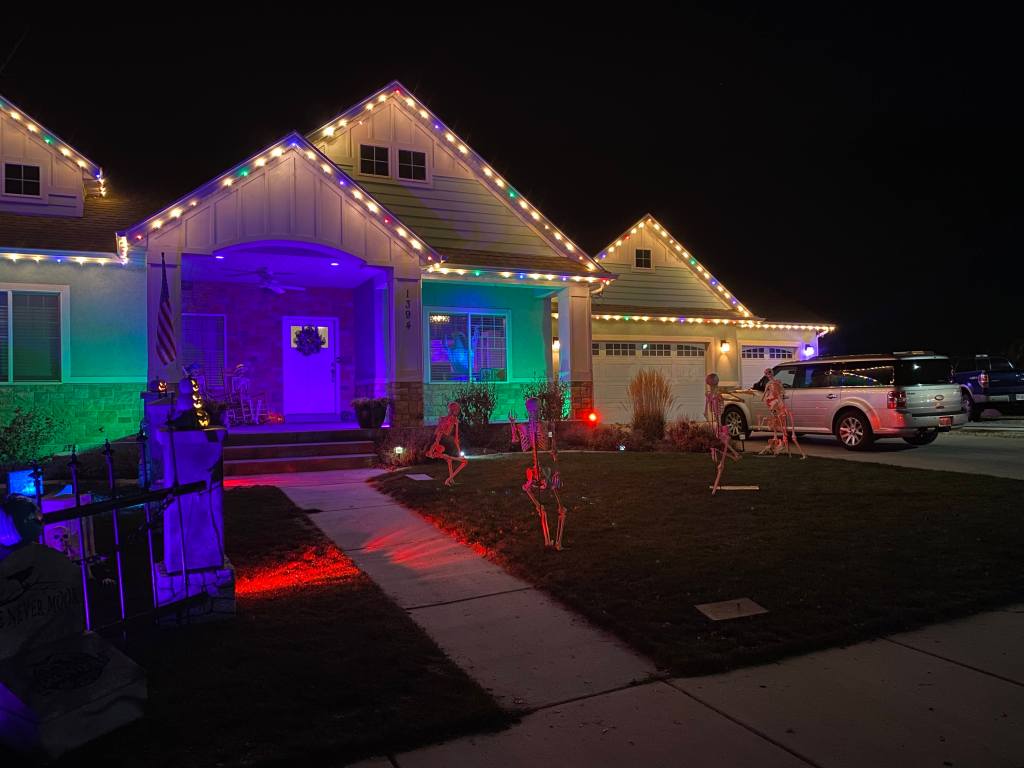
We set up the graveyard and skeletons on October 17, 2020. The kids wanted to set up some of the skeletons playing baseball, so we confined the graveyard to the left side of the yard and left the middle section of grass as the baseball field. The right side of the yard was dedicated to an Among Us display. Heidi decorated our fireplace mantle in a new way and I love it.


It snowed again on October 25, 2020.

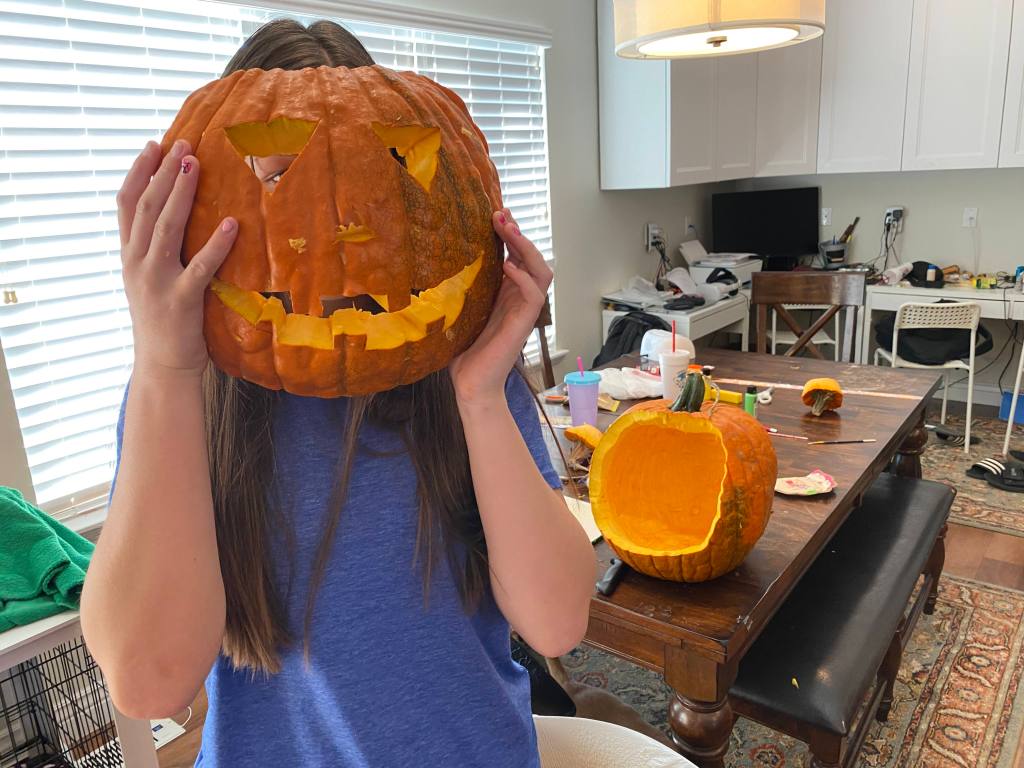
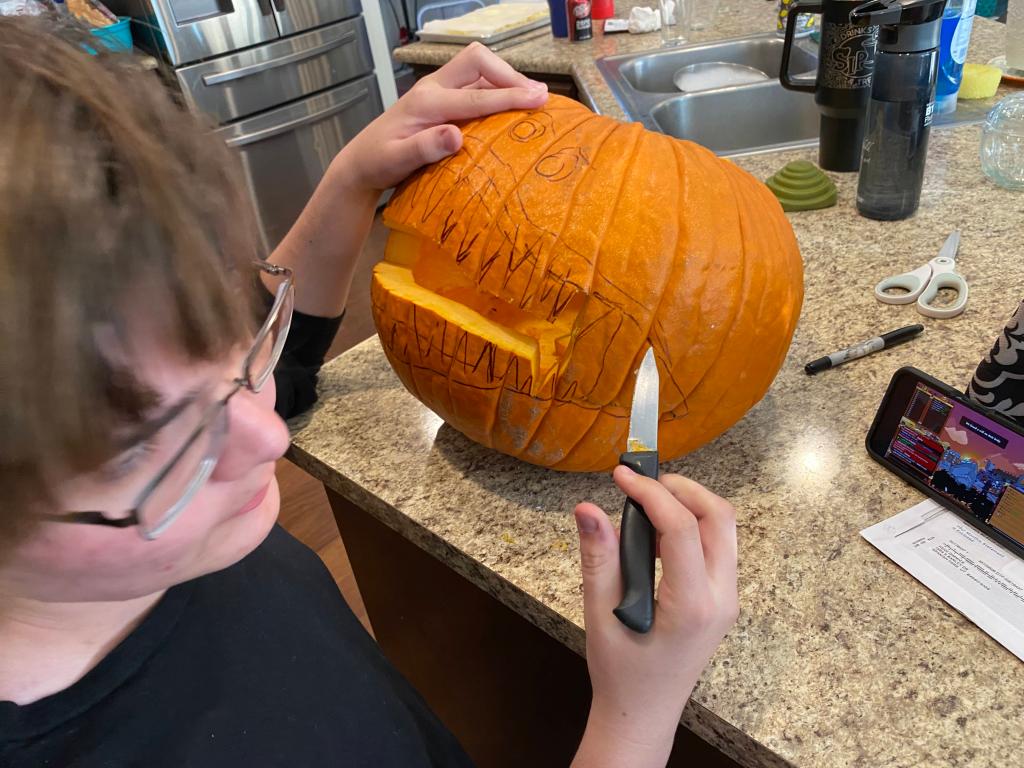
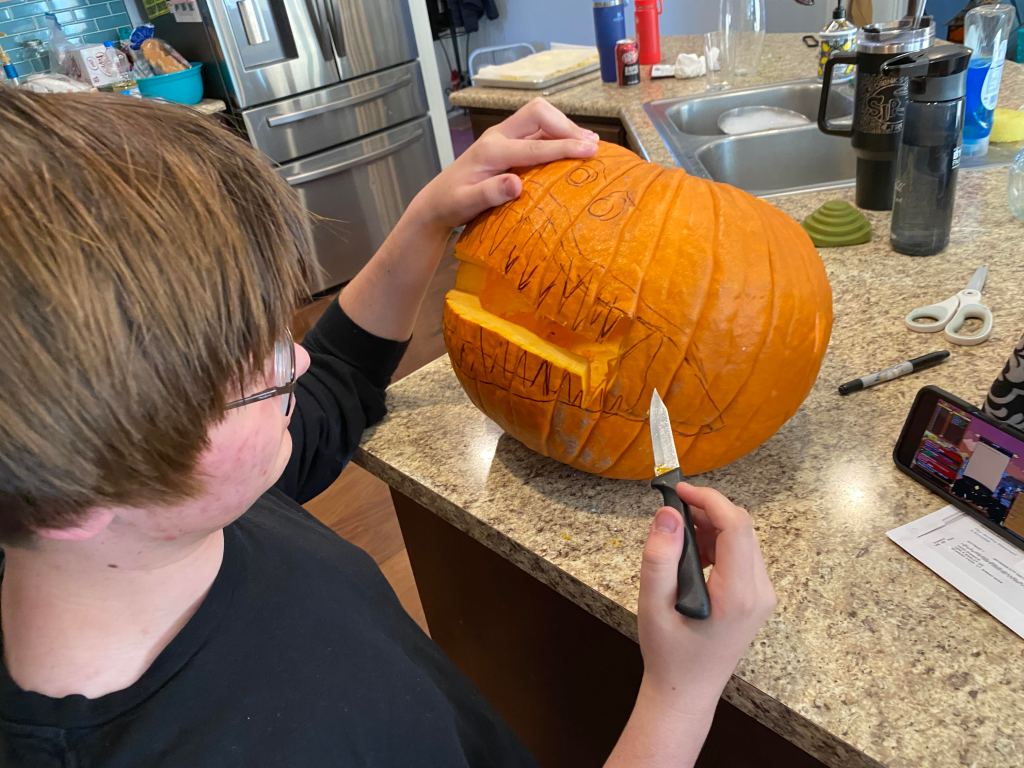
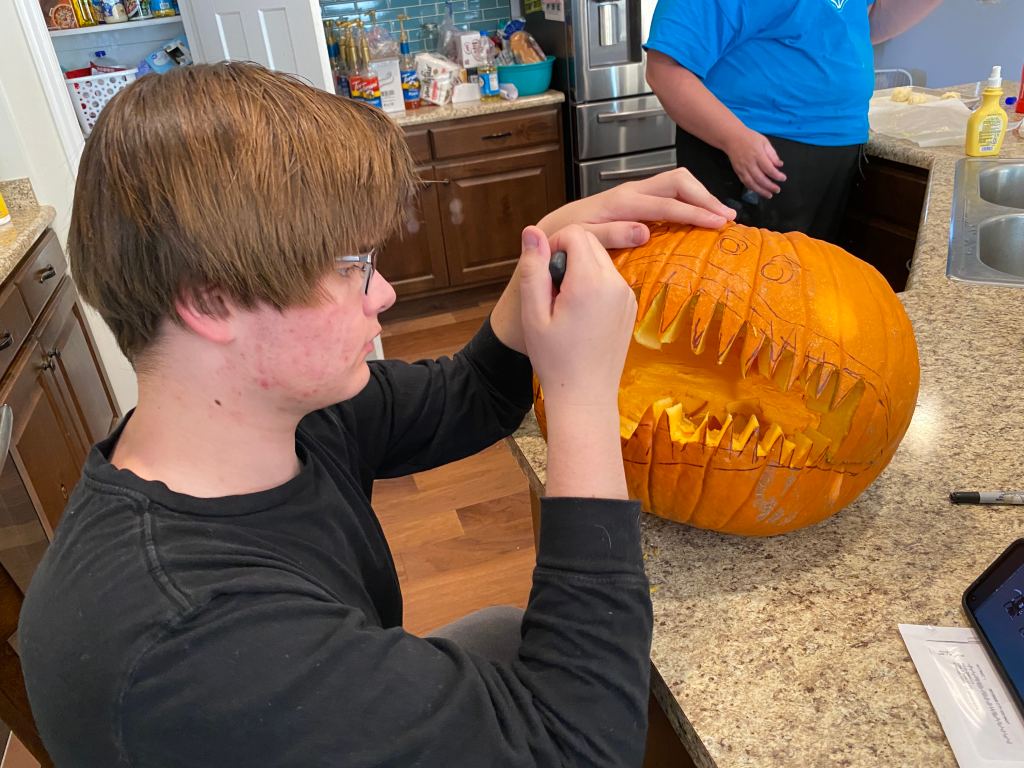
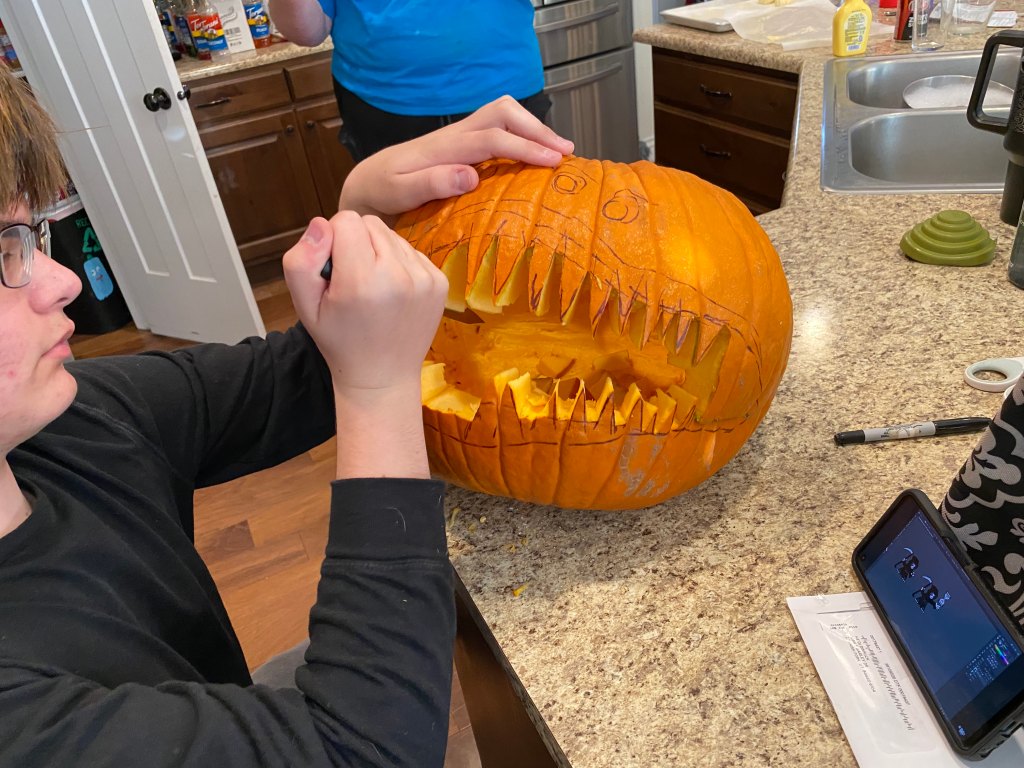
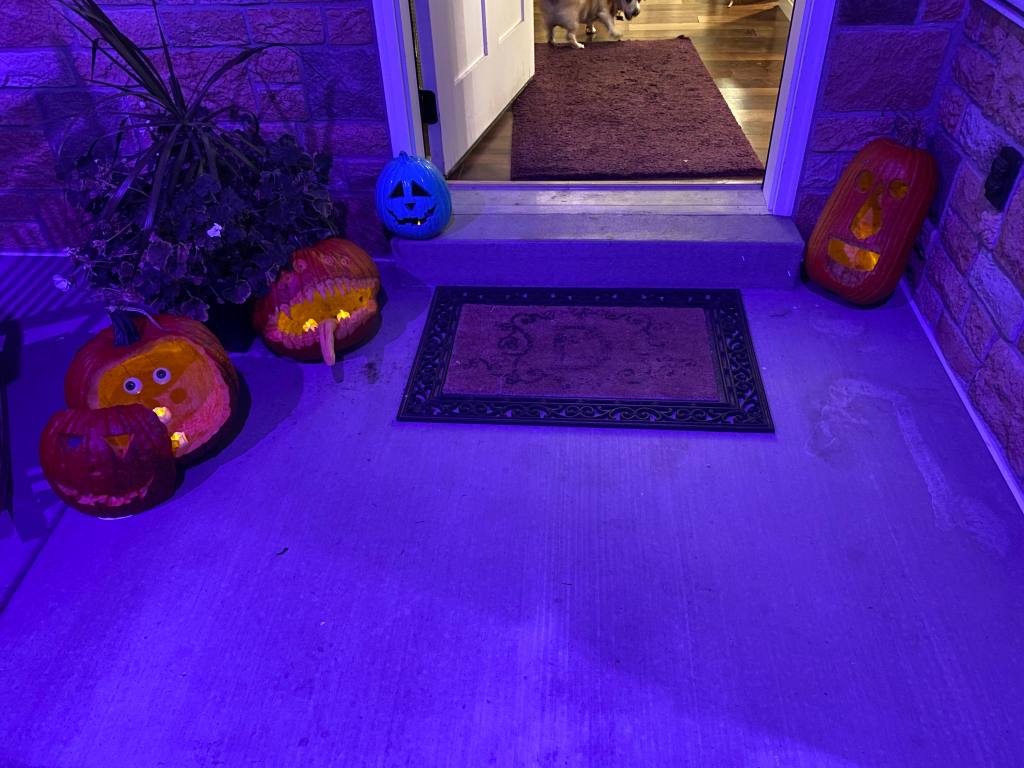
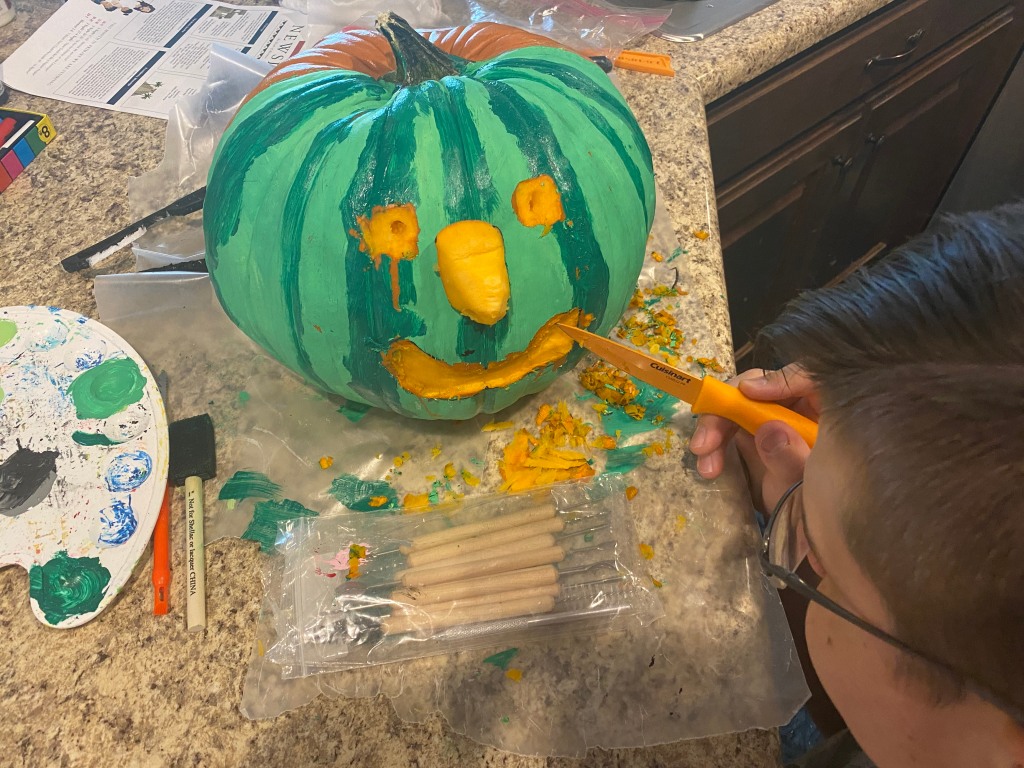
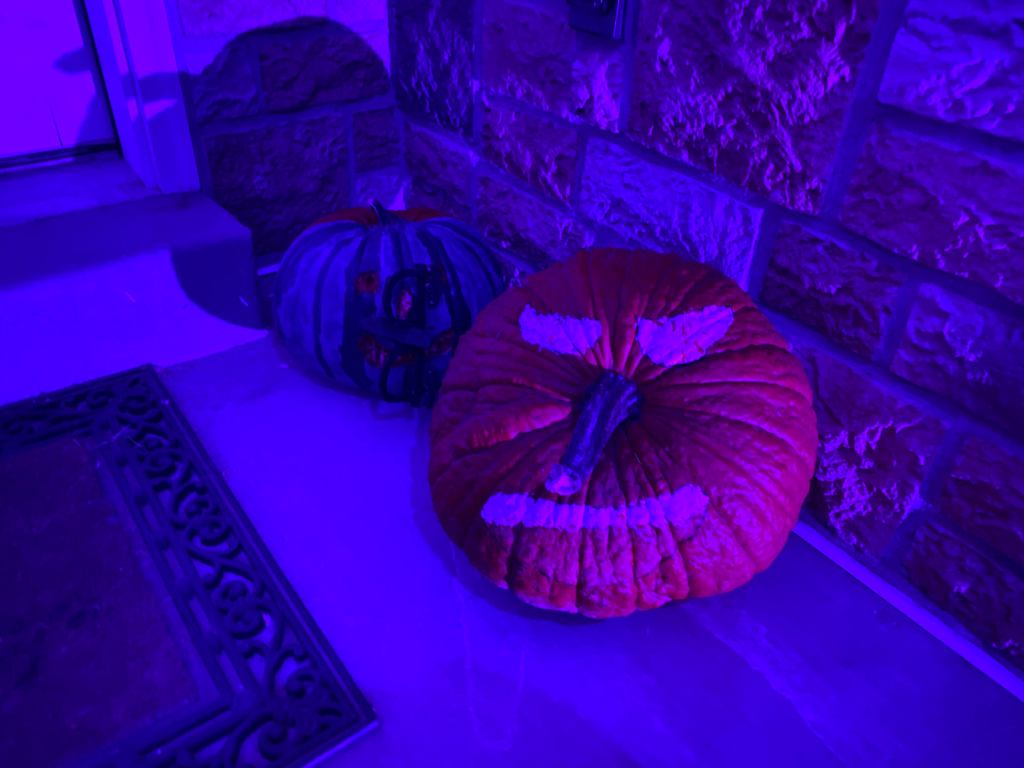
The kids entered a pumpkin contest with our local Church Youth Group. They made their pumpkin “disguised” as a watermelon. His name is Steve and he is a spy who infiltrated the world watermelon villain convention. By the end of Halloween he looked pretty ragged.


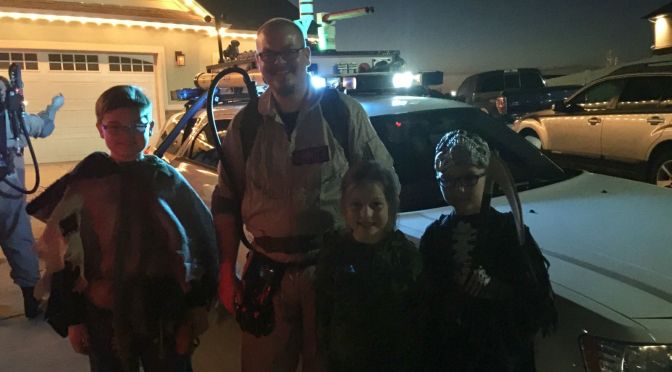
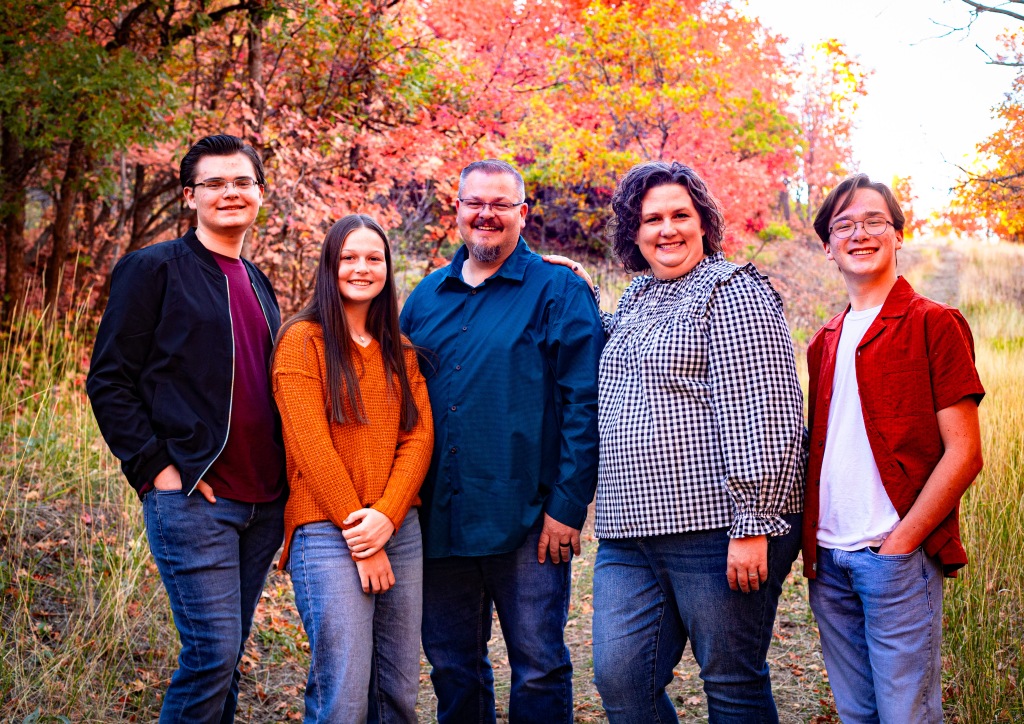
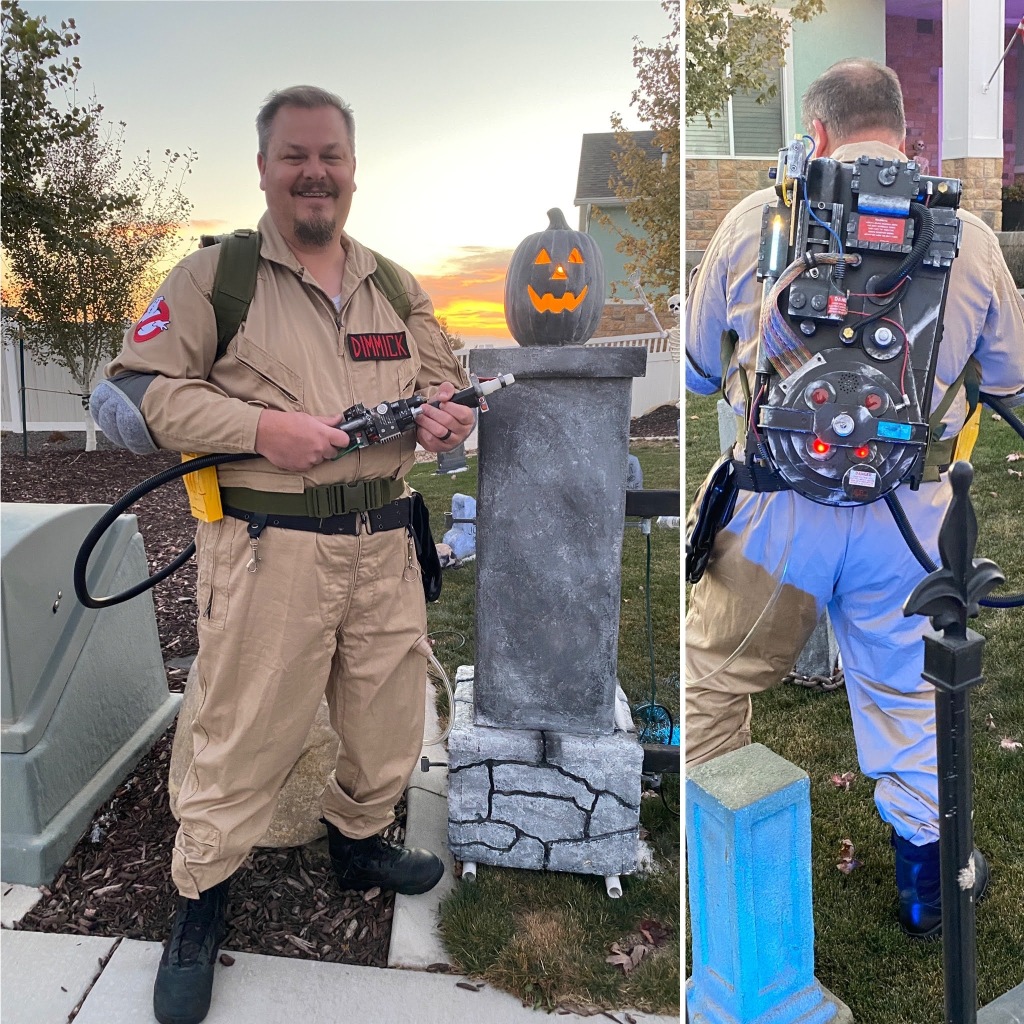
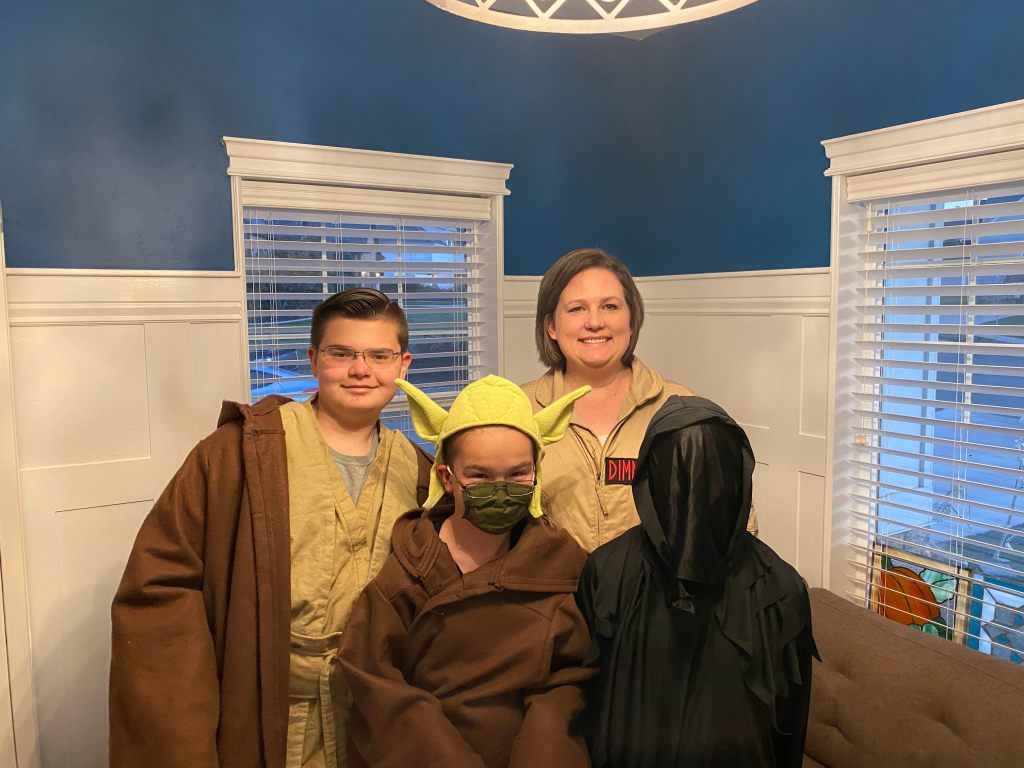
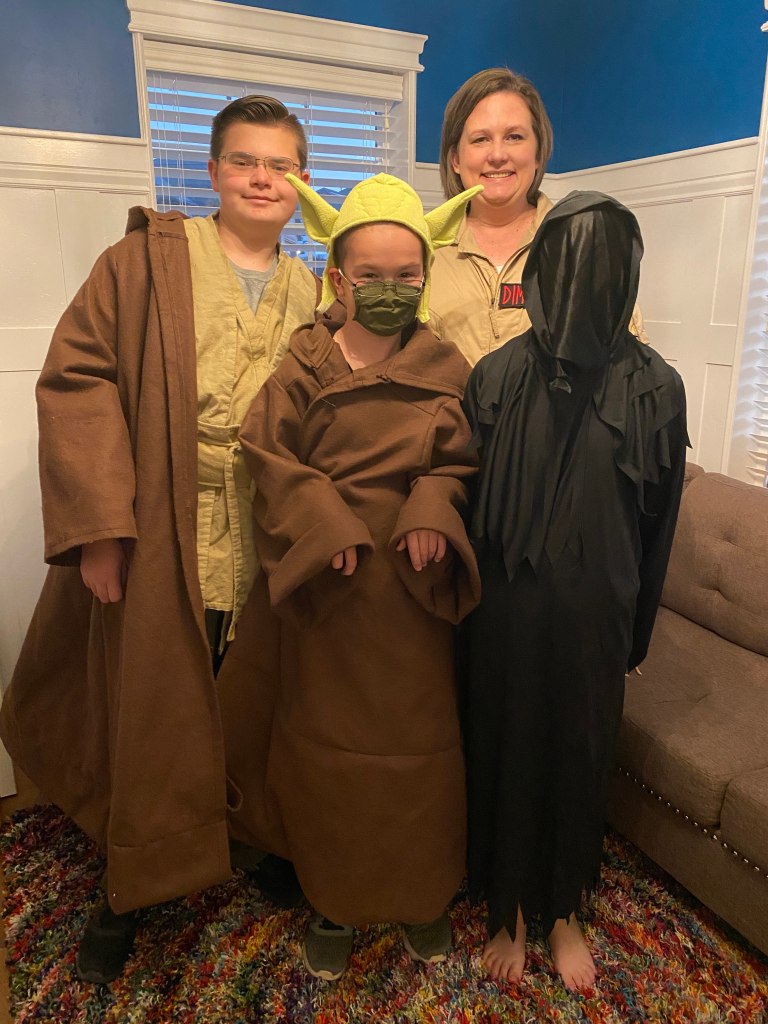
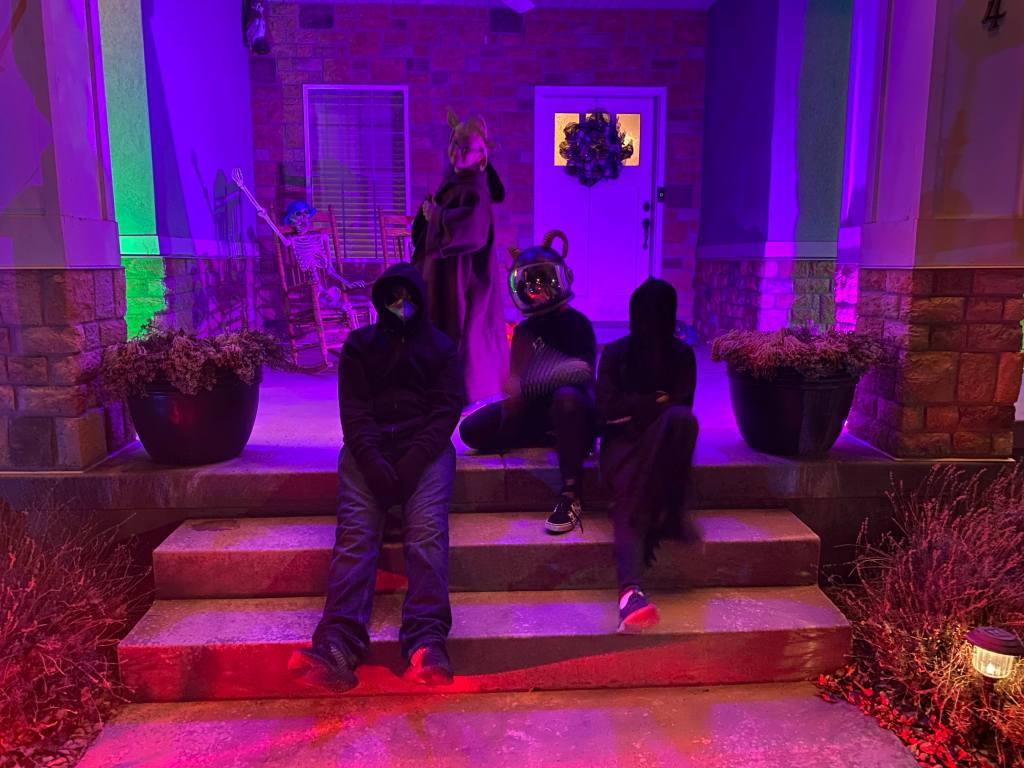
Our costumes this year were: Heidi=Ghostbuster, Benjamin=Jedi Knight, Tyler=Baby Yoda, Annie=Grim Reaper, Scott=Ghostbuster. I won best costume at work and won a nice cash prize.


We got our pumpkins from Glen Ray’s Corn Maze and Pumpkin Patch again this year.


It was a great Halloween and Tyler and Annie went Trick-or-Treating by themselves for the first time. Ben decided not to go ToTing and invited a friend over to hang out with. I passed out the glow bracelets until Annie got back from ToTing and she wanted to do it.


This year our Halloween Haunt almost didn’t happen. A few weeks before Halloween I just wasn’t feeling motivated to spend hours upon hours setting up the yard and the maze. Neighbors and friends kept asking, “are you doing your maze again this year?” And I would answer that maybe we would be doing it, but I hadn’t decided yet. I wasn’t looking forward to the time commitment and my lawn being compacted and damaged by the thousands of footsteps walking through the maze, then having to revive the lawn next spring.
Well, my kids wanted so badly to do it and so I told them that if it was going to happen that they would need to take charge and make it happen and they suggested that we set it up in the garage. It is a good thing that we had planned on setting up the maze in the garage because the day after we set up the graveyard fence and tombstones it snowed. Like four inches of snow.
So, we embraced the snow and the cold weather and posed our skeletons like they were sledding, having a snowball fight, and drinking hot chocolate near the fireplace. We didn’t use any animatronic or projection props this year since the kiddos didn’t set them up. It was a pretty “chill” year and we’re already looking forward to next year.
Happy Halloween from the Dimmicks!
Daddy Daughter Activity – October 15, 2019


Glen Ray’s Corn Maze – October 17, 2019


Setting up the Graveyard – October 26, 2019


Snow? – October 27, 2019


Setting up the Maze in the Garage – October 29-30, 2019


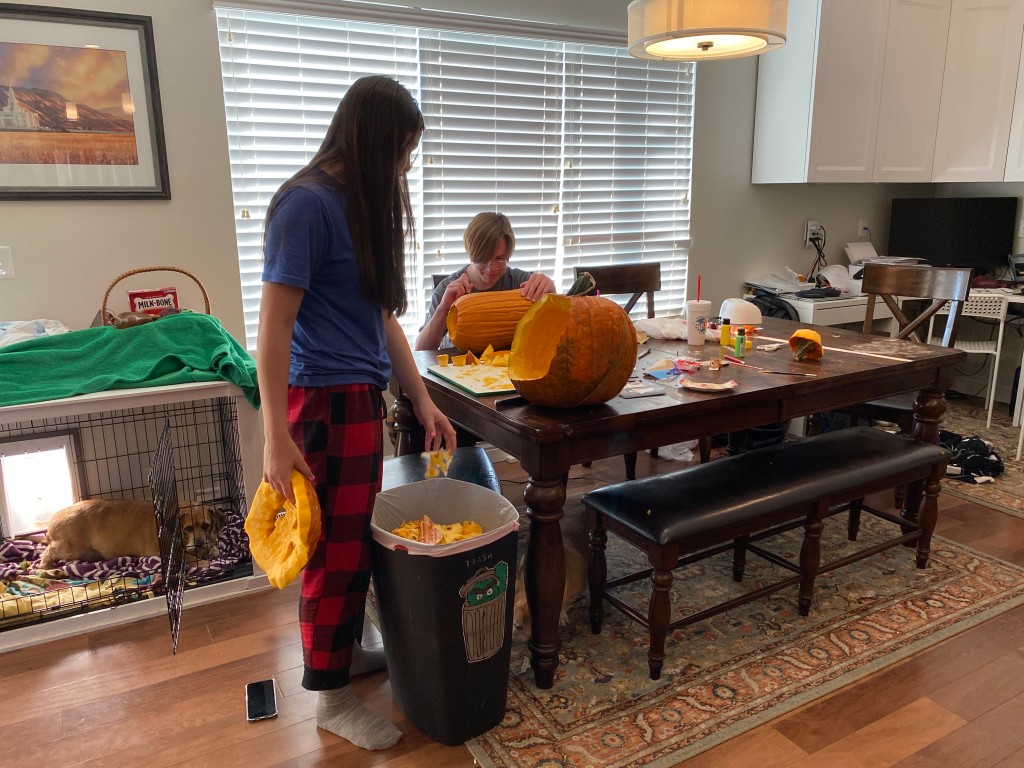
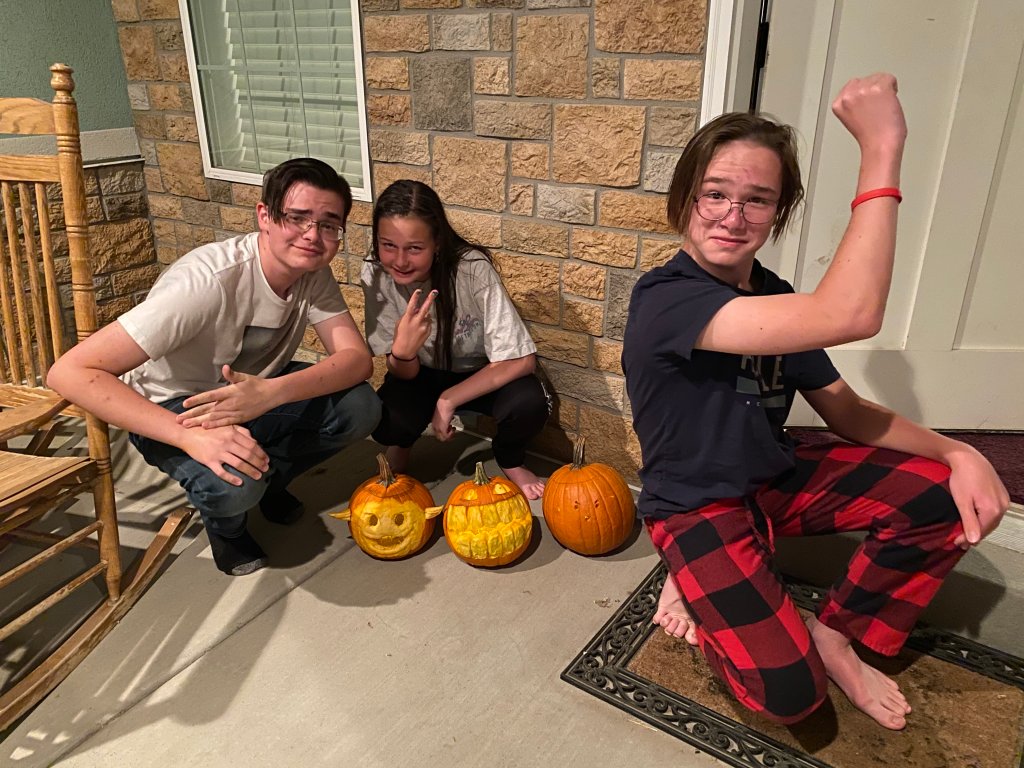
Carving Pumpkins – October 30, 2019


Halloween – October 31, 2019


This year we designed the maze to be bigger and we got a lot of comments about how good it was. The kids had a great time scaring the Trick-or-Treaters and their parents who ventured into the maze. We had almost 300 ToTs. We added skeletons in playful poses and scenes and the singing pumpkins returned this year. We had so much positive feedback from our neighbors, and that makes all of the work worth it. :,)


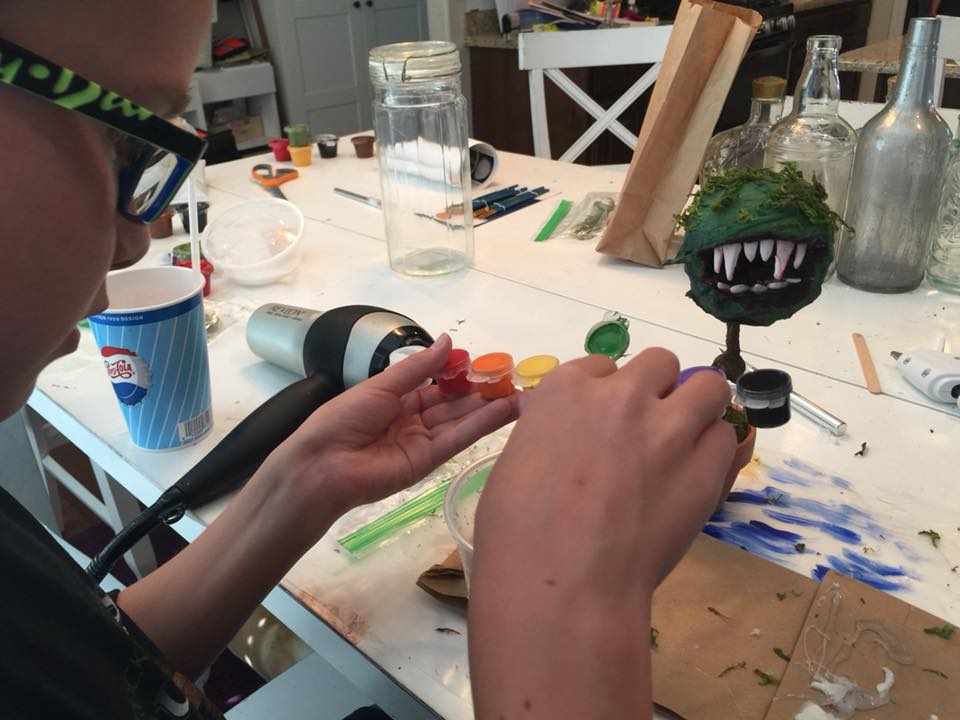
June 7-9 was the annual Rocky Mountain Haunters Gathering. This year we signed up to make several new animated props, as well as some fun, crafty art projects.
Mason Barton led a class in how to make his “Nibbler” art project. Mason provided the Nibbler kits for $10 each and my boys and I had a great time being creative and unique with each of our Nibblers. Hover over each picture for a description.


Joe Marquez and Karen Christensen led a prop build to make an animated prop of what they called the Twerking Ghoul. I prefer to call it the Crouching Ghoul. The kits cost $120. I was unable to take many pictures since I was busy building the prop, but I stole some from some of the other Haunters that were there.


Crouching Ghoul Instructions Sheet (PDF)
Blaine Young led a prop build to make an animated Monster-In-a-Box. The kit cost about $100. He did all of the welding and put together the mechanism. We were expecting to have to put the mechanism together, but he did all of the work. The mechanism will be installed inside a box or inside our casket to make it look like something is trying to get out.

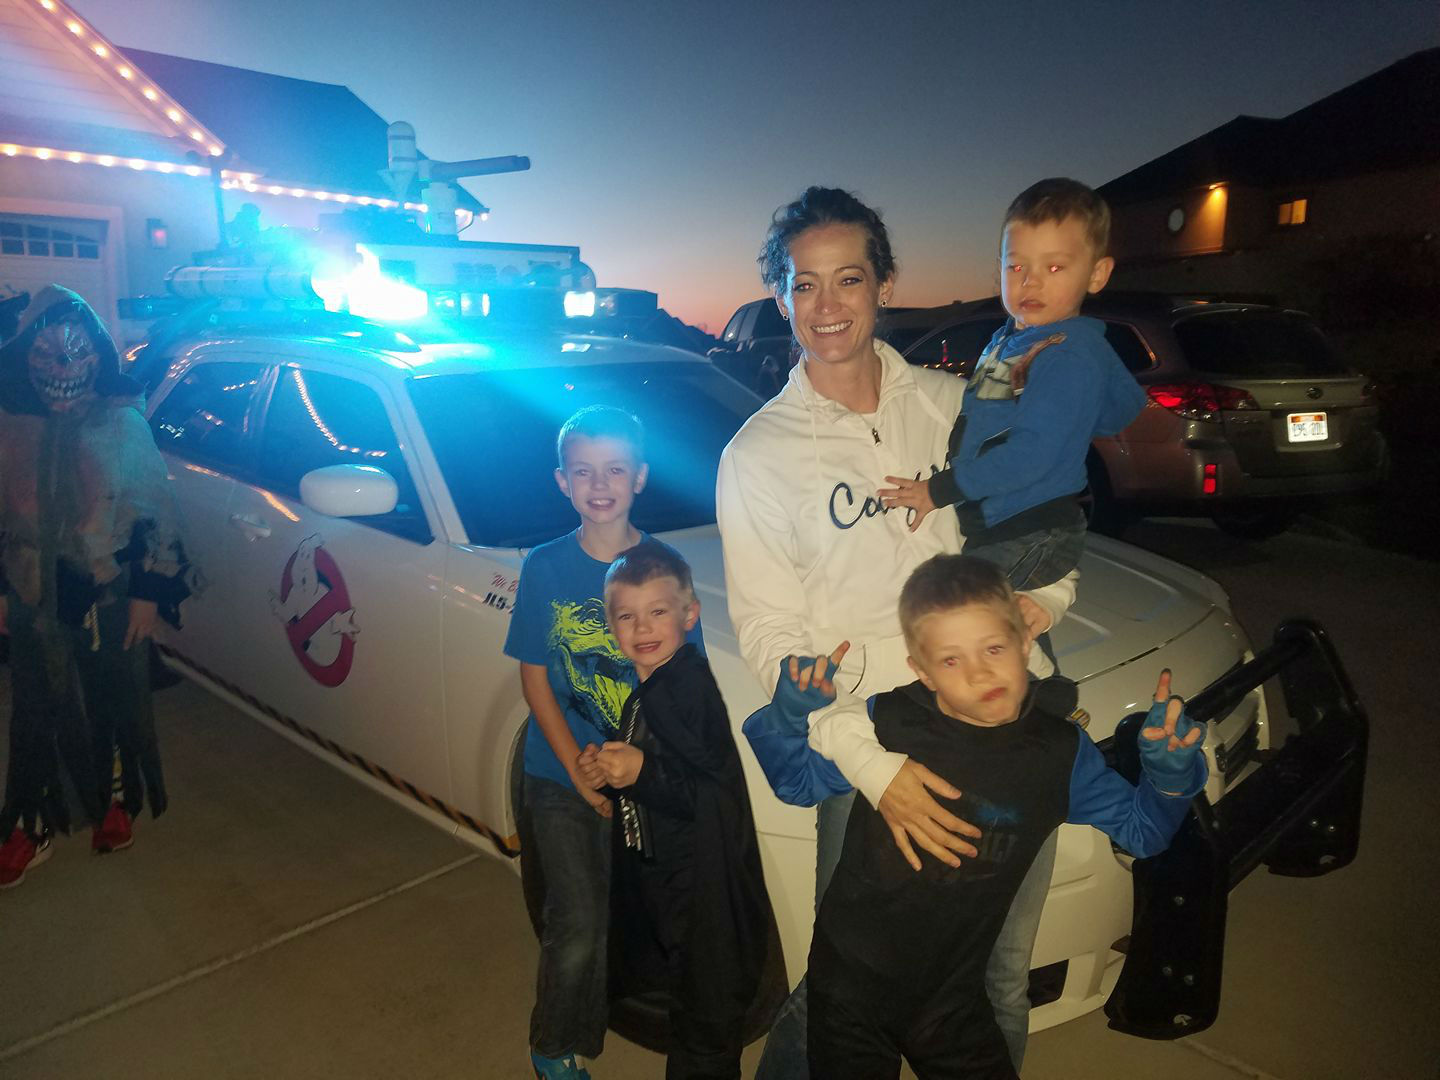
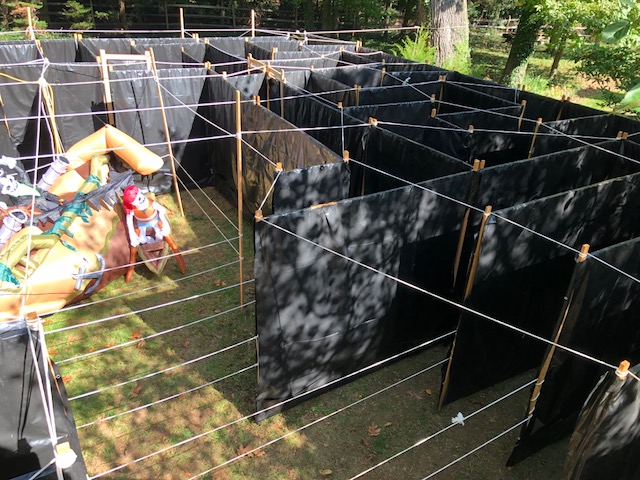
This year we added a Haunted Halloween Maze to our family’s Graveyard Haunt. I have shared instructions on how we built our Maze here. Because we spent so much time building the maze, fixing our graveyard fence, and also making my Ghostbuster Halloween costume we didn’t get all of our props and decorations out for Halloween. However, our Haunt was still a great success! We hosted a Halloween Open House Party on the 28th for our friends and family who usually cannot come to our home on Halloween to see our new maze and we had a visit from the Ghostbusters of Salt Lake. We had so many Trick-or-Treaters come this year that I didn’t get any pictures or video on Halloween Night. Enjoy and Happy Halloween!!!


For the past three Halloweens my oldest son, Benjamin, has wanted to and tried very hard to scare Trick-or-Treaters on Halloween night. I didn’t want to start producing a full-on Halloween Haunted House, but I wanted a way for him to have his wish. In searching online about how to make a maze I found instructions on how to build modular maze panels. Paul Nelson is a composer and has information on his website about his music, however, he also has complete instructions on how to build a large modular maze with detailed instructions on how to put it together. My purpose in providing the information below is not to copy Paul’s instructions, but to show how I used his plans to make our own smaller maze that fit our yard and needs, and to also preserve the plans in case he stops hosting the plans in the future. For full instructions please visit Paul’s Modular Maze Panels website (Update November 2023: It looks like Paul’s website is no longer active).
Paul’s full-size maze is 32.75 feet squared (14 panel segments by 14 panel segments), or larger. The area of my front yard where we planned to set our maze up was not that large, plus the cost of building the full maze would be over $1,500. My budget was $400, so I needed to come up with a design that would fit my budget and my yard. I settled on an 8 panel segment by 8 panel segment maze. That would be 18.75 feet squared and would fit in my yard nicely. Paul’s maze designs require 43 3-segment panels, 38 2-segment panels, and 14 1-segment panels. That’s 95 panels with 219 total segments. My smaller design required me to make 10 3-segment panels, 17 2-segment panels, and 13 1-segment panels. That’s 40 panels with 77 total segments.
What is a Segment?
If you look at your maze from above it is made up of many squares. Each side of the square where a wall or panel is in place is a segment. As you can see below, this is my concept design for the final design that we used. In this picture you can see how I divided the maze into 3-panel, 2-panel, and 1-panel segments. Although the final maze has some differences from this drawing, this is what we based our panel building off of.

Paul’s instructions include the dimensions for these segmented panels.


I started by calculating how much I needed of the following materials: 2x4s, 3/8″ plywood sheets, 6-mil black plastic rolls, screws, eye screws, wood glue, staple gun staples, rope, and tent stakes. For my maze I needed at least 47x 104.625x2x4s, 1 sheet of 3/8″ plywood, 3x 10’x100′ rools of 6-mil black plastic, 3 lbs of drywall screws, 250x #8 eye screws, 1x 18oz Gorilla Wood Glue, at least 4,500 staple gun staples, at least 150′ clothesline or rope, 10 to 20 tent stakes. I spent about $500 for all of the supplies. Paul has an itemized list of the supplies to build his full-size mazes on his website.


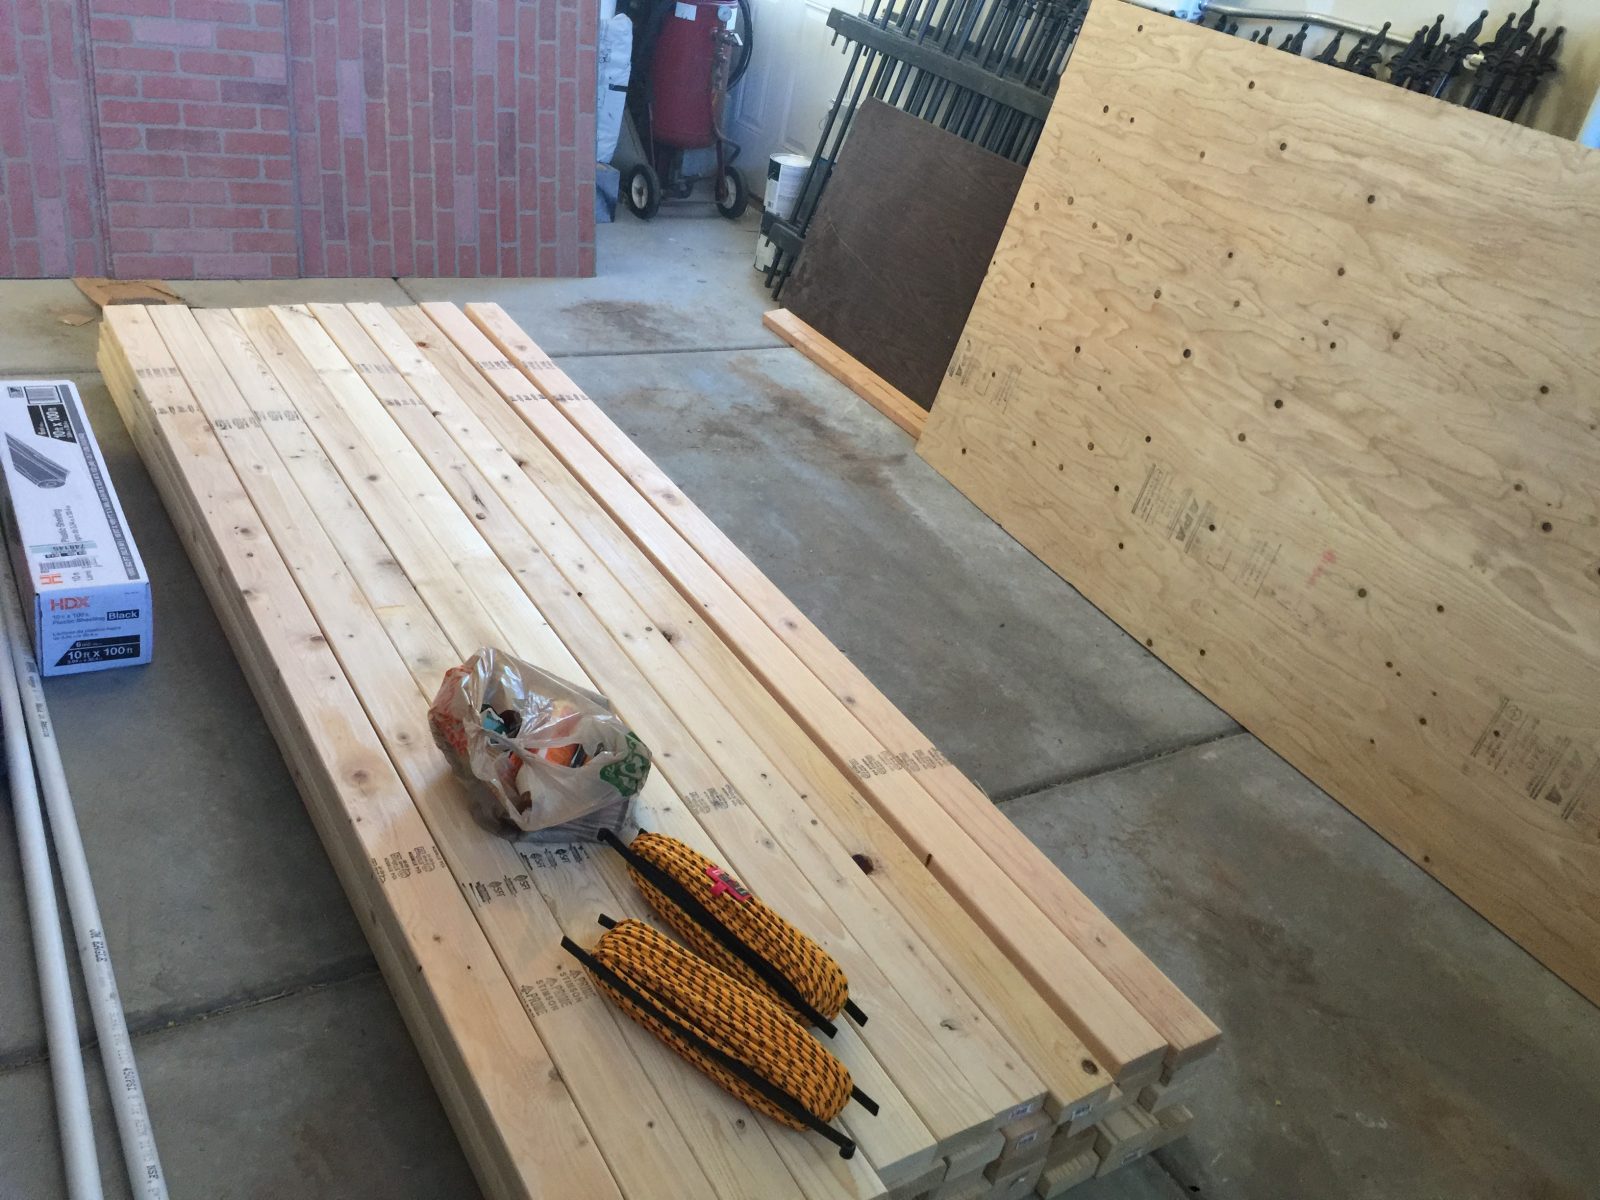
The first step in starting to build your modular maze panels is to rip the 2x4s lengthwise into four equal strips using a sharp blade on a table saw. Paul says to cut them to 0.875″. That is about 25/32″ on a tape measurer or on your table saw. It took my wife and I about 5 hours to rip all 50 of the 2x4s that we had. Our table saw kept tripping our breaker, so we had to keep resetting it. I also had bought a brand new 60-tooth blade, which I think it would have cut faster with a 40-tooth blade. When we were done we had about 200 struts.
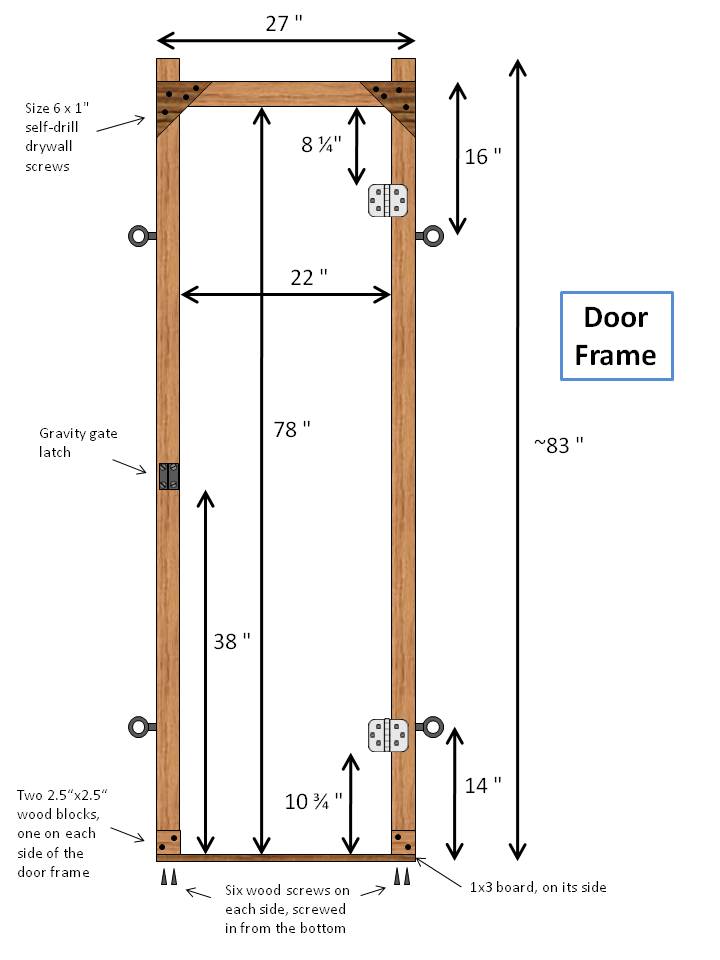
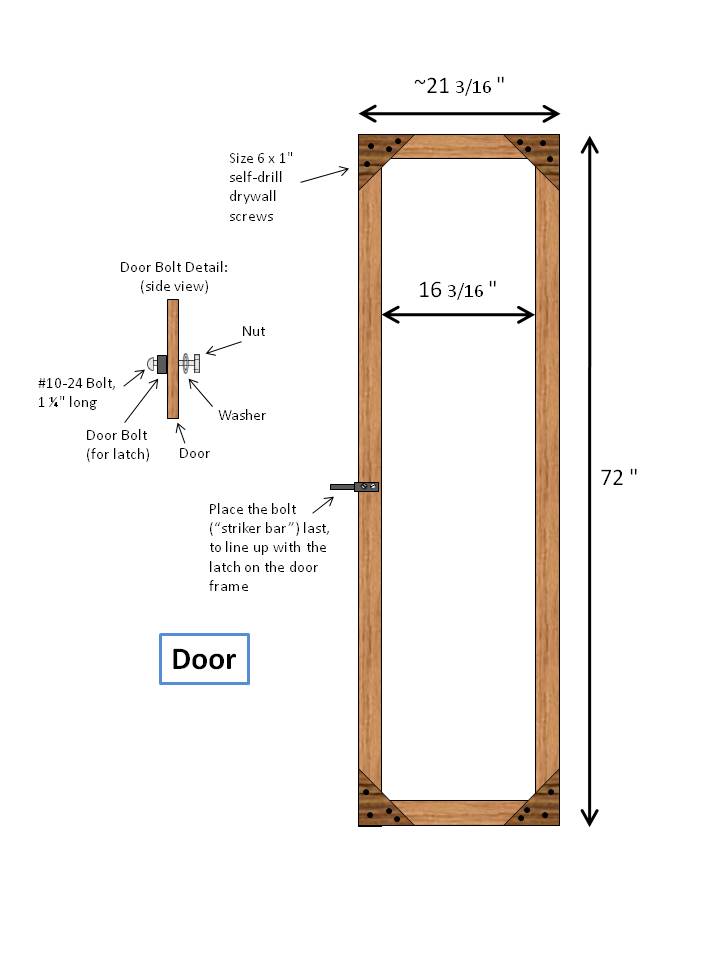
Next, we cut these wood struts into the correct dimensions for the different parts of the panels. We needed 80 cut to 81″ with a 15 degree angle on the bottom for the feet to “grip” the ground/grass. For the horizontal struts we needed 26 pieces cut to 24″ long for the single segment panels, 34 pieces cut to 52″ long for the two segment panels, and 20 pieces cut to 80″ long for the three segment panels. The inside vertical pieces are all 72″ long and we needed 37 of them cut. We also cut the 3/8″ plywood into over 234 5.5″x5.5″ triangle gussets. Again, Paul has instructions for the full-size modular maze panels on his website.


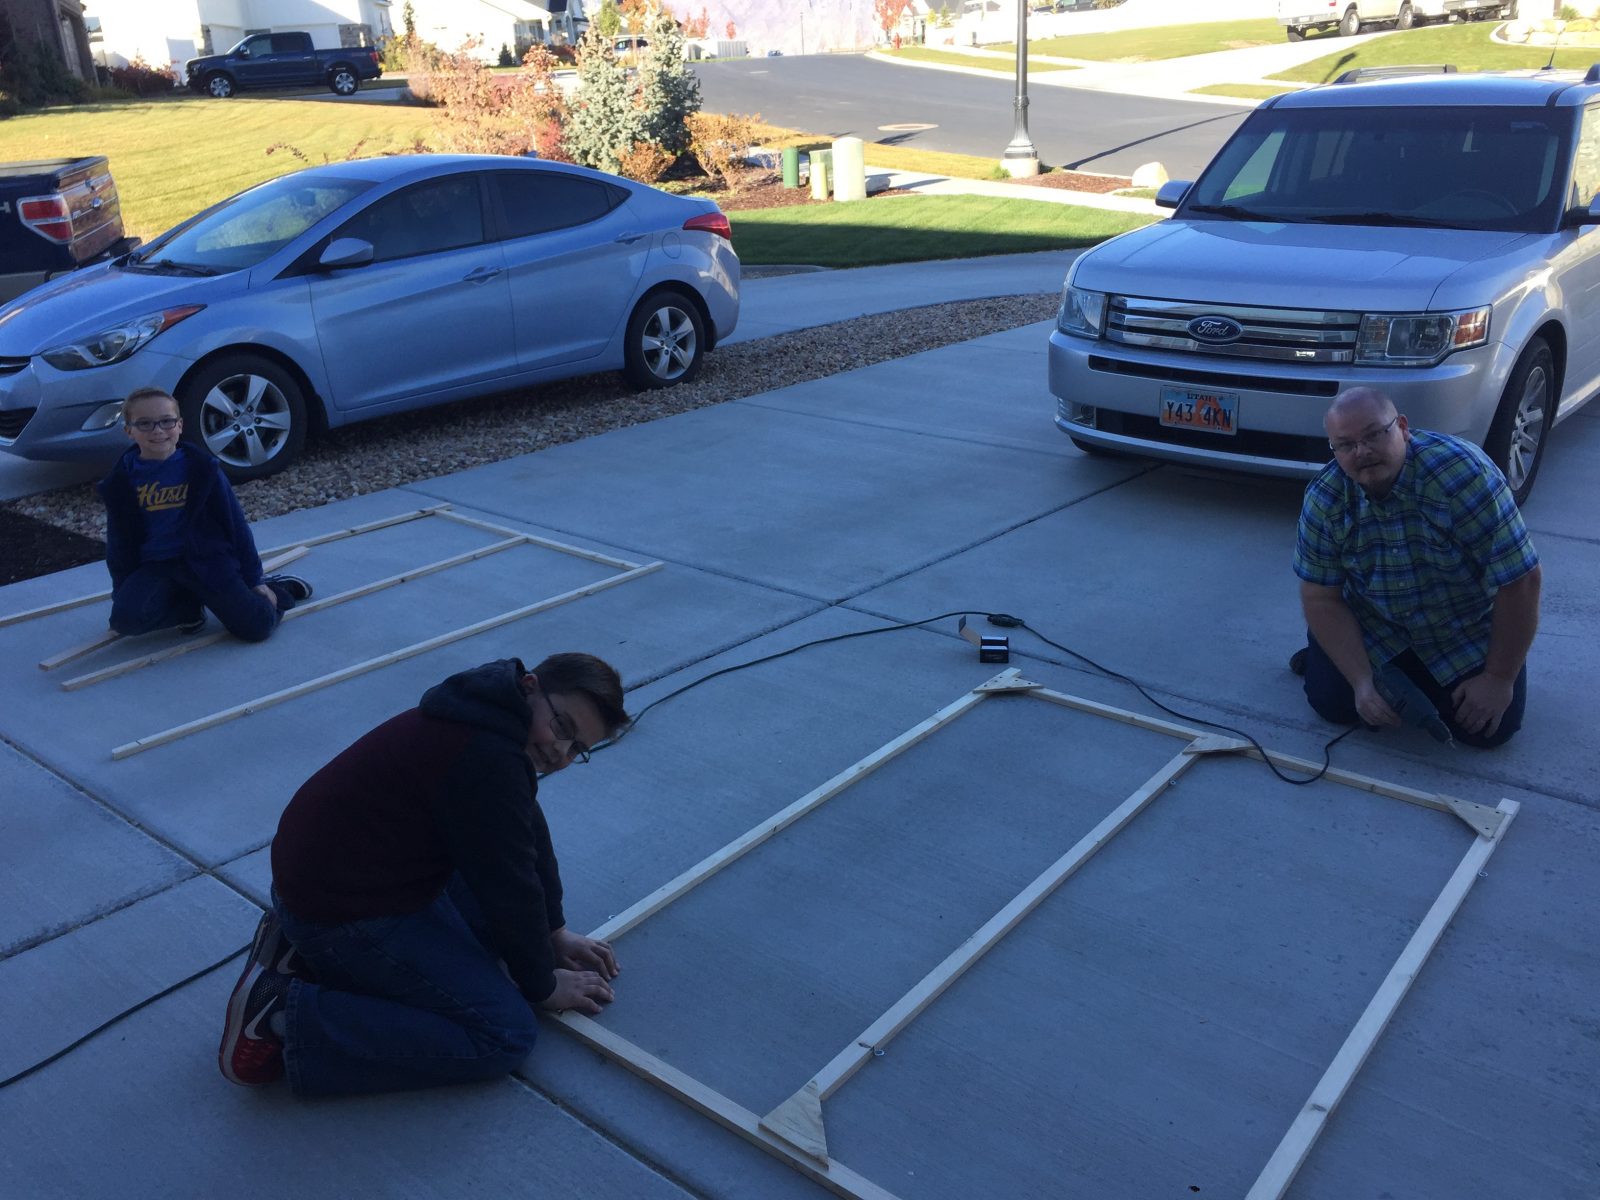
The next step is to measure and mark lines where the eye screws will be inserted. On the outer 81″ long struts measure and mark at 15″ and 66″ from the bottom and mark a perpendicular line across all of the struts. I used my garage door as a stop at the end to keep all of the pieces of wood together and straight. I used a 4 foot level to draw the lines. My two boys helped me A LOT to get these measured and marked. The vertical center pieces for the 2-segment and 3-segment panels need to be marked at 10.5″ from each end. Make sure that on the 81″ struts that you mark the outside (long end) of the wood, not the shorter angled side.
Next I drilled pilot holes for the eye screws. I moved pretty quickly through the struts trying my best to hit the center of the strut. They weren’t perfect, but they all worked just fine. I enlisted the help of my two youngest kids to help me screw the eye screws into the wood.


Next place the outer struts (81″ long ones) on their faces with the angled feet facing inward two at a time. You will want the angled end facing inward, so place a bunch of them together and mark at 3″ and 78″ to mark where the horizontal struts will attach. I used my garage door as the stop at the end. Mark a line on the wide face across all of the pairs of struts.
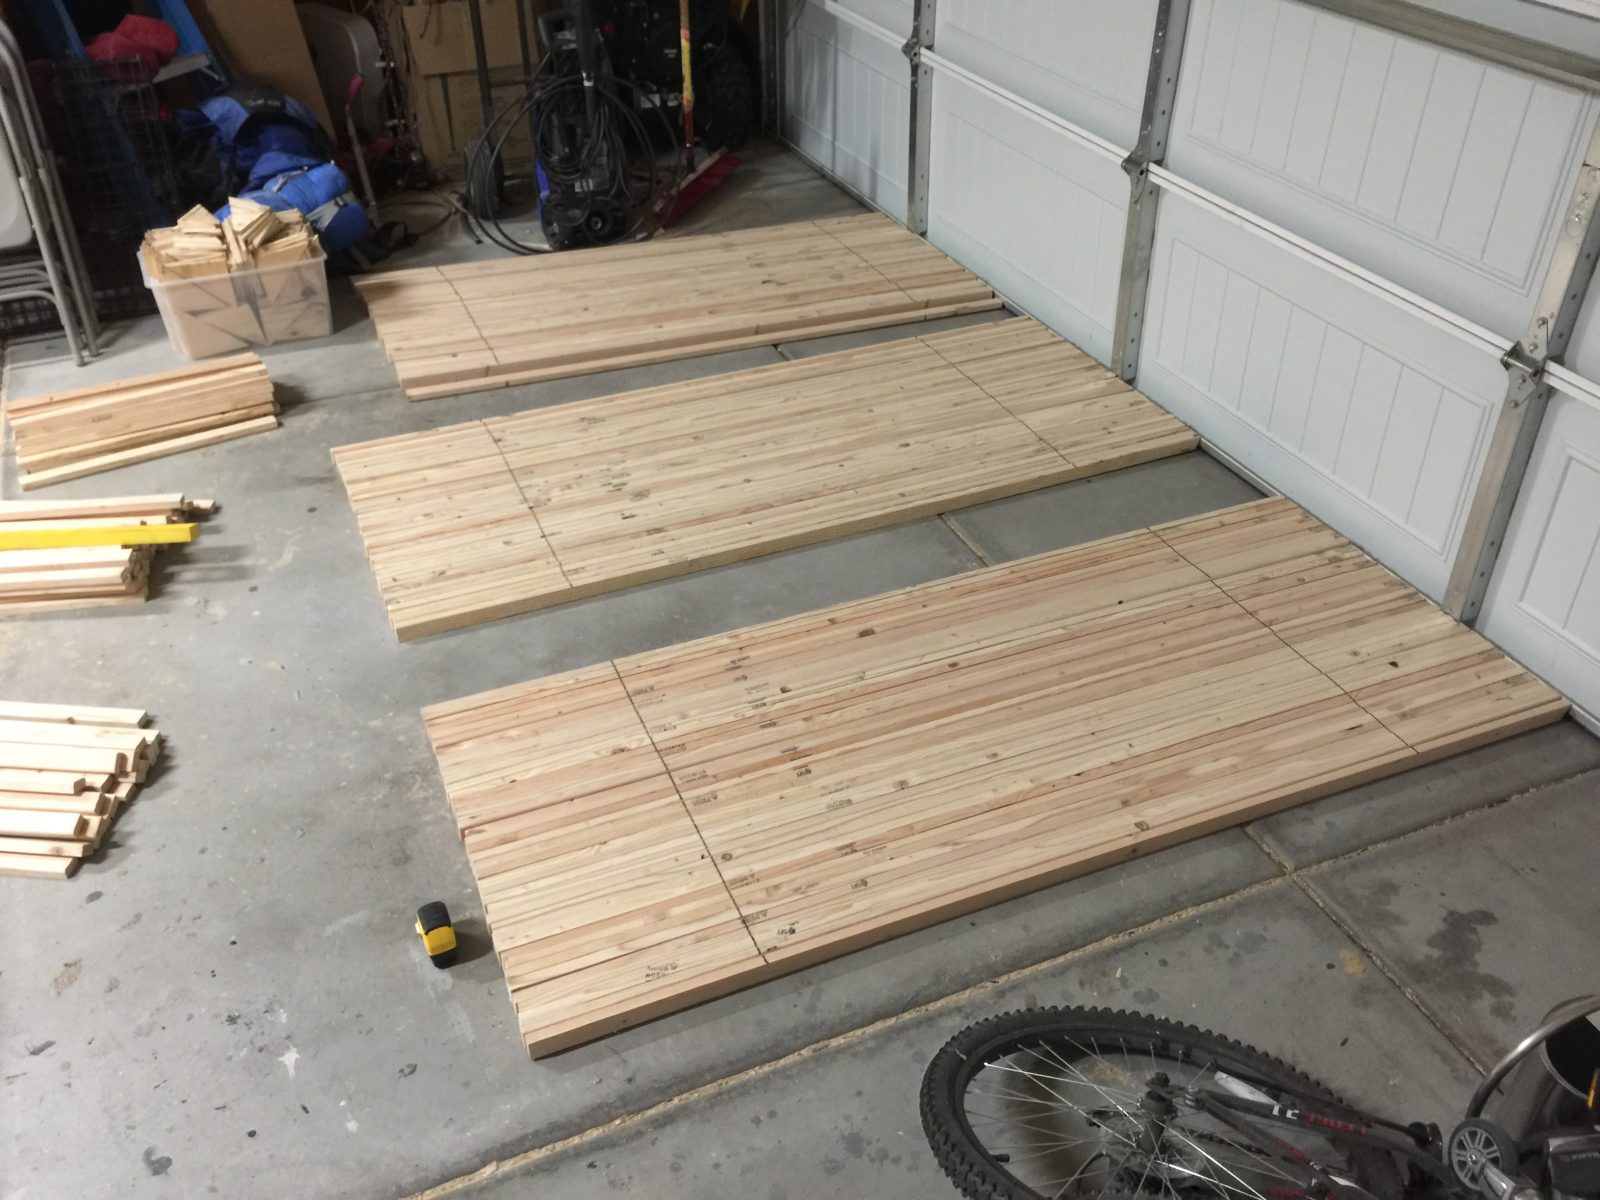
Now you are ready to assemble your panels. I laid out one of each size panel to get an idea of the sizes and what was needed. It also gave my kids a visual look at what the panels would look like when assembled.

We worked as a team to assemble the panels. We first did all of the single segment panels, then the two segment panels, then the three segment panels. My younger son arranged the wood struts, my daughter applied glue to the triangle gussets, and my oldest son placed the gussets on the joints, while I followed with a t-square to make sure the joints were square and then put the drywall screws in.


It took about 5 hours to assemble all of the panels.


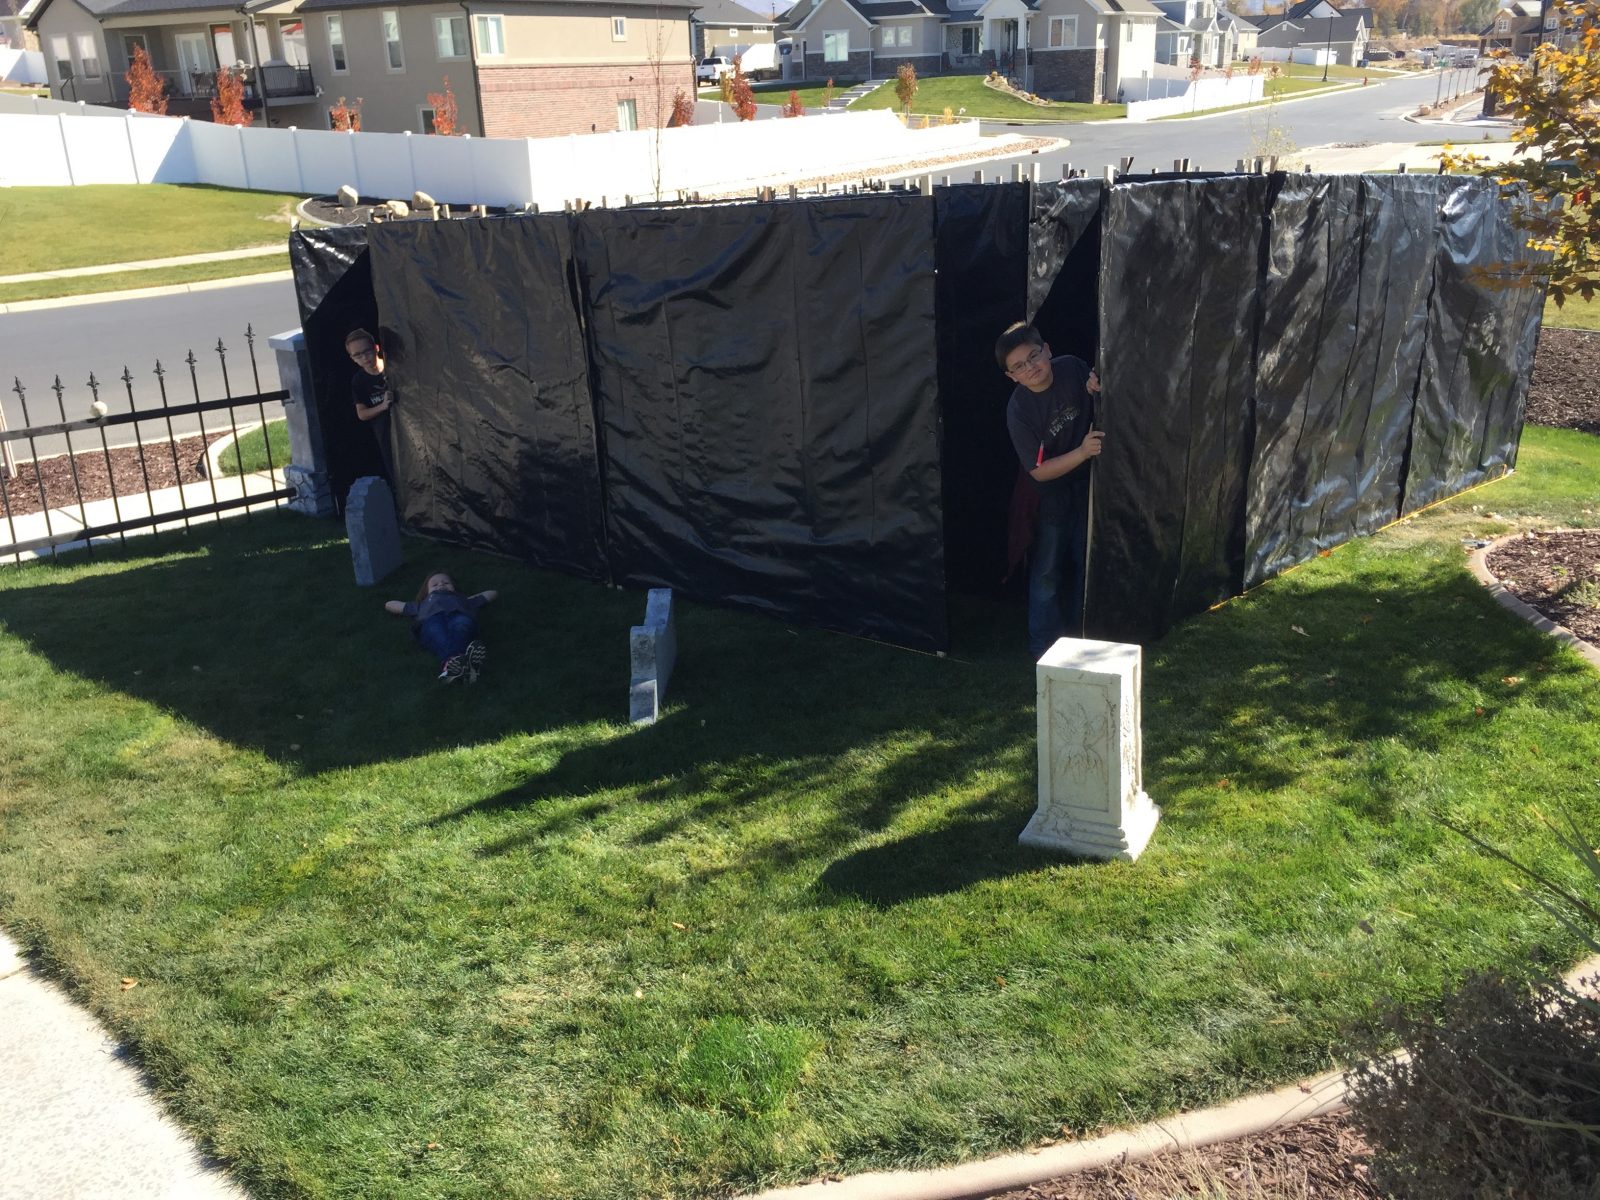
The last step in building your modular maze panels is to wrap the frames that you made with some kind of a covering. You can use plastic, burlap, fabric, canvas, wood, etc. Paul recommended 6-mil black plastic and I can understand why. I priced out using burlap and it was still way more expensive than using the plastic. Be sure to use 6-mil plastic or thicker or you may have lots of wear, even from your first use with visitors going through your maze. Paul says to buy the 20 foot wide by 100 foot long rolls of the plastic. I opted to spend a little bit more and use the 10 foot wide by 100 feet long rolls. The reason was that it was easier for me and my kids to manage the 10 foot roll.
Unroll about 160 inches at a time and cut with a straight edge at about 152.5 inches. You will end up with about 8 sections of plastic from each roll. Unwrap the sections of plastic to make it be 10 feet by 152.5″. We started with the 3-segment panels. Line up eye screws at the end of the straight side of 152.5″ side of the plastic with the bottom of your panel sticking out about 10 inches. Fold the long end over the top and align the plastic with the bottom rail of your frame. Staple along that edge of the side so that the plastic overlaps the eye screws slightly. This will hide the eye screws when the maze is assembled. We stapled about every 6 inches using the staple gun itself as our measurement. After stapling that first side, staple the bottom rail of the frame making sure to pull it tight and keeping it straight. Then pull the top tight and staple across the top, then the other side of the frame. Cut some slits in the top of the plastic and lift the panel and fold the plastic down on the other side. Staple the straight side, then the bottom, then the top, then the remaining side. Cut the excess plastic off with sharp scissors making sure to leave a small amount of plastic overlapping the eye screws. The remaining plastic is enough to do a single segment panel. There will only be 6-7 inches of wasted plastic per section of plastic that you cut.
With the two segment panels we laid two panels on the plastic and did both at the same time, cutting the plastic down the middle once we had three sides of the frame stapled on both of the panels. Then finished them separately. It took us about 10 hours to staple the plastic to all of the frames.


In all it took us about 20 hours to build our modular maze panels.
It took us about 3 hours to set our maze up for the first time. It was just me with my three kids, so with more adults your first time could be faster. The Maze was a huge success on both our Open House Party and on Halloween Night. We had so many Trick-or-Treaters come and were so busy that I didn’t take any pictures or video the entire night. Good luck with building your Modular Maze.

Paul’s Maze Plans in PDF format:
Plans | Construction | Assembly | One-way Doors

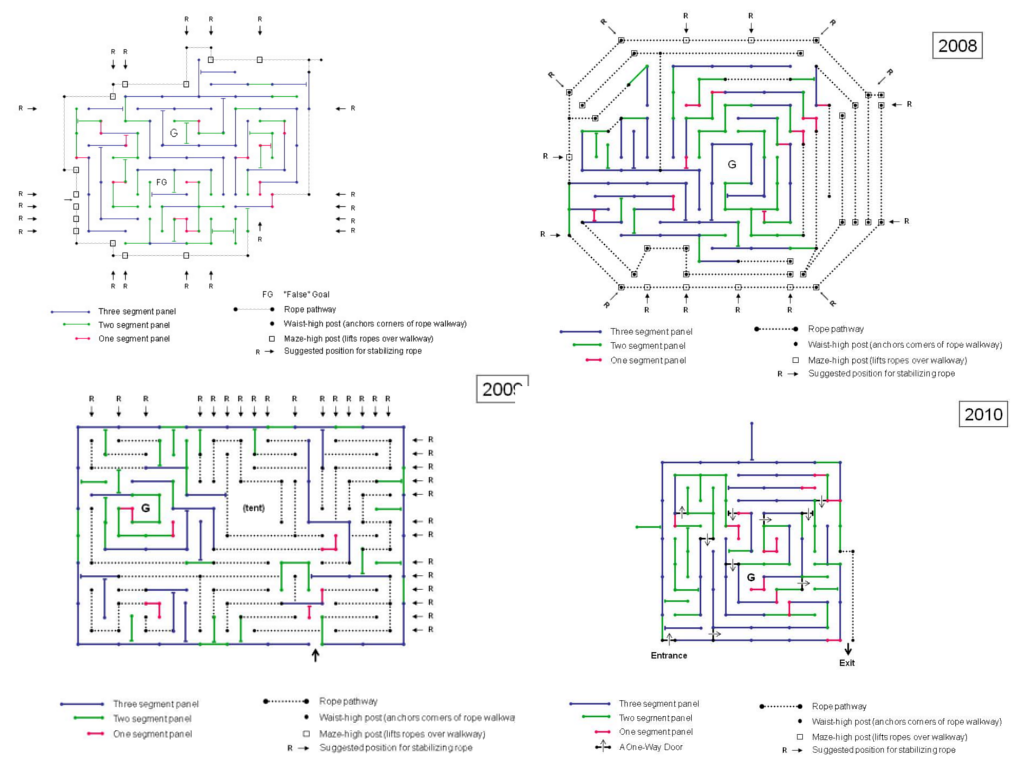

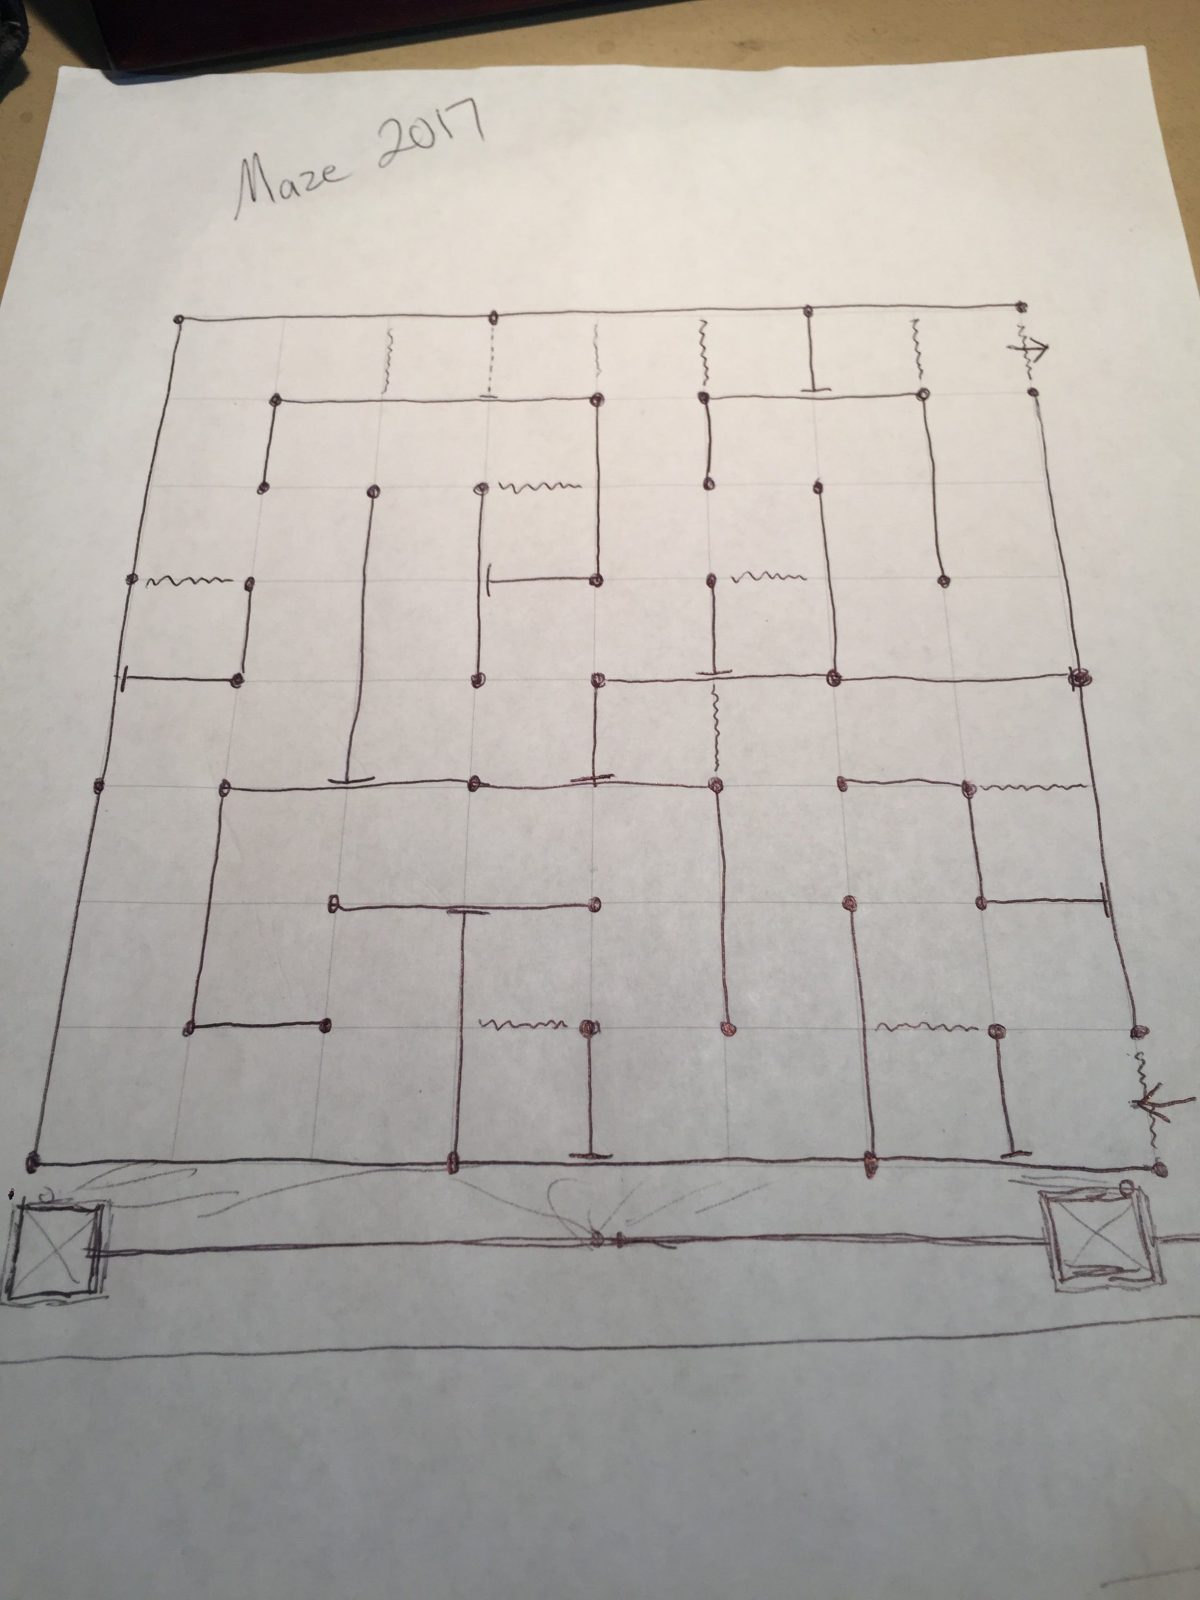
Paul’s 2017 Design:


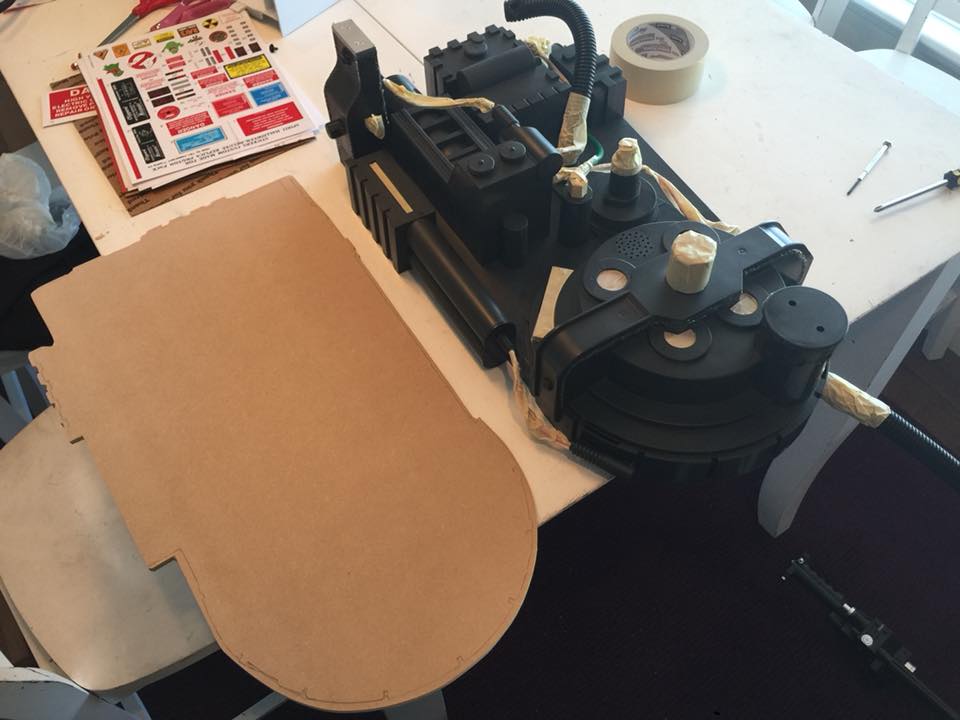
For Halloween this year I am dressing as a Ghostbuster. The khaki flight suit, the grey elbow pads, the belt with fobs, gadgets, and gizmos, black gloves, etc. are all part of the uniform. But what really makes a Ghostbuster a Ghostbuster is the Proton Pack. Now, I didn’t have $800 to $1,000 to spend on a full-size proton pack kit, so what were my options? Spirit Halloween released an 80%ish scale version of a Proton Pack this year. The shape and detail are actually pretty good considering it is an inexpensive ($70ish) toy version of the “real” thing.

With a little more money and a little bit of time the Spirit Halloween Proton Pack can be made to pass as a convincing proton pack. Here is what I did to mine:
First, I updated the lighting in the pack to have the correct rotating red lights on the cyclotron and the chasing blue lights on the power cell. I added red lighting gels and a GBfans.com lighting kit. I soldered the new lighting into the existing battery pack and left the original lights and sound effects in place.

Second, I removed the old decals with the heat from a hair dryer and masked off anything that should not be painted black. I cut a MDF motherboard for the backpack to attach to and to add some weight to the pack (it is very light). I hot glued some wood blocks inside the pack for the motherboard to be screwed to. I even added a Dixie cup holder V-hook to replace the cylinder knob to attach the wand to the pack. I used hot glue to add weld patterns to several areas to make it look like the originals.

Next, I painted everything with a Matte Black spray paint. I wasn’t too careful and there are some drips, but this is a Halloween prop, so it didn’t need to be perfect. In hindsight I would have waited to install the lighting effects until after painting it.

I then removed all of the masking tape and attached an Alice pack frame to the motherboard using black zip ties.

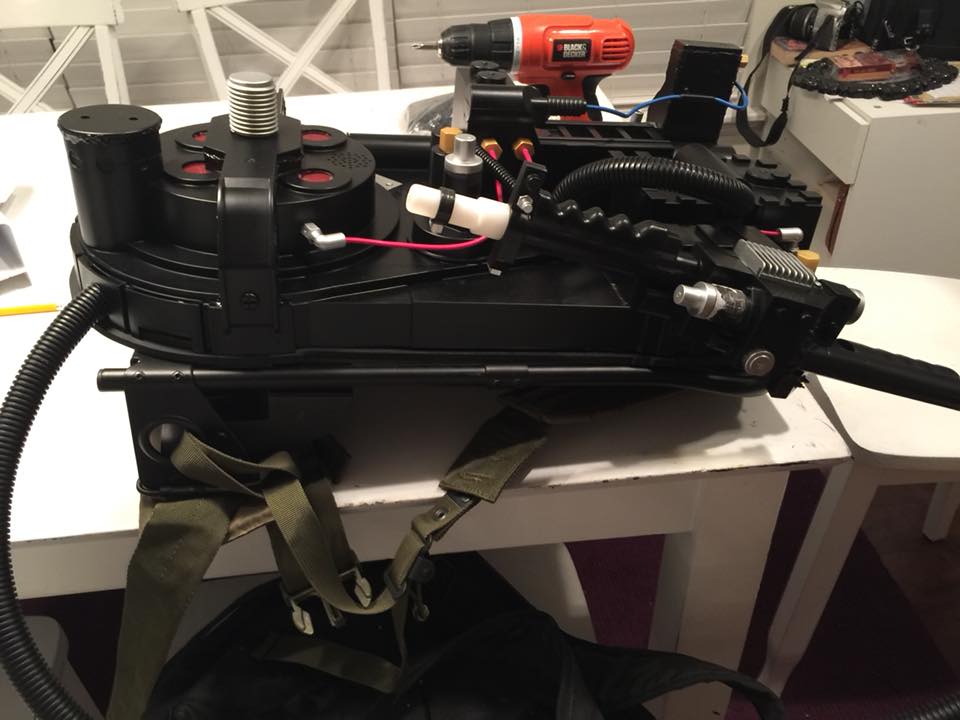
My Spirit Halloween Ghostbuster Proton Pack was now ready to add the finishing touches. I bought an upgrade kit from a member of GBfans.com on eBay for most of the cosmetic upgrades. The yellow tubing for the ion arm, the brass ion arm, the 80% scale cyclotron ribbon cable and cable clamp, various screws, the red and green tubing for the thrower wand, the white circles for the N-filter, and the black split loom over the green cable. All of these parts can be purchased separately, but it was convenient to buy them all from one source. This is what the upgrades look like installed without any other modifications.

The last step was painting the pack to look weathered and used and to apply the decals. I went with a heavily weathered look because the form of the Spirit Halloween Proton Pack was so sharp and rigid. I used Testors model paint: silver, gold, black, orange, and red, for weathering and for the buttons and lights.
I then applied all of the new decals including many that were not included on the Spirit Halloween Proton Pack originally. It took several hours to cut out and apply the decals. The decals can be downloaded from the GBfans.com website. I printed mine at between 80% and 83% of the original size. I added black paint to weather and dirty up the decals.
I wrapped the hand grips on the thrower with black electrical tape. I added a piece of gray foam pipe insulation with black zip ties to the Alice frame.


I couldn’t be more happy with how this turned out. I had planned on using a small iPod Touch Nano and a Bluetooth speaker attached to the motherboard to add all of the correct sounds, but ran out of time. Maybe in the future I will add those.
PS A friend of mine 3D printed a LifeGard II prop for me to wear on my belt.