

For Halloween this year I am dressing as a Ghostbuster. The khaki flight suit, the grey elbow pads, the belt with fobs, gadgets, and gizmos, black gloves, etc. are all part of the uniform. But what really makes a Ghostbuster a Ghostbuster is the Proton Pack. Now, I didn’t have $800 to $1,000 to spend on a full-size proton pack kit, so what were my options? Spirit Halloween released an 80%ish scale version of a Proton Pack this year. The shape and detail are actually pretty good considering it is an inexpensive ($70ish) toy version of the “real” thing.

With a little more money and a little bit of time the Spirit Halloween Proton Pack can be made to pass as a convincing proton pack. Here is what I did to mine:
First, I updated the lighting in the pack to have the correct rotating red lights on the cyclotron and the chasing blue lights on the power cell. I added red lighting gels and a GBfans.com lighting kit. I soldered the new lighting into the existing battery pack and left the original lights and sound effects in place.

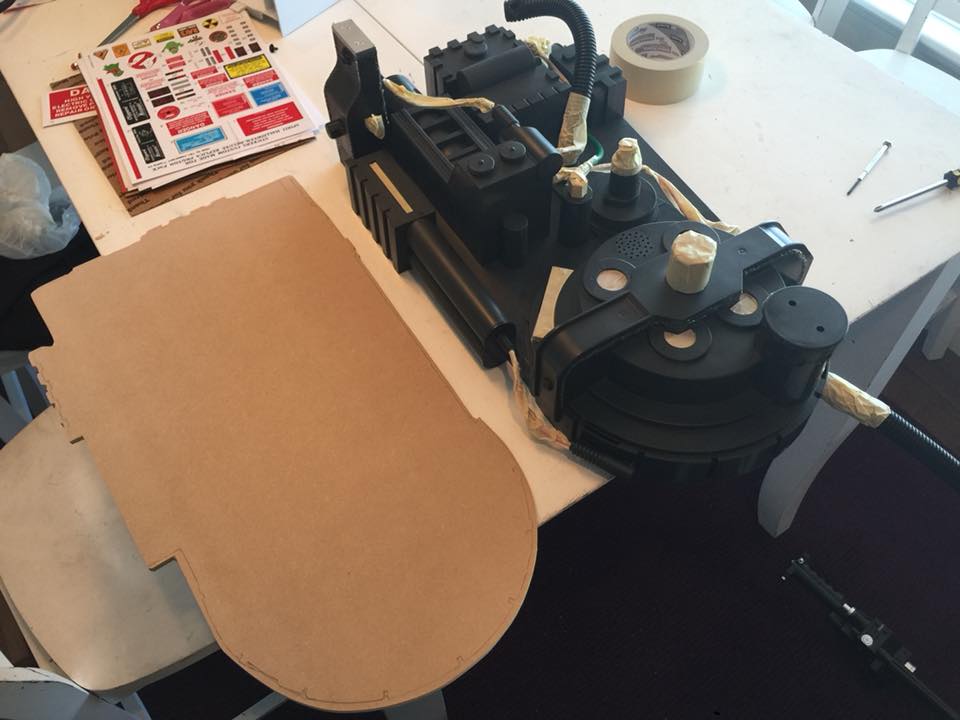
Second, I removed the old decals with the heat from a hair dryer and masked off anything that should not be painted black. I cut a MDF motherboard for the backpack to attach to and to add some weight to the pack (it is very light). I hot glued some wood blocks inside the pack for the motherboard to be screwed to. I even added a Dixie cup holder V-hook to replace the cylinder knob to attach the wand to the pack. I used hot glue to add weld patterns to several areas to make it look like the originals.

Next, I painted everything with a Matte Black spray paint. I wasn’t too careful and there are some drips, but this is a Halloween prop, so it didn’t need to be perfect. In hindsight I would have waited to install the lighting effects until after painting it.

I then removed all of the masking tape and attached an Alice pack frame to the motherboard using black zip ties.

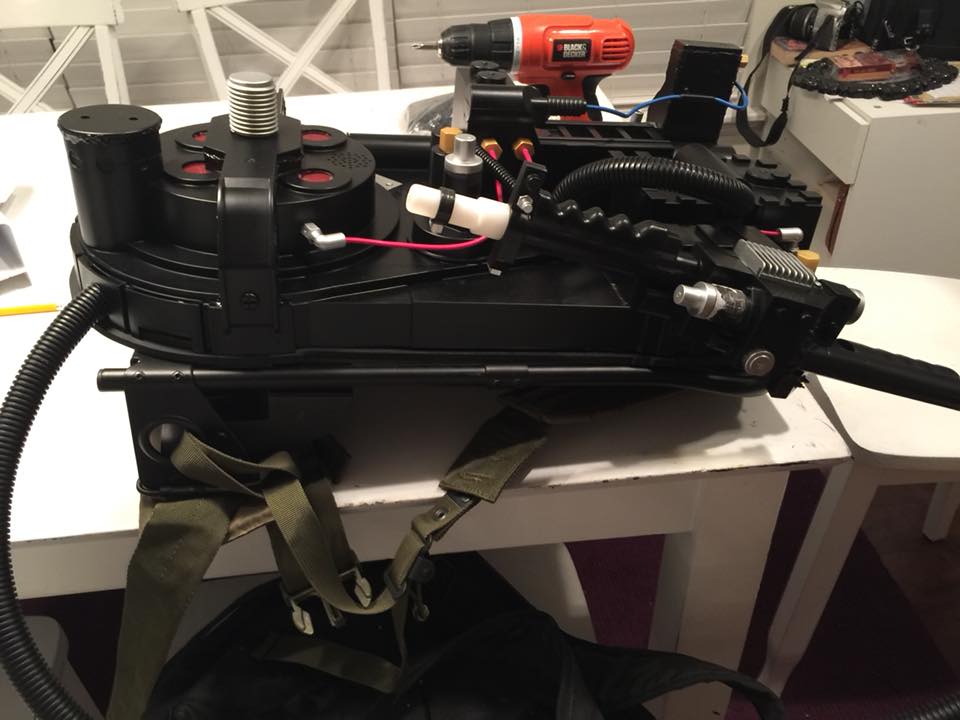
My Spirit Halloween Ghostbuster Proton Pack was now ready to add the finishing touches. I bought an upgrade kit from a member of GBfans.com on eBay for most of the cosmetic upgrades. The yellow tubing for the ion arm, the brass ion arm, the 80% scale cyclotron ribbon cable and cable clamp, various screws, the red and green tubing for the thrower wand, the white circles for the N-filter, and the black split loom over the green cable. All of these parts can be purchased separately, but it was convenient to buy them all from one source. This is what the upgrades look like installed without any other modifications.

The last step was painting the pack to look weathered and used and to apply the decals. I went with a heavily weathered look because the form of the Spirit Halloween Proton Pack was so sharp and rigid. I used Testors model paint: silver, gold, black, orange, and red, for weathering and for the buttons and lights.
I then applied all of the new decals including many that were not included on the Spirit Halloween Proton Pack originally. It took several hours to cut out and apply the decals. The decals can be downloaded from the GBfans.com website. I printed mine at between 80% and 83% of the original size. I added black paint to weather and dirty up the decals.
I wrapped the hand grips on the thrower with black electrical tape. I added a piece of gray foam pipe insulation with black zip ties to the Alice frame.


I couldn’t be more happy with how this turned out. I had planned on using a small iPod Touch Nano and a Bluetooth speaker attached to the motherboard to add all of the correct sounds, but ran out of time. Maybe in the future I will add those.
PS A friend of mine 3D printed a LifeGard II prop for me to wear on my belt.


…What would you say about replacing the hose connecting the nutrona wand to the pack with split-loom tube?
The one thing I dislike about the current setup is that the hose wants to go everywhere, and I’d like to look into something a little more controllable.
LikeLike
I agree, the hose connecting the wand to the pack is too stiff and not flexible enough. I’m not sure that a split loom would be the best solution since you’d have a sharp edge exposed the entire length of the hose any way you have it. GBfans.com has a split-less loom for about $10, but I’m not sure it is any more flexible than the one that Spirit uses. It may be worth the money to see if it will work. If you do find a solution, then there’s the problem of removing the stock hose without ripping out or breaking the fragile wiring that runs through it. Good luck!
LikeLike
@ Scott
“you’d have a sharp edge exposed the entire length of the hose any way you have it.”
…Zip ties dotted along the length of the hose to at least hide the join?
“If you do find a solution, then there’s the problem of removing the stock hose without ripping out or breaking the fragile wiring that runs through it. Good luck!”
I’ve already determined that my Spirit pack is a long-term project. This year I’m saying bye-bye to the stock thrower and replacing it with a custom-made 80% thrower.
LikeLike
When looking at the original plans posted I think by paranorman he used electrical tape all the around the split hose.
LikeLike
Nice job!
Was there any particular technique you used for the silver weathering? Or was it just gentle touches?
LikeLike
Bryan, just gentle strokes to layer the silver lighter in some spots and more liberally in others.
LikeLike
That looks amazing. How do yo remove the back of the protonpack? Ive trying but i dont want to break it
LikeLike
I believe there were just a bunch of screws holding the cardboard and fabric on the back. I then hot glued wood blocks into the pack and screwed 1/4 inch MDF as a motherboard to the back to make it stiff and heavier.
LikeLike